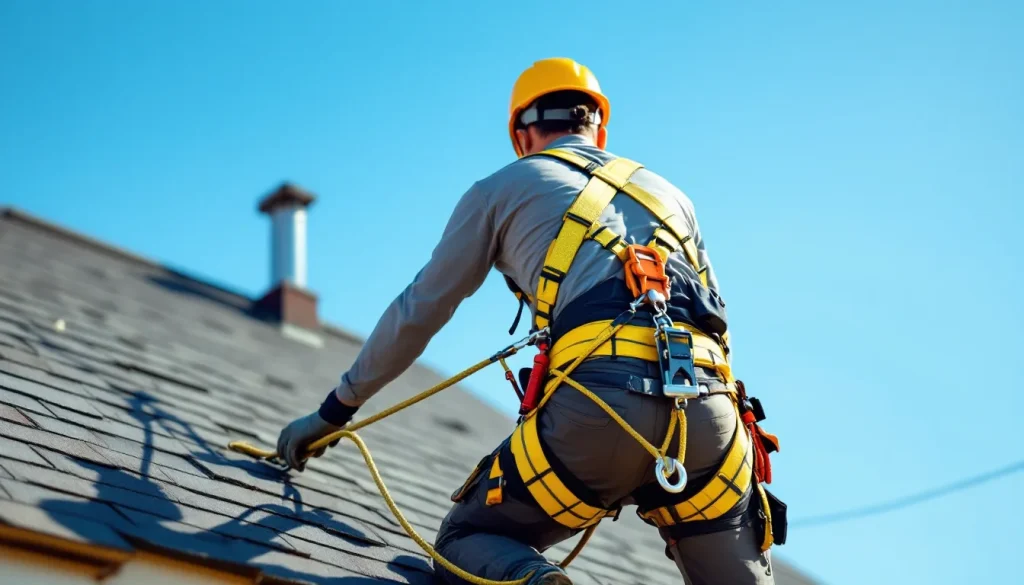
How to use a roof safety harness, in plain terms: put on a properly sized full-body harness with the D-ring centered between your shoulder blades, attach a shock-absorbing lanyard or self-retracting lifeline to the D-ring, anchor the other end to a tested 5,000 lb anchor point (typically a temporary roof anchor screwed through the sheathing into a rafter), and adjust the lanyard length so that any fall is arrested before you reach the eave or the ground. OSHA 1926.501 requires fall protection above 6 feet on residential roofs. The harness alone is useless. The full system, harness plus lanyard plus anchor plus correct slack length, is what stops the fall. Roofing falls killed 96 U.S. workers in 2023 (BLS data), and the majority were not wearing a working harness system.
The short version
- OSHA 1926.501 requires fall protection above 6 feet on residential roof work. State OSHA programs (CA, WA, OR, MI) often have stricter rules.
- A complete personal fall arrest system (PFAS) has three parts: full-body harness, connecting device (lanyard or self-retracting lifeline), and anchor rated to 5,000 lb.
- The D-ring goes between your shoulder blades. Front D-rings are for positioning only, not fall arrest.
- Total fall distance equals lanyard length plus deceleration distance plus harness stretch plus your height. On a 6 foot lanyard, plan for 18.5 feet of clearance.
- Temporary roof anchors (Guardian Fall Protection, Werner, Malta Dynamics) screw through sheathing into a rafter with 8 to 12 lag bolts. They are tested to 5,000 lb static.
- The biggest weekend DIY mistake: anchoring to a ridge vent, a fascia, or a single nail. None of those are 5,000 lb anchors. Use a real roof anchor or stay off the roof.
The short answer: what a safety harness system actually does
A safety harness system does not prevent falls. It arrests them after they start. The difference matters because most homeowners and weekend roofers assume that wearing a harness means they cannot fall. They still can, and they still will, if they slip. What the system does is stop the fall before it kills them, then keep them suspended in a survivable position until they can get back on the roof or be rescued.
A complete personal fall arrest system (PFAS, the OSHA term) has three parts: the harness on your body, the connecting device (a lanyard or a self-retracting lifeline) running from your harness to the anchor, and the anchor itself. All three have to work. A perfect harness anchored to a fascia board fails on the first fall.
OSHA 1926.501: what the rule actually says
OSHA 29 CFR 1926.501 sets fall protection requirements for construction work. For residential roof work the trigger is 6 feet of unprotected edge or fall distance. Below 6 feet, fall protection is recommended but not required. At or above 6 feet, one of the following must be in place:
- Guardrail system on the working edge
- Safety net system at or below the working level
- Personal fall arrest system (the harness method, the focus of this article)
- Slide guards on roofs between 4:12 and 6:12 pitch under the 1995 STD 3-0.1A interim policy (still cited but supplemented by 1926.501 today)
OSHA fines for residential roof violations in 2026 run $16,131 per serious violation (2025 maximum, adjusted annually). State OSHA programs in California (Cal/OSHA), Washington (DOSH), Oregon (OR-OSHA), and Michigan (MIOSHA) have additional requirements. Cal/OSHA in particular requires fall protection above 6 feet on residential and above 4 feet on commercial, with stricter anchor and inspection (see our 30-point inspection guide) rules.
What changed in residential enforcement
OSHA’s pre-2010 residential interim guidance (STD 3-0.1A) allowed alternative methods (slide guards, body belts, work practice plans) instead of full PFAS on residential roofs under specific conditions. That guidance was rescinded in 2011. Since 2012, residential roofs require the same PFAS, guardrail, or safety net system as commercial work. The interim guidance still floats around online; it is no longer current law.
The four components of a complete system
| Component | Function | OSHA spec | Typical brand examples |
|---|---|---|---|
| Full-body harness | Distributes arrest forces across the torso, holds you upright after fall | ANSI Z359.11, dorsal D-ring required for fall arrest | Werner, Guardian Fall Protection, Malta Dynamics, Miller (Honeywell) |
| Lanyard or self-retracting lifeline (SRL) | Connects harness to anchor, absorbs shock | Max arresting force 1,800 lb, max deceleration 3.5 ft | Guardian Big Boss SRL, Werner Upgear, Miller MightyLite SRL |
| Anchor point | The dead-stop point | 5,000 lb static load, or 2x max arrest force with engineered system | Guardian Temper Anchor, Werner Permanent Anchor, Malta Dynamics Tie-Off Anchor |
| Rope grab (rope-line systems) | Lets you move along a vertical lifeline | ANSI Z359.15 | Guardian Rope Grab, Miller Mighty Grip |
A complete homeowner-grade kit (harness, 6 foot lanyard, temporary anchor, lag bolts) runs $150 to $300 from major hardware retailers in 2026. A pro-grade kit with a self-retracting lifeline and permanent anchor runs $400 to $800.
Step 1: select and fit the harness
Full-body harnesses come in three sizing tiers: standard (most adults), universal (one-size-fits-most with extensive adjustment), and sized small or XL/XXL for outliers. Get the size right; an oversized harness lets the wearer rotate during fall arrest, dramatically reducing safety.
Putting it on correctly
- Hold the harness by the dorsal D-ring (the metal ring on the back) and shake it out so the straps hang free.
- Put your arms through the shoulder straps as if putting on a vest.
- Pull the leg straps up between your legs and clip them at the hips. The leg strap buckles should be even on both sides.
- Connect the chest strap across the sternum. It should sit at mid-chest, not at the throat or below the ribs.
- Tighten all straps until you can fit two fingers (no more, no less) between strap and body.
- Confirm the D-ring sits centered between your shoulder blades, not riding up to the neck or down to the lumbar.
The D-ring position check
This is the most failed fit check. Reach behind your back and feel for the dorsal D-ring. It should be roughly at the level of your shoulder blades, not at your neck. If it’s at the neck, the shoulder straps are too long. If it’s at the lumbar, they are too short. Adjust before climbing.
Front D-rings are for positioning, not arrest
Many harnesses have a sternum or hip D-ring in front. These are for work positioning (rope access, ladder climbing) and ladder safety, not for fall arrest. A fall arrested by a front D-ring rotates the worker face-down and concentrates force on the sternum. Use the dorsal (back) D-ring for fall arrest, every time.
Step 2: pick a connecting device
The connecting device is the rope, webbing, or cable that runs from your harness D-ring to the anchor. Three options for residential roof work:
Shock-absorbing lanyard (6 foot, standard)
A 6-foot webbing lanyard with a built-in deceleration pack. The pack tears under load to absorb shock and limit arrest force to 1,800 lb. Cheapest option ($35 to $75). Requires you to plan for 18.5 feet of fall clearance below the anchor.
Self-retracting lifeline (SRL)
An automatic-retracting cable or webbing line that pays out as you move and locks under sudden load. Shorter arrest distance (typically 2 feet), so you can work closer to edges with less clearance. More expensive ($150 to $400). Best option for roof work where you need mobility.
Rope grab on a vertical lifeline
A vertical rope hangs from the anchor; a rope grab device on your harness slides up and down the rope and locks on sudden load. Lets you move up and down the slope without re-tying. Best for repeated trips up and down the same roof. ($100 to $250 for the rope grab plus rope plus shock absorber.)
Step 3: install the anchor
The anchor is the single most important component because it has to hold 5,000 lb without yielding. Roofers anchor to one of these:
Temporary roof anchor (screw-down)
A metal plate with pre-drilled holes that gets screwed through the sheathing into a rafter or truss with 8 to 12 lag bolts (typically #14 x 2.5 inch). The anchor is left in place until the job is done, then removed and the holes sealed with roof cement.
- Guardian Fall Protection Temper Anchor: $30 to $50. Industry standard for residential reroofs.
- Malta Dynamics Tie-Off Anchor: $40 to $60. Stainless option for coastal work.
- Werner Permanent Anchor: $50 to $80. Heavier-duty, often used on commercial.
Install over a rafter or truss, not between them. Use the manufacturer-specified lag bolt count and torque. Hole spots in the sheathing get sealed with roof cement and a shingle replacement after the anchor is removed.
Permanent roof anchor
For homes where roof work happens regularly (chimney sweeps, solar maintenance, HVAC service), a permanent anchor screwed into a structural ridge beam and integrated under the ridge cap is the better answer. Cost (see our roof cost estimator guide) runs $150 to $400 installed.
What does NOT count as an anchor
- A ridge vent (sheet metal, will tear)
- A fascia board (will pull out)
- A plumbing vent stack (will bend or break the seal)
- A truck on the ground (will move if hit hard enough)
- A second person holding a rope (will not stop a real fall)
- A single nail or screw (5,000 lb requirement applies to single-anchor systems)
The 5,000 lb static load requirement exists because real fall arrest generates peak forces of 1,800 to 2,500 lb at the anchor, and OSHA wants a 2x safety factor. Anything that has not been engineered and tested to 5,000 lb does not qualify.
Step 4: calculate fall clearance
Total fall distance is the math that prevents the harness system from working perfectly and still killing you because you hit the ground before the arrest completes.
The standard formula
Total fall distance = lanyard length + deceleration distance + harness stretch + worker height + safety factor
| Component | Typical value |
|---|---|
| Lanyard length | 6 feet (standard) |
| Deceleration distance | 3.5 feet (max under OSHA) |
| Harness stretch | 1 foot |
| Worker height (D-ring to feet) | 5 feet |
| Safety factor | 3 feet |
| Total clearance required | 18.5 feet below anchor |
On a typical two-story home, the ridge is 25 to 30 feet above the ground. An anchor at the ridge gives plenty of clearance. An anchor 6 feet up the slope from the eave does not. If your anchor is too low on the slope, a 6 foot lanyard lets you fall past the eave before the arrest completes.
The SRL alternative
A self-retracting lifeline has a typical arrest distance of 2 to 4 feet because it locks within inches of the sudden load. Total clearance required drops to roughly 8 to 11 feet. SRLs are the only practical fall arrest option for single-story roofs where ground clearance is limited.
Step 5: working on the roof
Once the system is set up, the discipline is keeping the lanyard taut and the anchor above you whenever possible.
The 100% tie-off rule
You are tied off the entire time you are on the roof. Detaching to move to a new anchor location is the highest-risk moment in roof work. Use two lanyards (a Y-lanyard system) so you can stay connected at all times while transitioning between anchors.
Stay below your anchor (the swing fall problem)
If you fall while positioned to the side of the anchor instead of directly below it, you swing on the lanyard like a pendulum. The swing can drive you into the eave, a wall, or the ground at speeds that injure or kill you even though the lanyard arrested the vertical fall. Keep yourself in a 30-degree cone below the anchor at all times.
Working at the eave
The eave is the highest-risk zone on the roof. Adjust your lanyard so you cannot reach the eave edge unless you actively pay out slack. The default position should keep you 4 to 6 feet back from the eave.
Self-retracting lifeline (SRL) vs lanyard
| Factor | Shock lanyard | Self-retracting lifeline |
|---|---|---|
| Cost | $35 to $75 | $150 to $400 |
| Arrest distance | 3.5 feet | 2 feet typical |
| Total clearance required | 18.5 feet | 8 to 11 feet |
| Mobility | Fixed length (6 feet) | Pays out and retracts automatically |
| Best for | Single-spot work on tall structures | Active roof work, single-story, repeated moves |
| Maintenance | Inspect before each use | Annual factory recertification |
For most residential roof work, SRLs win on safety because the shorter arrest distance gives more clearance margin and the auto-retract keeps slack out of the system. The price gap has closed in 2026 with imported SRLs available for $120 to $180 from major hardware retailers.
Pre-use inspection checklist
Every piece of fall protection equipment gets inspected before every use. Tag and remove from service any item that fails inspection.
Harness
- No frayed webbing, cuts, burns, or chemical damage
- All stitching intact (red warning threads not exposed)
- D-ring not bent, cracked, or showing wear marks
- All buckles function smoothly and lock
- No corrosion on metal hardware
- Within service life (typically 5 to 7 years from date of manufacture)
Lanyard or SRL
- Snap hooks open and lock with positive engagement
- Shock absorber pack not deployed (no visible tear-out)
- Webbing or cable free of damage
- SRL retracts smoothly and locks on quick pull
- Service tag current
Anchor
- All lag bolts torqued to spec
- Bolts into solid wood (a rafter or truss, not just sheathing)
- No corrosion or cracking on the anchor plate
- Manufacturer label visible and legible
What kills weekend DIYers most often
1. No fall protection at all
The most common failure mode. Homeowner climbs the ladder, walks on the roof, slips. No harness, no anchor, nothing. BLS data shows roofing as one of the most dangerous trades by fatality rate, and homeowner falls are a major share of non-occupational roof deaths.
2. Anchored to the wrong thing
Lanyard tied to a ridge vent, a vent stack, or a single nail. These are not 5,000 lb anchors. In a real fall, the anchor fails and the harness becomes useless.
3. Anchor too low on the slope
Worker installs the anchor 6 feet up from the eave because the ridge is too steep to climb to. On a fall, the worker reaches the ground before the lanyard arrests because the math doesn’t work. Anchor at the ridge or use an SRL.
4. Lanyard too long for available clearance
Single-story home, 6 foot lanyard, anchor at the ridge 12 feet up. The worker falls off the eave and hits the ground at full speed because the 18.5 foot clearance requirement isn’t met. SRL or shorter lanyard required.
5. Detaching to move
Worker reaches a spot where the lanyard won’t quite reach. Unhooks for “just a second” to move closer. Slips during the unhooked moment. The single highest-risk action on any roof.
6. Suspension trauma after a successful arrest
Worker falls, lanyard arrests the fall, worker hangs in the harness. After 5 to 15 minutes of suspension, blood pools in the legs and the worker loses consciousness. Without rescue within roughly 30 minutes, suspension trauma can be fatal. Plan rescue before the fall, not after.
Suspension trauma and rescue planning
OSHA 1926.502(d)(20) requires a “prompt rescue” plan in place before any worker uses a PFAS. The plan has to address how to get a fallen worker out of suspension within minutes, not hours. For DIY homeowners and small crews, the practical options are:
- Suspension trauma straps. Foot loops attached to the harness that the worker deploys after a fall to take weight off the legs and slow venous pooling. Cost $20 to $40. Should be on every harness used on residential roof work.
- Ground rescue plan. Someone on the ground with a ladder, ready to climb up to the suspended worker and lower them. Requires a second person to be present.
- 911 call. Default option. Response time in most U.S. metros is 5 to 15 minutes, which is within the suspension trauma window if the worker has the strength to deploy suspension straps.
Working alone on a roof with a harness but no rescue plan is technically OSHA-noncompliant even on owner-occupied homes. For DIY work, having a second person on the ground is the minimum reasonable practice.
Cost of a complete homeowner kit
| Item | Spec | Cost range |
|---|---|---|
| Full-body harness | ANSI Z359.11, dorsal D-ring | $50 to $120 |
| 6-foot shock-absorbing lanyard | ANSI Z359.13 | $35 to $75 |
| Temporary roof anchor | 5,000 lb tested | $25 to $50 |
| Lag bolts (10 pack #14 x 2.5) | For anchor install | $10 to $20 |
| Suspension trauma straps | Pair | $20 to $40 |
| Helmet (recommended) | ANSI Z89.1 Type I or II | $30 to $80 |
| Complete kit | $170 to $385 |
Pre-packaged kits from Werner, Guardian, Malta Dynamics, and Miller bundle the harness, lanyard, and anchor for $150 to $250. Add the trauma straps and helmet separately. See our broader roof safety guide for ladder safety and ground prep.
When to skip DIY entirely
Some roof work is not a reasonable DIY job regardless of harness use:
- Pitch above 8:12 without prior roofing experience. Steep roofs are physically different to work on. The harness saves your life when you slip; it doesn’t make the work easier.
- Three-story homes. Clearance math and anchor placement get harder. SRLs become mandatory rather than optional.
- Wet, icy, or windy conditions. Postpone the work, regardless of harness setup.
- Solo work with no ground person. Even with a perfect system, rescue planning fails when there’s no one to call 911 and help.
- Active leak diagnosis where you don’t know what you’re looking for. Hire a roofer. See how to fix a roof leak.
FAQ
Do I really need a harness for a quick roof inspection?
If you are above 6 feet of fall distance (any single-story home and up), OSHA requires fall protection for occupational work. For homeowner non-occupational work, OSHA doesn’t apply, but the physics do. The fall doesn’t care whether you were getting paid. A complete kit costs under $200 and lives in the garage between uses.
What’s the difference between a harness and a body belt?
A body belt wraps around the waist only and is no longer OSHA-acceptable for fall arrest. Arrest forces concentrated at the waist can injure internal organs and the wearer often inverts after arrest. Full-body harnesses distribute force across the torso and keep you upright. Body belts are now only used for work positioning (rope access, window cleaning) where falls aren’t the design case.
Where do I anchor on a roof with no ridge access?
Use a temporary screw-down anchor (Guardian Temper Anchor or equivalent) placed at the highest accessible point and lagged through the sheathing into a rafter. Patch and seal the bolt holes after the anchor is removed.
How long does a harness last?
Manufacturer service life is typically 5 to 7 years from the date of manufacture, regardless of use. Sun exposure, chemical contact, and storage conditions affect this. Inspect before every use. Tag out and replace any harness that has arrested a fall, shows webbing damage, or is past its service date.
Can I share my harness with my brother?
Sharing a harness is fine if it’s properly fitted to each user before use. Each user takes 30 seconds to adjust the leg straps, chest strap, and shoulder straps to their own body. A loose harness on a smaller user or a tight one on a larger user reduces the safety margin significantly.
Bottom line
A safety harness without a proper anchor is theater. The system works when the harness fits correctly, the lanyard or SRL is rated and inspected, the anchor is engineered to 5,000 lb and installed into structural framing, and the fall clearance math works for the height of the anchor. All four conditions, every time you go on the roof.
For homeowners, the calculation is straightforward: a complete kit costs $170 to $385, takes 20 minutes to set up, and saves your life when you slip. The fall isn’t a question of “if” on a steep roof in poor weather, it’s a question of “when.” Get the kit, learn the math, and don’t be one of the 96 annual roof fatalities BLS counts every year. For the broader roof safety context including ladder use, ground prep, and personal protective equipment, see our roof safety guide.