If your downspouts dump water within three feet of the foundation, you have a basement problem waiting for the next half-inch storm. A properly built french drain gutter tie-in moves that water 15 to 30 feet from the house, disperses it into native soil or a drywell, and keeps it from saturating the backfill around your footings. Done right, the system runs for 30 years without intervention. Done wrong, it becomes a perched water table six inches from your basement wall.
This guide walks through the three viable termination options (daylight, pop-up emitter, and drywell), the pipe choice that matters more than most homeowners realize, and the trench specs that separate a real french drain from a buried pile of rock that silts up in two seasons.
What a French Drain Actually Does (and Doesn’t Do)
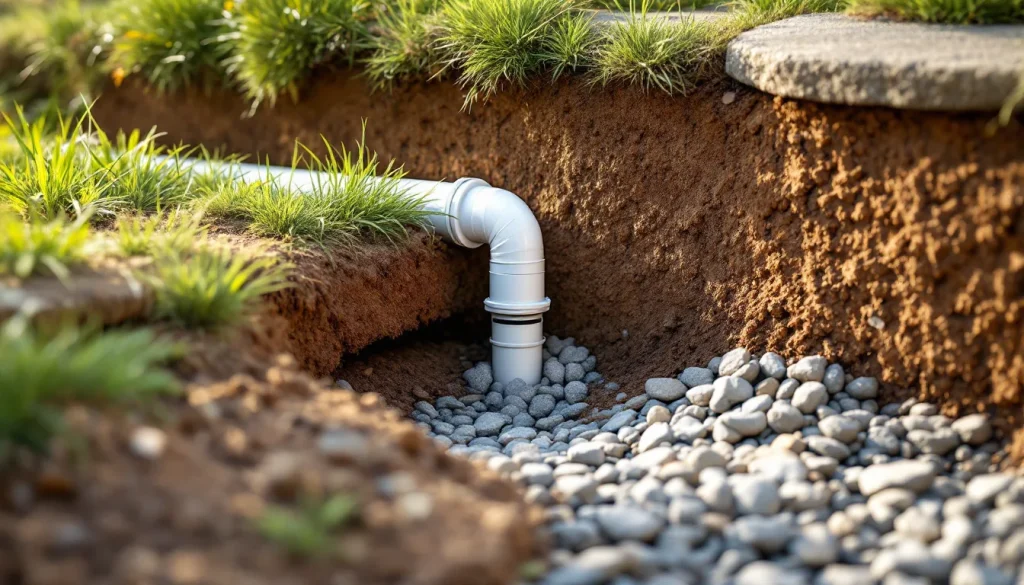
A french drain is a perforated pipe surrounded by clean rock and wrapped in filter fabric, set in a trench that slopes away from the house. Water enters the pipe through the perforations or through the rock backfill, then flows downhill to a discharge point. The system handles two jobs at once: it intercepts surface and shallow groundwater, and when connected to your downspouts, it carries roof runoff away from the foundation.
Here’s what it doesn’t do. A french drain does not pump water uphill. It does not work if the discharge end is buried with no daylight outlet. It does not magically dewater clay soil with no infiltration capacity. If your yard is 80% clay and the drain has nowhere to go, you are building a 30-foot bathtub. Test percolation before you trench, or plan on a daylight discharge from day one.
Roof runoff is bigger than most people estimate. A 1,000 square foot roof sheds about 620 gallons in a 1-inch rainstorm. A 2,500 square foot roof under the same storm dumps roughly 1,550 gallons. That’s why the pipe size and the discharge plan matter more than the rock you choose. For more on how much water your roof actually produces and why downspout placement matters, see our gutter installation guide and the breakdown of gutter installation cost.
Pipe Choice: 4-Inch Corrugated HDPE vs. 4-Inch SDR-35 PVC
This is the decision that quietly determines whether your drain lasts 10 years or 40. Both pipes are 4 inches in diameter, both are sold in solid and perforated versions, and both are rated for buried use. They are not equivalent.
Corrugated HDPE (the black flexible pipe in the orange box) runs about $0.60 to $1.20 per linear foot. It bends around obstacles, glues nothing, and installs fast. The ribbed interior collects silt and slime, the wall is easy to crush if you backfill with anything bigger than 1.5-inch rock, and the perforations are huge slots that let fines wash in. It is fine for short runs in sandy soil. It is the wrong call under a driveway, under a patio, or under any run longer than 30 feet.
SDR-35 PVC (the green sewer-and-drain pipe) runs $1.50 to $3.00 per linear foot. The interior is smooth, so flow velocity stays high enough to self-scour. The wall is rigid enough to handle a vehicle load with proper bedding. Joints are solvent-welded with primer and cement, which means zero infiltration of fines at the connections. For the downspout-to-drain main, this is the pipe to use. Save the corrugated for the perforated leg inside the rock trench, if anywhere.
Schedule 40 PVC also works and is what you’ll see on most professional installs. It costs more than SDR-35 and is overkill for gravity drainage, but plumbers stock it and the fittings are universal. Don’t use thin-wall sewer pipe rated for direct burial only. The crush rating is too low for a typical residential trench.
Trench Specs: Depth, Width, Rock, and Fabric
The trench is where most DIY installs fall apart. The numbers are not arbitrary.
Depth: 18 to 24 inches. Deep enough to slope below frost line in mild climates and below typical lawn root mass. In hard-freeze zones (Minnesota, Maine, Vermont, northern Wisconsin), go to 36 to 42 inches for any solid pipe carrying water in winter. A frozen trap halfway down your drain backs water into the basement.
Width: 12 to 18 inches. Wide enough to set the pipe and pack rock on the sides. Narrower trenches collapse during backfill and put point loads on the pipe wall.
Slope: 1% minimum, 2% preferred. That’s 1 inch of drop per 8 feet at 1%, or 1 inch per 4 feet at 2%. Use a laser level or a string with a line level. Eyeballing slope is how you end up with low spots that pond and silt.
Rock: 3/4-inch to 1.5-inch clean, washed, no fines. Granite, basalt, or river rock all work. What you cannot use is “drainage gravel” with crusher fines mixed in. The fines fill the voids between rocks and turn the trench into a slow-draining mud column. Ask the quarry for “washed drainage rock” or “septic rock.” If it leaves dust on your hand, send it back.
Filter fabric: Mirafi 140N, US Fabrics US 200NW, or equivalent non-woven geotextile, 4 ounce per square yard minimum. Wrap the entire rock envelope, not just the pipe. The fabric keeps soil fines out of the rock voids. Skip this step and the drain silts up in three to seven seasons depending on soil type. Overlap fabric seams by 12 inches minimum and burrito-wrap the top.
Option 1: Daylight Discharge
The simplest and most reliable termination. The solid pipe carrying water from your downspouts (and the perforated leg if you have one) exits the ground at a low spot, ditch, dry creek, or wooded edge. Gravity does the work. There is no equipment to fail.
The catch is grade. You need a discharge point that is at least 6 inches below the upstream end of the drain, ideally 12 inches lower over a 30-foot run. On flat lots this is impossible without an above-grade headwall or a pump pit, which defeats the purpose. Daylight also requires somewhere you can legally and physically discharge. Dumping roof runoff onto a neighbor’s lot is grounds for a stop-work order and a civil suit in most jurisdictions. Check setbacks before you trench.
At the outlet, install an animal guard. A 4-inch flap valve or a stainless mesh insert keeps rodents, snakes, and nesting birds out of the pipe. Without one, you’ll find a chipmunk nest 8 feet up the line in year two.
Option 2: Pop-Up Emitter
A pop-up emitter is a spring-loaded green cap on a 4-inch riser that sits flush with the lawn. When water pressure builds in the pipe, the lid pops up and discharges into the grass. When flow stops, the lid settles back down, sealing out debris and small animals.
The NDS pop-up emitter (model 322 or 422) is the industry standard. It runs $15 to $25 and accepts 3-inch or 4-inch corrugated or PVC depending on the adapter. Install it at the lowest point of your yard, with the riser pipe set to the same slope as the main drain. Add a foot of clean rock under the emitter to disperse discharge and prevent erosion ring formation.
The honest tradeoff: pop-ups work great in moderate storms and clog in big ones. If your roof drains 2,000 square feet through a single emitter, a 2-inch rainstorm produces 1,250 gallons in about 30 minutes. The emitter can’t pass that volume fast enough, water backs up the pipe, and you get a fountain in the yard. For homes with high-volume runoff, split the load across two or three emitters or step up to a drywell.
Option 3: Drywell
A drywell is a buried storage chamber that holds runoff and lets it percolate into the surrounding soil. Used when daylight is impossible and the soil drains well enough to infiltrate.
Sizing rule of thumb: for typical sandy-loam soil with reasonable percolation, a 4 to 6 foot deep by 3 to 4 foot diameter drywell handles roughly 1,000 square feet of contributing roof area in most climates. Clay soils need two to three times that volume or you’re building a cistern. The right way to size is a perc test: dig a 12-inch test hole, fill with water, time the drop in inches per hour, and use that infiltration rate to calculate volume.
Pre-fab drywell options include the NDS Flo-Well (a stackable plastic chamber that holds 50 gallons per unit) or a 55-gallon perforated polyethylene tank. Old-school installs use a 4-foot diameter ring of concrete blocks or a buried 55-gallon drum with holes drilled in the sides. All of them get wrapped in filter fabric and surrounded by 12 inches of clean rock on all sides.
Cleanout access matters. A 6-inch PVC riser with a screw cap at grade lets you inspect the chamber and pump it dry if it ever silts up. Without access, you’ll never know it failed until water shows up in the basement. Drywells in commercial applications are sometimes specified alongside a scupper drainage system, where roof discharge volumes are far higher than residential.
Connecting the Downspout to the Drain
This is the joint that fails most often. The downspout drops a stream of water plus leaves, shingle grit, and the occasional tennis ball into a 4-inch fitting. Without a catch basin, that debris ends up wedged 20 feet down the line.
Install a downspout adapter (a 2×3 or 3×4 inch rectangular-to-round reducer) at the bottom of the downspout, then a 4-inch tee with a 90-degree drop into the trench. The third leg of the tee gets a screw cap or a 4-inch cleanout. That gives you a rod-out point for clearing blockages without digging up the lawn.
For homes with heavy tree cover, add a leaf catcher above grade. A simple 4-inch riser with a removable basket strainer catches the worst of it. Clean it twice a year, spring and fall. If you don’t already have gutter protection in place upstream, our guide to the best gutter guards walks through which screens actually keep debris out of the system in the first place.
Common Failures and How to Avoid Them
The drain doesn’t drain. Usually a slope problem. Run a hose down the cleanout and watch the discharge point. If water shows up in 30 seconds, slope is fine. If it takes 5 minutes or never appears, you have a low spot, a clog, or zero pitch. Excavate and rebuild that section.
Mosquitoes breeding in the discharge. Standing water inside the pipe or at the pop-up. This is what makes municipal stormwater inspectors angry. Add a flap valve at daylight outlets, use a self-sealing pop-up like the NDS 422, or eliminate any low spots where water sits more than 48 hours.
Fines silting up the rock envelope. The fabric was skipped, was cheap non-woven fabric that tore during backfill, or was overlapped only 2 inches instead of 12. Once silted, the drain is essentially dead. Rebuild with proper fabric is the only fix.
Pipe collapses under a driveway. Corrugated HDPE used where SDR-35 PVC was required. Excavate, replace with rigid pipe, bed in 6 inches of clean rock above and below, and backfill with screened native soil.
Pop-up emitter blasts mulch and grass everywhere. Discharge velocity too high. Step up to a drywell, add a rock splash pad around the emitter, or split the flow across two emitters.
Cost Range
DIY materials for a 30-foot french drain with daylight discharge, connecting two downspouts: $250 to $450 in pipe, fabric, rock, fittings, and emitters. Add rental on a mini-excavator or trencher ($150 to $300 per day) if you don’t dig by hand.
Professional installation runs $1,200 to $3,500 for the same scope, depending on regional labor, access, and discharge complexity. Drywells add $400 to $1,200. Long runs under driveways or patios add $50 to $100 per linear foot for cutting, hauling, and patching. Total system cost for a typical four-downspout home with a buried main drain and pop-up termination lands between $2,500 and $6,000 installed.
Worth the spend when you compare against $8,000 to $25,000 for foundation crack repair and basement waterproofing, which is what improper roof drainage eventually buys you. For homes where the fascia and soffit are also showing signs of water damage from chronic gutter overflow, address the structural pieces first; our deep-dives on fascia board and soffit vents cover what to look for.
Permits and Code
Most jurisdictions don’t require a permit for a residential french drain that discharges to your own property and doesn’t connect to the municipal storm sewer. Some do. Coastal communities, lots in HOAs with grading covenants, and any property within a stormwater overlay district often require a drainage plan stamped by a civil engineer. Check before you trench.
What is almost universally regulated: connecting a private french drain to the public storm sewer or sanitary sewer. That requires a permit, an inspection, and in many cities a fee. Tying a roof drain into a sanitary sewer is illegal almost everywhere and can void your homeowner insurance if a backup damages the house.
Call 811 before you dig. Free service, mandatory in every state, and the only thing standing between your shovel and a gas line.
When a French Drain Isn’t the Right Answer
If your lot is dead flat and the soil is heavy clay, no french drain is going to save you. The right move is a sump pump pit at the lowest point of the foundation, a sealed buried main from each downspout to that pit, and a discharge line that runs uphill (under pressure) to a stormwater approved outfall. That’s a $4,000 to $12,000 system, and on the wrong lot it’s the only one that works.
For flat-roof structures where roof drainage piles up and gutters can’t handle peak flows, the upstream design question matters more than the underground termination. Our guides on flat roof drainage design and the gutter-vs-scupper tradeoff are required reading before you spec the buried system.
The french drain is a tool. Used in the right soil, on the right grade, with the right pipe and the right rock, it keeps a foundation dry for decades. Skip the specs and you’ll be digging it up before the warranty expires on the shingles. For homeowners working through the broader drainage puzzle from the roof down, our learn library indexes every related topic in one place.