A vent pipe flashing replacement in 2026 runs $30 to $80 for the part itself (Oatey Master Flash, Lifetime Tool, Perma-Boot, or a lead base with neoprene collar), $150 to $450 installed by a professional, or $40 to $100 if a homeowner does it themselves. The job is the single most common residential roof repair in North America because the rubber or neoprene collar around the pipe ages out at the 10-to-15-year mark, well before the shingles themselves are due for replacement. Catching the failure early (before it stains a ceiling below) keeps the bill at a few hundred dollars. Letting it run for a few years adds drywall, insulation, and paint repair inside, which is where the cost compounds into thousands. Four failure modes account for nearly every leaking vent boot in service today: cracked rubber collar, lifted lead base, dried-out sealant at the flange perimeter, and corroded vent pipe rusting through from the inside.
The short version
- Vent pipe flashing replacement: $30 to $80 part, $150 to $450 installed pro, $40 to $100 DIY.
- Main products: Oatey Master Flash (most common), Lifetime Tool (no-collar all-metal), Perma-Boot (retrofit collar over existing base).
- 4 failure modes: rubber collar cracked, lead base lifted by squirrels or freeze-thaw, sealant at flange dried out, vent pipe corroded through.
- Typical service life of the rubber collar: 10 to 15 years; lead base lasts 50+ years if not lifted.
- Pro install lifts the shingle course above to resequence the flange under it; not just slid in place.
- DIY install is feasible if the homeowner is comfortable on a roof and can handle the shingle resequence; otherwise it is a leak waiting to happen.
- This is the most common residential leak source on roofs under 20 years old.
Why vent pipe flashing is the most common leak source on residential roofs
Every plumbing vent stack in the house has to terminate above the roof to maintain drain pressure and let sewer gases escape. That vertical pipe (typically 1.5, 2, 3, or 4-inch ABS, PVC, or cast iron) pokes through the roof deck and the shingles, and the gap between the pipe and the deck has to be sealed with a flashing piece. The two dominant styles are a lead base with a flexible neoprene collar molded over the pipe (the classic, used for 60-plus years on US residential), and an all-plastic ABS base with an EPDM rubber collar (the modern alternative, sold under the Oatey Master Flash and similar brands).
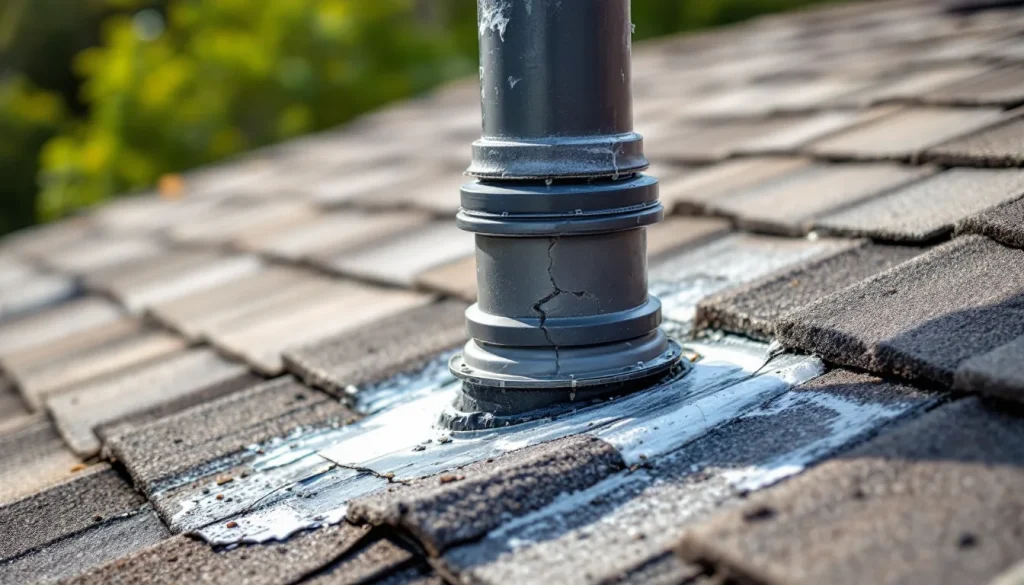
The lead base lasts essentially forever, often 50-plus years, because lead is dimensionally stable, weather-tolerant, and self-healing under foot traffic. The rubber or neoprene collar that seals around the pipe is the failure point. UV exposure, thermal cycling, and ozone in the air all degrade the elastomer. By year 10 to 15 on a typical residential installation, the collar develops a hairline crack at the pipe sealing surface. The crack widens, water enters around the pipe, runs down inside the boot, and onto the deck. From the deck it migrates along the underside of the sheathing until it finds a low point (usually the next rafter bay over) and starts dripping onto the ceiling drywall below. The leak typically shows up as a small brown spot 6 to 36 inches away from the actual roof penetration, which is why homeowners almost always misidentify the source.
Because the collar fails 10 to 15 years before the surrounding shingles are due for replacement (most asphalt shingles are rated 25 to 50 years), the boot is consistently the first thing on a residential roof to fail. The fix is straightforward and cheap if caught in the first season. If the leak has been running for 2 to 4 years, interior repair costs typically dwarf the roof work. For the broader product comparison see our roof vent pipe boot guide; this piece focuses on replacement scope, cost, and the DIY-vs-pro decision.
The 4 failure modes (which one you actually have)
Before ordering a replacement, identify which of the four failure modes is at play. The fix is the same (replace the boot), but the diagnosis tells you whether to also expect deck damage, animal intrusion, or pipe replacement on top of the boot itself.
Failure mode 1: cracked rubber or neoprene collar. This is the most common failure, accounting for the majority of vent boot leaks in service. The collar develops a hairline crack at the top of the pipe sealing surface, visible from the roof as a thin dark line on the rubber. Water enters and runs down inside the boot. The fix is a straightforward boot replacement: the lead base might be perfectly sound, but you replace the whole unit anyway because the lead-to-rubber molded joint is the same age as the rubber and not worth saving on a $50 part.
Failure mode 2: lifted lead base. Squirrels and raccoons chew on lead boots because they like the texture; freeze-thaw cycling can also lift a poorly nailed lead base over time. The result is a bent or lifted lead flange that no longer seals against the deck. Water enters under the lifted edge, runs along the underside of the shingles, and onto the deck. The fix is the same boot replacement but with care to install the new base flat against the deck and to consider an animal-deterrent collar (some installers use stainless mesh wrapped around the pipe above the boot to discourage chewing).
Failure mode 3: dried-out perimeter sealant. If the original install used roof cement or polyurethane sealant under the flange perimeter, that sealant has a 5-to-10-year service life. When it dries out and cracks, wind-driven rain gets under the flange and onto the deck. The fix is to lift the boot, scrape off the old sealant, lay down a fresh bead, and reseat. If the boot itself is still in good shape (under 8 years old, collar intact), this can be a sealant-only repair without full boot replacement. Past 8 years, just replace the whole boot while you have it lifted.
Failure mode 4: corroded vent pipe. Older homes (pre-1990) often have cast iron or galvanized steel vent pipes that rust through from the inside. The rust shows up as a brown stain on the rubber collar or as a visible hole at the top of the pipe. The fix is not just the boot; the pipe itself has to be replaced or sleeved, which is a plumber’s call rather than a roofer’s, and the cost jumps to $400 to $1,500+ depending on how much of the vent stack needs replacement. If the pipe is sound and only the boot is failing, the fix stays in the $150 to $450 range.
Product options: Oatey Master Flash, Lifetime Tool, Perma-Boot, lead
Four product categories cover the bulk of replacement installs. Each has trade-offs in cost, longevity, and install style.
Oatey Master Flash (and similar all-rubber EPDM boots): The most common 2026 replacement product. ABS plastic base with an EPDM rubber collar molded to fit pipe sizes from 1.25 to 4 inches. Cost: $15 to $35 retail at Home Depot or Lowes, $20 to $50 at a roofing supply house. Service life: 10 to 15 years on the collar (matching the failure mode that drove the original replacement). Trade-off: cheap and fast to install but the collar will fail again at the same interval, putting you back in the same place in roughly 12 years.
Lead base with neoprene collar: The traditional install. Cost: $25 to $60 retail, $30 to $80 at supply. Service life: 50-plus years on the lead, 10 to 15 years on the collar. The collar can be replaced independently of the base in some configurations, extending the useful life of the install. Best long-term value if the lead is well-protected from animal damage.
Lifetime Tool boot: All-aluminum or all-stainless-steel collar with no rubber or neoprene component. The seal at the pipe is metal-to-metal with a precision-formed gasket. Cost: $40 to $80 retail. Service life: theoretically the life of the roof because there is no elastomer to degrade. Trade-off: requires more precise install (less forgiveness on out-of-plumb pipes) and is more expensive upfront. Worth it on a new install where the homeowner expects to live with the roof for 25-plus years.
Perma-Boot retrofit collar: Not a full boot replacement, but a retrofit sleeve that slides over an existing failed collar and seals against the pipe with a fresh rubber lip. Cost: $20 to $40 retail. Install time: 15 to 30 minutes without lifting any shingles. Service life: 8 to 12 years on the retrofit collar. Best application: a leaking boot caught early on a relatively new roof where lifting the shingles to replace the full boot is more disruptive than the underlying problem warrants. The full breakdown on this product is in our Perma-Boot vent repair guide.
| Product | Part cost | Service life | Install style |
|---|---|---|---|
| Oatey Master Flash | $15 to $35 | 10 to 15 yrs | Full boot replacement |
| Lead base, neoprene collar | $25 to $60 | 50+ yrs base, 10-15 collar | Full boot replacement |
| Lifetime Tool boot | $40 to $80 | Life of roof | Full boot replacement |
| Perma-Boot retrofit collar | $20 to $40 | 8 to 12 yrs | Slips over existing |
Pro install: what the $150-$450 actually buys
A professional vent boot replacement on a single boot runs $150 to $450 in 2026 contractor pricing, with most jobs landing $200 to $325 for a straightforward swap on a walkable shingle roof. The price includes the trip charge (typically $150 to $250 minimum to put a truck on a driveway in 2026), the part itself ($20 to $80), and the labor for the actual swap (45 to 75 minutes including setup).
The labor difference between a good install and a hack job is whether the installer lifts the shingle course above the boot to resequence the flange. The correct sequence is: lift the next shingle course up, remove the old boot’s nails, slide the old boot out from under the upper shingles, slide the new boot in so its upper flange tucks under the upper shingle course, nail the upper flange to the deck (typically with two ring-shank roofing nails), bed the lower flange in roof cement against the underlayment, and re-set the shingle course above with a fresh bead of cement under each shingle’s nail line. That sequence takes 45 to 60 minutes, ensures the upper flange of the new boot is properly weather-lapped, and gives the install a 10-to-50-year life depending on the product chosen.
The hack version is to leave the upper shingle course in place, slide the old boot out the bottom, slide the new boot in from the bottom so its upper flange sits on top of the existing shingle course, and seal the whole perimeter with a thick bead of roof cement. That sequence takes 15 minutes, looks fine from the ground, and starts leaking within one or two seasons because the upper flange is now exposed to water flow rather than weather-lapped underneath the shingles. If a contractor’s quote is significantly under the $200 minimum, ask which sequence they intend to use. The answer will usually tell you which one you are buying.
DIY install: when it makes sense and when it does not
Vent boot replacement is one of the few roof repairs that is genuinely DIY-feasible for a moderately handy homeowner who is comfortable on a roof. Total cost for the DIY path: $40 to $100 (the boot itself, a tube of roof cement, a small bag of roofing nails, and a flat pry bar if you do not already own one). Tools needed: hammer, flat pry bar, utility knife, caulk gun, plus a sturdy ladder and basic roof-safety gear (rubber-soled shoes, a helper to hold the ladder, a harness on anything steeper than 6:12 or higher than one story).
The DIY install follows the same correct sequence as the pro install: lift the shingle course above, remove the old boot, slide the new boot in so the upper flange tucks under the upper shingles, nail it off, seal the perimeter, re-cement the upper shingle course. Three things to watch for. First, do not crack the upper shingles when you lift them; on a roof under 10 years old the shingles will lift fine, but past 15 years they get brittle and a cold-weather lift will crack the shingle tabs. Plan the work for a warm day. Second, use ring-shank roofing nails rather than smooth-shank; they hold better in a re-driven hole. Third, do not over-seal. A thick bead of roof cement looks reassuring but actually creates dams that trap water against the boot rather than letting it shed. A thin even bead under the flange perimeter is the correct application.
DIY is not the right call if the existing boot shows signs of failure mode 4 (corroded pipe), if the roof is steeper than the homeowner is comfortable working on, or if there is any evidence of deck rot around the boot perimeter (soft spots in the sheathing when pressed). Any of those three escalates the scope past the DIY range and into pro territory.
What this scope looks like as part of a bigger job
If the roof is within a few years of full replacement anyway, the right call is usually to bundle the boot work into the re-roof rather than spend $400 on a standalone visit. New construction shingle installs in 2026 typically replace every vent boot on the roof as part of the spec, with the cost essentially absorbed into the per-square shingle price. A boot replacement as part of a re-roof costs almost nothing as a marginal line item (the crew is already on the roof, the shingles are already off, and the new flashing kit is part of the install).
If the leak has already caused ceiling damage, the interior repair is usually a separate scope and a separate quote. Drywall patching, primer, and matching ceiling paint on a leak that has run for 1 to 3 years typically runs $400 to $1,500 depending on how visible the stain pattern is. The full diagnostic for a leak that shows up as a ceiling stain is in our water stain ceiling roof leak guide, and the broader leak repair playbook is in how to fix a roof leak and roof leak repair. For the broader flashing repair context see roof flashing repair, and for boot products see our roof vent pipe boot guide. For adjacencies like bathroom and dryer vents that have different flashing requirements see bathroom vent through roof and dryer vent through roof. Repair cost itemization for boot work and adjacent flashing scopes is in our roof repair costs itemized reference.
Bottom line
Replacing a failed vent pipe flashing is the cheapest meaningful roof repair on the menu in 2026: $30 to $80 for the part, $150 to $450 installed by a pro, $40 to $100 DIY for a comfortable homeowner. The job needs to happen on a 10-to-15-year cycle on most residential roofs because the rubber or neoprene collar fails well before the shingles. The right product depends on how long you plan to live with the roof: Oatey Master Flash for a quick fix on a roof nearing replacement anyway, lead with neoprene for the conventional long-life install, Lifetime Tool for the no-rubber upgrade, Perma-Boot retrofit for an early-catch repair without lifting shingles. The single biggest predictor of whether the install actually lasts is whether the upper flange got lapped under the upper shingle course (correct, 10-to-50-year life depending on product) or sealed on top with caulk (hack, 1-to-2-year life until the next leak).