Venting a bathroom vent through roof in 2026 is required by IRC M1507.2 in nearly every jurisdiction. Venting a bathroom exhaust fan into the attic is a code violation that causes mold, sheathing rot, and structural damage to roof trusses. The 2026 installed cost for a code-compliant through-roof bathroom vent runs $250 to $700 depending on roof complexity, duct length, and whether the fan itself needs replacement. Here is the full install process, why attic venting is illegal, and how the costs break down by scenario.
The short version
- 2026 installed cost: $250 to $700 for a standard install. Asphalt shingle single-story is the cheap end. Tile and metal roofs run $500 to $1,000.
- IRC M1507.2 requires bathroom exhaust to terminate outside. Attic venting is a code violation in all 50 states.
- Duct must be 4-inch minimum for fans up to 100 CFM, 6-inch for larger fans. Rigid metal or insulated flex (R-6 minimum in unconditioned attics).
- Insulation around the duct is mandatory where it passes through attic space, to prevent condensation and ceiling stains.
- Roof cap requires backdraft damper and proper flashing. Cap should be at least 3 feet from any roof intake or window per M1507.2.1.
- Combining multiple bath fans into one roof penetration is permitted with proper duct sizing and backdraft dampers on each branch.
Short answer and 2026 cost
If your bathroom fan vents into the attic, fix it now. The water vapor a typical 2-person household produces (estimated 4 to 6 pints per day from showers, brushing, and general use) condenses on cold sheathing in winter, soaks insulation, and rots the wood. Mold colonies establish in 2 to 5 years of attic venting in cold climates, faster in mixed-humid climates.
The 2026 cost to install a code-compliant through-roof bathroom vent:
| Scenario | Total installed cost |
|---|---|
| New construction, single-story asphalt shingle | $250 to $400 |
| Retrofit, existing fan, single-story asphalt shingle | $300 to $500 |
| Retrofit, fan replacement plus new vent path, single-story | $400 to $650 |
| Retrofit, second-story or vaulted ceiling | $500 to $800 |
| Retrofit, tile or standing seam metal roof | $500 to $1,000 |
The cost variables that matter most: existing fan condition, duct length from the bathroom to the roof, roof penetration complexity, and whether the duct passes through conditioned or unconditioned space.
IRC M1507 code requirements
IRC Section M1507 covers all mechanical ventilation, including bathroom exhaust. The key paragraphs for bathroom vents:
- M1507.2 – Exhaust openings. Air exhausted by mechanical ventilation must be discharged to the outdoors. Air cannot terminate in soffits, eaves, attics, ridge vents, crawl spaces, or any concealed building space.
- M1507.2.1 – Location. Termination must be at least 3 feet from any property line, intake openings, or operable windows. On a roof, this generally means at least 3 feet from soffit vents, ridge vents, and skylights.
- M1507.3 – Whole-house ventilation rate. Sets the design CFM for bathroom fans. The minimum is 50 CFM intermittent or 20 CFM continuous per bathroom.
- M1507.4 – Local exhaust rate. 50 CFM intermittent or 20 CFM continuous per bathroom is the code minimum. Practical recommendation is 80 to 110 CFM intermittent for showers.
- M1507.4.2 – Air filtration. Not required for bathroom exhaust (this is intake-only).
The header that bathroom-fan installs hit most often is M1507.2 (must terminate outside) and M1507.2.1 (3-foot separation from intakes). The most common code violations are: dumping exhaust into the soffit or ridge area, placing the cap too close to a skylight or attic intake vent, and using an unsealed duct that leaks into the attic before reaching the cap.
Why attic venting is a code violation
Venting a bathroom fan into the attic, whether intentionally or because the duct disconnected, fails for four reasons:
- Moisture damage. A shower produces roughly 0.25 to 0.5 pints of water vapor per shower. A 4-person household produces 2 to 4 pints of bathroom water vapor per day. Dumped into a cold attic, this condenses on the cold sheathing, drips back onto insulation, and saturates the wood over time.
- Mold. The wet attic environment hits Aspergillus and Cladosporium growth thresholds within 1 to 3 years in cold climates, faster in mixed-humid. Mold colonies on roof sheathing become structural problems and create indoor air quality issues if they communicate with the conditioned space.
- Sheathing rot. OSB and plywood sheathing rated for normal moisture loads start to delaminate at sustained humidity above 80%. A bathroom-venting attic easily exceeds this for hours daily.
- Insulation degradation. Fiberglass batt insulation loses 40% of its R-value when wet. Cellulose loses 60%. The attic insulation that should protect your conditioned space stops working.
The cost of fixing attic-venting damage after 5 years (insulation removal and replacement, sheathing repair, mold remediation, fan re-routing) typically runs $4,000 to $15,000. The cost of doing the venting correctly upfront is $250 to $700.
Signs your existing bathroom fan vents into the attic
If you bought the home and are not sure where the fan ducts terminate, here are the signs of an attic-vented or otherwise non-compliant install:
- Visible water stains on the bathroom ceiling near the fan grille.
- Dust or lint streaks on the ceiling around the fan housing (air leaking around the housing rather than into the duct).
- Attic inspection shows the duct ending under the insulation, dangling from the ceiling joists, or terminating at a soffit vent without a cap.
- Moldy or musty smell in the attic, particularly in winter when humidity differentials are highest.
- Visible mold or black staining on attic sheathing, especially near the bathroom fan.
- Frost or ice on the underside of roof sheathing in winter (a clear sign of moisture infiltration from below).
- Increased humidity reading in the attic (above 60% in summer or 50% in winter).
If you see any of these signs, schedule the through-roof retrofit promptly. Every month of continued attic venting in a cold climate adds to the sheathing damage and mold growth. The cost of fixing the venting is fixed at $250 to $700; the cost of attic remediation grows with time.
Through-roof vs through-wall venting
Bathroom fans can vent through a roof or through an exterior wall (often through the gable end). Both are code-compliant under M1507.2. The trade-offs:
| Factor | Through-roof | Through-wall |
|---|---|---|
| Cost | $250 to $700 | $200 to $500 |
| Distance from typical bathroom | Shorter, fewer elbows | Longer if bathroom is interior |
| Penetration complexity | Higher (roof flashing) | Lower (wall cap) |
| Leak risk | Moderate, depends on flashing | Low |
| Visual impact | Hidden on roof | Visible on wall, some HOA issues |
| Cold climate performance | Slight risk of cap freeze-up | Lower risk |
| Permitted for most layouts | Yes | Only if exterior wall is reachable |
Through-wall is cheaper and lower-risk when you have an exterior wall within 8 to 12 feet of the bathroom fan. For interior bathrooms or second-story bathrooms with no eave-level wall, through-roof is the practical answer.
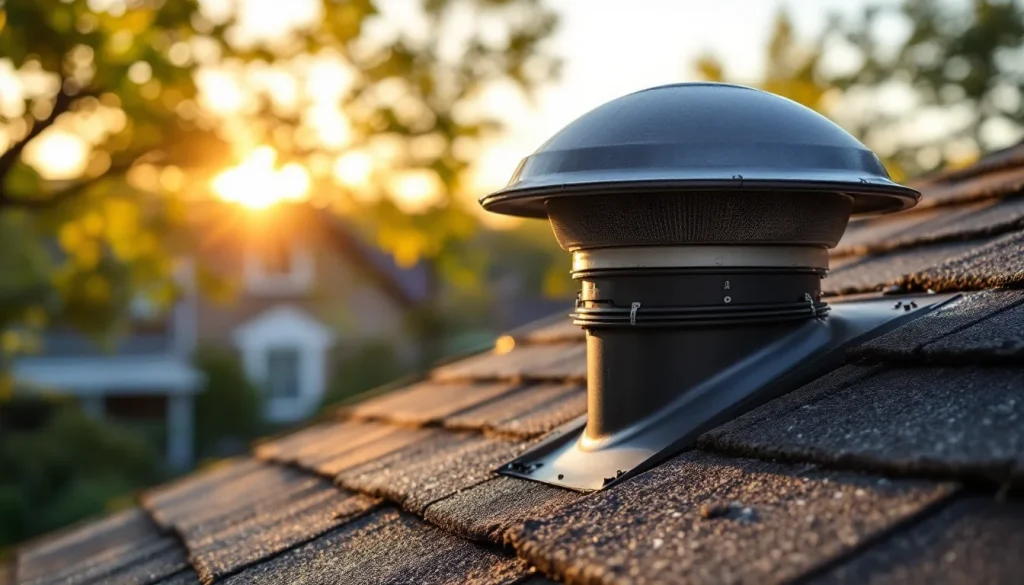
Vent cap selection for bathrooms
The cap selection rules are similar to a dryer vent but the airflow direction and humidity load are different. Key requirements:
- Backdraft damper. Spring-loaded or gravity damper that closes when the fan is off. Prevents cold air infiltration and rain entry.
- 4 to 6 inch size matched to duct. Most residential bath fans use 4-inch ducts; larger fans (110+ CFM) use 6-inch.
- No fine mesh. Coarse pest-resistant openings are fine, but fine screens catch lint-like dust and ice over in cold weather.
- Roof-rated flashing flange. The cap should come with a built-in flange that integrates with shingle courses.
- Insulated cap body in cold climates. Some caps (Lambro, Heartland, Famco) offer insulated versions that reduce condensation drip-back.
Recommended products for 2026: Heartland Industries SRC-4 ($35 to $45), Builder’s Best 4-inch Roof Vent ($25 to $35), and Famco RV-4 ($45 to $60). All three meet IRC M1507.2 requirements when properly installed.
Duct sizing and routing
Bathroom fan duct sizing is straightforward but commonly violated. The minimums:
| Fan CFM | Minimum duct diameter | Maximum equivalent length |
|---|---|---|
| 50 CFM | 4 inch rigid | 50 ft |
| 80 CFM | 4 inch rigid | 70 ft |
| 110 CFM | 4 inch rigid | 80 ft |
| 110 to 150 CFM | 6 inch rigid | 120 ft |
| 150+ CFM | 6 inch rigid | per manufacturer |
Equivalent length calculation: each 90-degree elbow adds 15 feet of equivalent length, each 45-degree adds 5 feet. A typical install with two 90s and one 45 is 35 feet of equivalent length even before any actual duct.
The duct material rules:
- Rigid metal (galvanized or aluminum) is the gold standard. Smooth interior, no condensation pockets, full code compliance.
- Insulated flex duct (R-6 minimum in unconditioned attics, R-8 in cold climates) is acceptable for most jurisdictions but must be supported every 4 feet to prevent sagging.
- Uninsulated foil flex is the worst choice. Condensation forms on the inside, drips back into the bathroom, and can stain ceilings.
- PVC pipe is not approved for bathroom exhaust in most jurisdictions because it is not listed for that use.
Route the duct with a slight slope toward the cap (1/4 inch per foot minimum) so any condensation that forms drains outside rather than back into the fan housing.
Insulation requirements through the attic
Where the duct passes through unconditioned attic space, insulation is required. The rule: keep the duct surface warmer than the dew point of the air inside the duct, so condensation does not form.
The two acceptable approaches:
- Insulated duct. Use R-6 insulated flex or wrap rigid metal duct with R-6 fiberglass duct wrap. R-8 is recommended in zones 5 and colder.
- Conditioned-space routing. Route the duct through interior walls or chases that stay above 50 degrees year-round, then only the short section through the attic to the cap needs insulation.
In cold climates (zones 5 to 8), inadequate duct insulation produces the same problem as attic venting: condensation, dripping, ceiling stains. We have seen DIY installs with bare metal duct in cold attics produce visible ceiling stains within two heating seasons. The R-8 insulation adds $30 to $80 to the install cost and prevents thousands in damage.
For the broader attic ventilation context that interacts with bathroom fan routing, see /attic-ventilation/ and /soffit-vents/.
Roof flashing for the bathroom vent
The roof penetration for a bathroom vent is the same kind of detail as a dryer vent or plumbing stack. The flashing approach:
- Locate the cap position. Maintain at least 3 feet from any ridge vent, soffit vent intake, skylight, or window. M1507.2.1.
- From inside the attic, drill a pilot hole through the deck.
- On the roof side, mark the hole pattern from the pilot. Use a hole saw matched to the cap (typically 5-1/4 inch for 4-inch duct).
- Cut the hole through the deck.
- Pull back two shingle courses above the cap location. Cut shingles only as needed.
- Bed the cap flange in a polyurethane roofing sealant. The flange should be wide enough to extend at least 4 inches in all directions from the hole.
- Slide the upslope half of the flange under the existing upper shingles. The downslope half sits on top of the lower shingles, exactly like a plumbing stack flashing.
- Nail the upper flange under the shingle course above. Never expose nails to weather.
- Replace shingles. Seal cut edges with roofing cement.
- Verify the cap is plumb so the damper seats correctly.
This is functionally identical to flashing any other roof penetration. For more on roof flashing principles, see /roof-flashing/. For repair scenarios where existing flashing failed, see /roof-leak-repair/.
Combining multiple bath fans into one penetration
Some installs combine two or three bath fan exhausts into a single roof cap to reduce penetrations. This is permitted under IRC M1507 with three conditions: proper duct sizing, backdraft dampers on each branch, and listed fittings for the joint.
| Configuration | Main duct size | Branch sizes | Damper requirement |
|---|---|---|---|
| 2 fans, 50 CFM each | 5 inch | 4 inch each | Damper at each fan housing |
| 2 fans, 80 CFM each | 6 inch | 4 inch each | Damper at each branch fitting |
| 3 fans, 50 to 80 CFM each | 6 inch | 4 inch each | Damper at each branch fitting |
| 2 fans, 110 CFM each | 6 inch | 4 inch each, with high-flow tee | Damper at each branch, possibly high-flow tee |
The dampers on each branch are non-negotiable. Without them, running one fan pushes air backward through the other fans and out into other bathrooms (or back into the ceiling cavity). The damper at the fan housing is often built into the fan itself; verify on the spec sheet.
Combined installs save one roof penetration but add a tee fitting, additional duct, and more complex sizing. The cost trade-off is usually break-even: combined saves $100 to $200 on the second penetration, costs $100 to $200 in extra ducting and fittings.
Cost breakdown by component
The detailed 2026 install cost components for a single bathroom fan vent through the roof:
| Component | Material cost | Labor cost | Subtotal |
|---|---|---|---|
| Roof cap with damper | $25 to $60 | included | $25 to $60 |
| 4-inch rigid metal duct (15 to 25 ft) | $20 to $50 | included | $20 to $50 |
| Insulation wrap (R-6) or insulated flex | $15 to $40 | included | $15 to $40 |
| Foil tape, clamps, hangers, sealant | $10 to $30 | included | $10 to $30 |
| Labor: 3 to 5 hours, one trade | $200 to $400 | $200 to $400 | |
| Roof penetration and flashing | $10 to $30 | included | $10 to $30 |
| Optional: new fan housing (Broan, Panasonic) | $80 to $250 | $100 to $200 | $180 to $450 |
Total range for fan-only install (existing housing remains): $300 to $600. Total range for full fan replacement plus through-roof vent: $400 to $800. Cold-climate installs with insulated duct and high-spec caps run an additional $50 to $150.
Fan sizing and selection
If you are replacing the fan as part of the through-roof install, the sizing rules under ASHRAE 62.2 and IRC M1507.4 are straightforward. The intermittent-use formula is the bathroom floor area divided by 7.5, minimum 50 CFM:
| Bathroom size | Floor area | Minimum CFM (intermittent) | Recommended CFM |
|---|---|---|---|
| Powder room | 20 sq ft | 50 CFM (floor) | 50 to 80 CFM |
| Standard 5×8 full bath | 40 sq ft | 50 CFM | 80 to 110 CFM |
| Master bath, 80 sq ft | 80 sq ft | 50 CFM | 110 to 150 CFM |
| Large master, 120 sq ft | 120 sq ft | 50 CFM | 150 to 200 CFM |
| Bathroom with steam shower | any | per shower spec | 150 to 250 CFM with humidity sensor |
The CFM recommendations on the right column assume you actually want the moisture removed, not just code compliance. The code minimum of 50 CFM for a full bath removes shower humidity in roughly 20 to 30 minutes. At 110 CFM, the same job takes 8 to 12 minutes. The energy cost difference is small (a few cents per shower); the mold-prevention value is large.
Recommended fan brands for through-roof installs (where quiet operation matters because the duct run is longer): Panasonic WhisperCeiling DC ($120 to $250), Broan-NuTone AER110LK ($90 to $140), Delta BreezGreenBuilder ($110 to $180), and Air King Quiet AKF ($80 to $120). All four are rated 1.0 sones or quieter at 110 CFM, which is essentially silent.
Humidity sensor and timer controls
Modern bathroom fans can be controlled by humidity sensors that turn the fan on when humidity rises and off after it returns to baseline. The pros and cons:
- Humidity sensor. Runs the fan exactly as long as needed. Best moisture removal for the energy used. Useful for renters, kids, and anyone who forgets to turn the fan on.
- Timer switch. 20, 30, or 60-minute mechanical timer. Lower cost than humidity sensor. The fan runs after the bathroom is empty, which is when you want it.
- Motion sensor. Turns the fan on when someone enters. Useful in light-and-fan combo applications but does not handle shower humidity well.
- Smart switch (Lutron Caseta, Leviton Decora Smart). Integrates with whole-house ventilation strategies and can be tied to occupancy or humidity from a separate sensor. More complex install.
For the energy and mold-prevention math, the humidity sensor is the best choice for any bathroom that gets daily shower use. The premium over a basic switch is $40 to $80, and the better moisture management protects the entire room finish over the long run.
When to call a pro
This is a project where the math usually favors hiring a competent installer. The work crosses three trades: electrical (fan wiring), HVAC (duct sizing and connection), and roofing (penetration and flashing). The mistakes that compound:
- Wrong duct size leads to fan straining, eventually motor burnout and warranty void.
- Uninsulated duct in cold climates leads to condensation, ceiling stains, eventual drywall replacement.
- Poor flashing leads to leaks that show up months later as attic insulation damage.
- Cap too close to a ridge vent or soffit intake can short-cycle the exhaust back into the attic, defeating the entire install.
For homeowners who have done some roof and electrical work before, this is within DIY reach for $80 to $200 in materials. For everyone else, $400 to $700 for a competent install is the better value.
For contractor vetting criteria, see /how-to-choose-a-roofing-contractor/. For broader ventilation context, see /attic-ventilation/ and /soffit-vents/.
FAQs
Is venting a bathroom fan into the attic ever allowed?
No. IRC M1507.2 requires exhaust air to terminate outside. All 50 states have adopted versions of the IRC that prohibit attic venting. The only acceptable termination points are through the roof, through an exterior wall, or through a soffit cap that is specifically designed and listed for exhaust (most soffit terminations short-cycle into the attic and fail the spirit of the code).
How much does it cost to vent a bathroom fan through the roof in 2026?
$250 to $700 for a standard asphalt shingle install. Single-story new construction is the cheap end. Second-story retrofits, tile or metal roofs, and installs requiring fan replacement push toward the high end. Combined multi-fan installs through one penetration run $400 to $900.
Can I use a soffit vent cap for a bathroom fan?
Only with a vent cap specifically listed for exhaust and installed at the correct distance from any intake vents (3 feet minimum per M1507.2.1). Most residential soffit installs short-cycle the moist exhaust back into the attic through the adjacent soffit intake vents. Through-roof or through-gable-wall is the safer choice.
Do I need insulated duct for a bathroom vent through the roof?
Yes in cold climates (USDA zones 5 to 8). Uninsulated duct in unconditioned attic space causes condensation inside the duct, which drips back into the fan housing and stains ceilings. R-6 minimum is the code requirement; R-8 is recommended for cold zones.
How far apart should bathroom and dryer vent caps be on the roof?
At least 3 feet per IRC M1507.2.1 and M1502.3. The separation prevents moist bathroom exhaust from being pulled into the dryer duct and vice versa. Practical spacing is often 6 to 10 feet for visual cleanliness on the roof.
Can I combine two bathroom fans into one roof vent?
Yes, with proper duct sizing (typically 5 to 6 inch main duct), backdraft dampers on each branch, and listed fittings. The damper requirement is non-negotiable; without it, running one fan pushes air backward through the other.
How long does it take to install a bathroom vent through the roof?
3 to 5 hours for a single-story asphalt shingle install with one trade. Second-story or tile roof installs run 5 to 8 hours. Combined multi-fan installs add 1 to 2 hours per additional fan branch.
For more roof and ventilation coverage, browse the full /learn/ library. Related reads: /dryer-vent-through-roof/, /attic-ventilation/, /roof-flashing/, and /soffit-vents/.