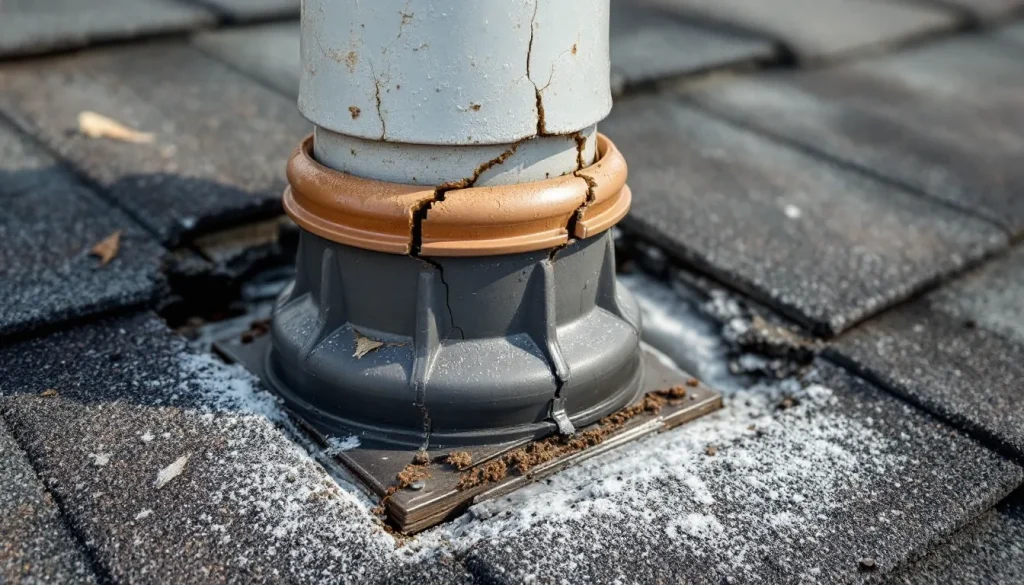
A roof vent pipe boot is the rubber-collared metal flashing that seals around a plumbing vent stack (see our evap cooler roof jack install guide) where it exits the roof, and it is the single highest-failure-rate component on a residential asphalt shingle roof. The rubber collar typically fails at 8 to 12 years, well before the shingles around it, and accounts for roughly 30% of all residential roof leaks. Replacement cost in 2026 runs $150 to $450 for a pro install and $30 to $80 for a confident DIYer. The boot is cheap. The interior water damage from ignoring a cracked one is not.
The short version
- The rubber collar on standard vent boots dries out, cracks, and fails at 8 to 12 years.
- This is the most common roof leak source, responsible for roughly 30% of residential leak calls.
- Symptoms: water staining on the ceiling directly below or downhill of the vent stack, especially after wind-driven rain.
- Pro replacement cost 2026: $150 to $450 per boot. DIY material cost: $15 to $35 plus 30 minutes.
- Two product paths: full boot replacement (Oatey Master Flash, Lifetime Tool) or slip-on retrofit (Perma-Boot).
- Spec the right collar size: a 3-inch collar on a 3-inch stack, a 4-inch collar on a 4-inch stack. The size is printed on the boot.
- If the boot is over 10 years old and your roof is over 15 years old, replace the boot during the roof job.
What a vent pipe boot is and why it fails first
Residential plumbing systems require vent (see our vent pipe flashing replacement (full)) stacks that exit through the roof to equalize pressure in the drain system. These are typically 1.5-inch, 2-inch, 3-inch, or 4-inch PVC pipes that stick up 12 to 24 inches above the roof. Each one is sealed where it penetrates the deck with a vent boot: a square metal base flange that integrates with the shingle pattern, topped by a rubber or rubber-like collar that wraps tight around the pipe.
The metal base flange (aluminum or galvanized steel) lasts as long as the shingles around it. The rubber collar does not. Standard EPDM and rubber collars have a service life of 8 to 12 years under direct UV exposure. The collar dries out, hardens, and develops radial cracks at the top where it grips the pipe. Once cracked, water runs down the pipe, through the cracks, into the attic insulation, and finally shows up as a ceiling stain. The leak is small but constant, which is why the resulting damage often exceeds the cost of the part by 50 to 100 times.
Cheaper builder-grade boots installed on tract homes in the late 1990s and 2000s often fail at 6 to 9 years because of thinner rubber compounds. Quality replacement boots from Oatey and Lifetime Tool now use modified EPDM or thermoplastic elastomer collars rated for 20+ years. If you replaced a boot 15 years ago with a builder-grade unit, it has likely failed again. If you replace it now with a current quality unit, the boot will probably outlast the shingles.
How to spot a failing vent boot from the ground and the attic
Signs from the interior
- Ceiling stain directly under or 2 to 6 feet downhill of a known plumbing vent location (over a bathroom, kitchen, or laundry)
- Staining that appears or worsens after windy rainstorms
- Damp insulation in the attic in a circle around a vent pipe penetration
- Rust streaks running down the pipe inside the attic
Signs from the attic
- Water staining on the underside of the deck around the pipe penetration
- Daylight visible around the boot from inside (severe failure)
- Black mold or efflorescence on framing immediately adjacent to the pipe
- Wet insulation that dries between rains
Signs from the roof
- Visible radial cracks in the rubber collar at the top of the boot
- Collar pulled down from its original position, exposing the pipe
- Collar hardened to the point that it does not deform under finger pressure
- Caulk smeared over the collar (a previous bad repair, now leaking through)
- Discoloration of the shingles in a triangle downhill of the boot
From a ladder at the gutter line, you can see most of these signs without going on the roof. If you can use binoculars from a safe distance, do that. For broader leak diagnostics from inside the home, see water stain on ceiling.
The three product paths for vent boot replacement
Path 1: full boot replacement (Oatey Master Flash, generic aluminum)
Standard practice for shingle roof boot replacement. The old boot is removed (which requires lifting the shingles above the boot to access the back edge), a new boot with a fresh collar is installed in its place, and the shingles are sealed back down. Materials: $15 to $35 for the boot. Common products:
- Oatey Master Flash: thermoplastic collar, 20-year rating, fits 1/4 to 3 inch and 1 to 4 inch pipe ranges. The widely accepted standard in 2026.
- Lifetime Tool Ultimate Pipe Flashing: silicone-rubber collar over aluminum, 50-year limited warranty.
- Builder-grade EPDM: still sold at home centers under various house brands. Avoid for replacement work; the collar will fail again in 8 to 12 years.
Pro install cost: $150 to $350 per boot. Time on site: 20 to 45 minutes per boot.
Path 2: slip-on retrofit (Perma-Boot)
The Perma-Boot is a two-piece collar that slides down over an existing boot without removing shingles or disturbing the base flange. The original collar stays in place (or is cut off if severely deformed), and the new collar locks onto the original base. The installation takes 5 to 10 minutes per boot and requires no roof tear-up.
The trade-off: a slip-on retrofit covers the symptom but leaves the original base flange in place. If the base flange is rusted or damaged, the retrofit will not fix that. The retrofit is appropriate when the base flange is sound and only the collar has failed, which is the most common scenario.
Cost: $20 to $40 per Perma-Boot retrofit. Pro install: $80 to $200 per boot. See our Perma-Boot vent repair guide for the full retrofit detail.
Path 3: lead jack (premium and historic)
Lead pipe jacks are the historic standard and still used on premium and historic restoration work. A lead sleeve is wrapped over the pipe and turned down inside the pipe opening, eliminating the rubber gasket entirely. No rubber means no UV failure mode. Service life: 40 to 75 years.
The downside: lead is heavier, more expensive, and handled less commonly by residential roofers. Cost: $80 to $150 per piece installed. Available through historic restoration suppliers and copper-roof shops like Berridge.
Pro vs DIY replacement cost (2026)
| Approach | Materials | Pro labor | Total cost | Service life |
|---|---|---|---|---|
| Full boot replacement, single | $15-$35 | $135-$415 | $150-$450 | 20+ years |
| Perma-Boot retrofit, single | $20-$40 | $60-$160 | $80-$200 | 15-20 years |
| Lead jack, single | $50-$80 | $150-$350 | $200-$430 | 40-75 years |
| DIY full boot | $15-$35 | 0 | $15-$35 | 20+ years if installed right |
| DIY Perma-Boot retrofit | $20-$40 | 0 | $20-$40 | 15-20 years |
| Replace all boots during reroof | $60-$140 | included | $0-$200 add | 20+ years |
The single biggest pricing trap: a roofer quotes $400 for a “vent boot replacement,” shows up, slaps a Perma-Boot retrofit over the old collar in 5 minutes, and leaves. The retrofit is the right product. The pricing is a markup. Get a quote that specifies which product will be installed and the warranty period.
How to replace a vent pipe boot yourself
This is one of the more accessible roof DIY jobs because the access is local (one boot at a time), the parts are cheap, and the risk of doing it wrong is contained. If you are comfortable on the roof, walk safely, and the slope is under 8:12, this is achievable in 30 minutes.
Tools and materials
- Replacement boot (Oatey Master Flash sized to your pipe)
- Pry bar or shingle ripper
- Roofing nails (1.25-inch galvanized)
- Hammer
- Polyurethane sealant (NPC Solar Seal 900 or Henry 208)
- Utility knife
- Safety harness if slope is over 6:12
Step 1: lift shingles above the boot
Using a pry bar or shingle ripper, gently break the seal on the three shingles directly above the boot. Lift them up enough to access the back edge of the boot base flange. Do not tear the shingles. If they are brittle from age, work them in cold weather when they are less likely to crack.
Step 2: pull nails and remove old boot
The base flange is nailed to the deck under the shingles above. Pull each nail with the pry bar. The old boot will then lift off over the pipe. If the collar is bonded to the pipe with old sealant, slice through it with a utility knife.
Step 3: clean the deck
Brush debris off the deck around the pipe penetration. Inspect the deck for any rot or staining. If the deck is soft, you have a bigger problem than the boot and need a roofer.
Step 4: slip new boot over pipe
Slide the new boot down over the pipe so the base flange sits flat on the deck. The collar should grip the pipe firmly. Center the base flange so the back edge is fully covered by the shingles above and the front edge is exposed.
Step 5: nail the back edge
Drive four roofing nails through the back half of the base flange into the deck, two per side. Do not nail the front (downhill) edge. The shingles below will overlap the front of the flange, covering the joint.
Step 6: bed and seal
Apply a bead of polyurethane sealant where the collar meets the pipe at the top. Apply a small bead under the back edge of the shingles above before pressing them down. Do not over-caulk. A thin bead is correct.
Step 7: reseat shingles
Press the lifted shingles back down. They will reseal in summer heat naturally. If installing in cooler weather, hand-seal each tab with a dab of asphalt cement.
Inspect from the attic after the next rain. The boot should be dry. If you see any moisture, the seal is wrong and the boot needs to come back off.
What goes wrong with DIY installs and how to avoid it
Wrong size collar
The most common DIY mistake. A 3-inch collar on a 4-inch pipe will not seal. A 4-inch collar on a 3-inch pipe will sag. Measure the pipe OD before buying. Most home center boots have the size range printed on the package.
Reusing old nails
Old nail holes are stretched. New nails in old holes do not bite. Drive new nails in new holes, at least 1 inch from any old hole.
Caulk-only installs
Some DIYers see a cracked collar and decide to caulk the cracks instead of replacing the boot. This holds for 6 to 18 months and then fails worse than before because the caulk traps moisture against the pipe. Always replace, never caulk-only.
Installing on dirty deck
Granules, dirt, and old sealant under the base flange prevent flat seating. Always sweep the deck clean before setting the new boot.
Skipping the seal bead
The top of the collar where it grips the pipe needs a small bead of sealant to compensate for thermal expansion. Without it, the seal opens by 1/32 to 1/16 inch in winter and lets water in.
Vent boots during a full reroof
If you are planning a reroof, every existing vent boot should be replaced as part of the job. The labor is already on site, the cost premium is $0 to $200 over the roof itself, and you reset the boot lifespan to match the new roof. A roofer who proposes to reuse existing vent boots during a reroof is taking a shortcut that will leak within 5 to 10 years. Read your contract to confirm new boots are included. See 30-point roof inspection checklist for what should be inspected on every penetration.
For a typical residential roof with 4 to 8 vent pipes, the line item cost added by replacement boots is $60 to $200 in materials. There is no reason to skip this.
How vent boots compare to other roof penetrations
Vent pipes are the most common roof penetration but not the only one. Each penetration type has its own boot system and failure pattern.
| Penetration | Typical sealing method | Failure rate | Service life |
|---|---|---|---|
| Plumbing vent pipe | Rubber collar boot | High (8-12 yr) | Until collar fails |
| Bathroom vent | Roof cap with collar | Medium | 15-20 years |
| Dryer vent | Roof cap with damper | Medium | 15-20 years |
| Furnace B-vent | Storm collar and metal flashing | Low | 30+ years |
| Electrical mast | Mast boot with collar | Medium-high | 10-15 years |
| Solar panel mount | Lag mount with flashing | Low if installed right | 25+ years |
| Skylight | Multi-piece flashing kit | Medium (gasket-dependent) | 15-25 years |
Bathroom and dryer vents have their own dedicated boot styles. See bathroom vent through roof and dryer vent through roof for those specifics.
When the vent boot is not actually the leak
Water staining near a vent pipe is not proof the boot is the source. Three common alternative sources show up at the same interior location.
Source: ridge or hip cap failure uphill
Water entering at a damaged ridge or hip cap runs down the underside of the deck, follows the slope along a rafter, and exits at the next break in the deck (often the vent pipe penetration). Inspect ridge and hip lines uphill of the leak before assuming the boot.
Source: shingle failure uphill
Missing or cracked shingles, especially after wind events (see shingles blowing off and nail pops on shingles), let water in well above the vent and route it to the same exit point.
Source: condensation around the cold pipe
In winter, a plumbing vent pipe carries cold outside air down into the attic. The pipe surface in the attic chills to outside ambient. Warm humid attic air condenses on the cold pipe and drips. The “leak” appears only in cold weather and only when humidity is high. Fix is attic ventilation and insulation, not boot replacement.
Always rule out uphill sources before replacing the boot. The hose test from the attic side (helper inside watching while you spray outside in zones) finds the real source.
When to call a pro instead of DIY
- Roof slope is over 8:12 (too steep for confident foot traffic)
- Roof is over 15 years old and shingles are brittle (high tear risk during lift)
- More than 2 boots need replacement at once
- Adjacent shingles are damaged and need replacement
- The deck around the boot is soft (rot from chronic leak)
- You do not have a stable ladder or fall protection
For an isolated boot on a sub-8:12 roof with shingles in decent shape, DIY is reasonable. Anything more complex is pro work. The labor savings are not worth the injury risk.
FAQ
How often do vent boots need to be replaced?
Original builder-grade boots typically need replacement at 8 to 12 years. Quality replacement boots (Oatey Master Flash, Lifetime Tool) using modern thermoplastic or silicone collars are rated for 20 to 50 years and often outlast the shingles around them. Inspect annually from a ladder.
Can I just caulk around the cracked collar?
No. Caulk holds for 6 to 18 months and then fails worse than before because it traps moisture against the pipe. Replace the boot or use a Perma-Boot retrofit. Caulk-only is the most common reason a “fixed” boot leaks again within 2 years.
Is the Perma-Boot retrofit as good as a full replacement?
For most failures, yes. The Perma-Boot solves the collar failure without disturbing the base flange, which is the most common scenario. If the base flange is rusted or damaged, full replacement is better. Always inspect the base flange before choosing.
Why do builder-grade boots fail so fast?
Thin EPDM compounds, sometimes with minimal UV stabilizers, are used to hit a price point on tract construction. Modern aftermarket boots from quality manufacturers use modified EPDM, thermoplastic elastomers, or silicone with proper UV protection. The cost difference is $5 to $15 per boot. The service life difference is 10 to 15 years.
Should I replace all my boots at once?
If the roof is over 8 years old and any boot has failed, the others are close behind. Replacing all of them at once costs 2 to 3 times a single replacement but saves 60% of the per-boot labor over staggered replacements. Bundle them.
Bottom line
The vent pipe boot is the highest-failure-rate component on a residential roof, but it is also one of the cheapest things to fix correctly. Inspect annually from the ground or a ladder, replace as soon as cracks appear, and use a quality aftermarket product instead of another builder-grade collar. If your roof is over 15 years old and any boot is failing, plan boot replacement into the reroof itself, not as a separate later job. For broader leak diagnostics, see roof leak repair. For the slip-on retrofit detail, see Perma-Boot vent repair. For broader flashing context, see roof flashing and what is flashing on a roof.