
Reviewed by The Roofing Brief Team. Last reviewed: October 2026.
Roof flashing is the sheet metal pieces installed at every roof penetration, valley, and intersection (chimneys, vent pipes, skylights, valleys, walls, and dormers) to direct water away from these weakness points on a roof and back onto the shingles. Related: What is flashing on a house. IRC R903.2.1 requires flashing at wall and roof intersections, slope changes and roof openings, and metal flashing must be corrosion resistant and at least 0.019 inch thick (No. 26 galvanized sheet). The reroof-time cost of the pieces ranges from $30 to $80 per vent boot to $300 to $800 for a 4-piece chimney system (editorial planning ranges, see the cost table below).
The short version
- Leaks concentrate at chimneys, valleys, walls, skylights and pipe boots, where the continuous shingle field is interrupted; no public dataset gives an exact share.
- IRC R903.2 requires corrosion-resistant flashing at every wall intersection, valley, and roof penetration on residential roofs.
- Step flashing is L-shaped metal, at least 4 in by 4 in under R905.2.8.3, woven into each shingle course where a wall or dormer meets the roof.
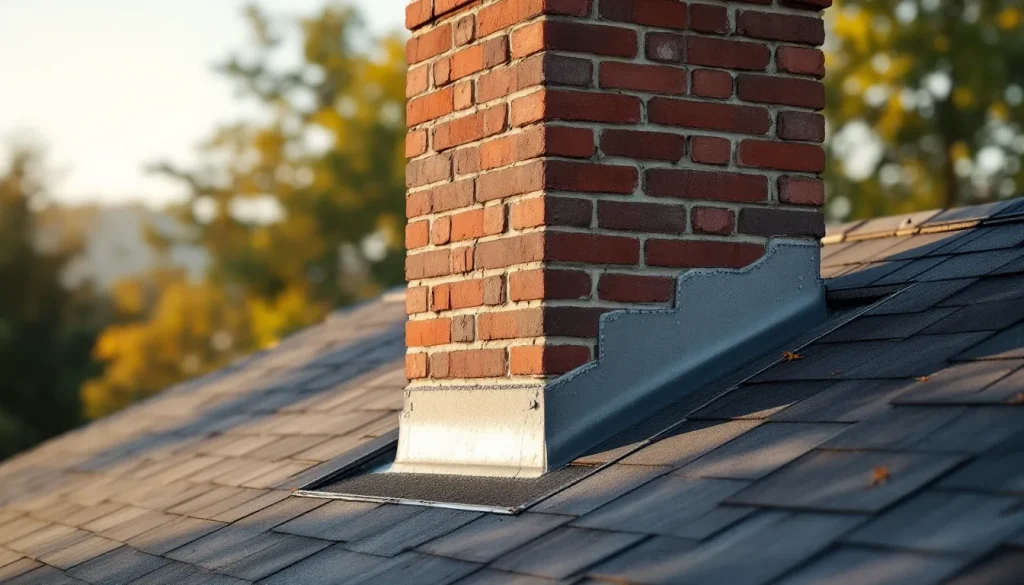
- Chimney flashing is a 4-piece system: step flashing, counter flashing, apron at the front, and a cricket or saddle at the back once the chimney is over 30 inches wide.
- Material choice runs aluminum (most homes), galvanized steel (cold climates), copper (architectural), and lead (chimneys and historic).
- The right sequence (underlayment first, step flashing woven with shingles, counter flashing on top) prevents most flashing leaks. Caulk-only flashing is a short-term fix.
The Short Answer: Why Flashing Matters Most
On a simple gable roof, most of the surface is open shingle field, which sheds water until the shingles reach end of life. The leaks start at the interruptions: chimneys, walls, valleys, vent pipes and skylights. IRC R903.2.1 names the same locations: wall and roof intersections, slope or direction changes and roof openings. No public dataset gives the exact share of leaks that begin at flashing, so treat any precise percentage you see online as unsourced.
At every penetration and intersection, water running smoothly across the shingles meets a vertical surface or a change of direction. Flashing redirects it back onto the shingles on its way to the gutter, as IRC R903.2 requires at “intersections with parapet walls and other penetrations through the roof plane”, which is why the leak rate of a roof depends on the flashing detail more than on the shingle brand. Curb-mounted units follow the same rule, as our evaporative cooler roof jack install guide shows.
The NRCA Roofing Manual carries flashing drawings for each roof type. Under IRC R905.2.8.4, flashing against a vertical front wall, soil stack, vent pipe and chimney must follow the asphalt shingle maker’s printed instructions, so a detail that departs from them can also put the shingle warranty at risk. For the leak-tracing steps, see roof leak repair.
Step Flashing (the Most Important Type for Walls/Dormers)
Step flashing is the L-shaped metal piece (typically 5×7 inches or 4×10 inches per piece) woven into each shingle course where a roof plane meets a vertical wall or dormer. Each piece extends about 4 inches up the wall and 4 inches across the roof (the R905.2.8.3 minimum is 4 inches by 4 inches), and each piece overlaps the piece below by 2 inches. The result is a continuous, shingle-by-shingle layering of metal and shingle that prevents water from ever reaching the wall-to-roof joint directly.
Walls and dormers are the longest runs of vertical-to-horizontal transition on a typical roof. At a 5 inch shingle exposure, a 12-foot wall needs about 29 pieces (144 inches / 5), and each one has to lap the next.
The right step flashing install sequence:
- Install ice-and-water shield or underlayment up the wall by at least 6 inches before any flashing.
- Install the first shingle course at the base of the wall.
- Place the first step flashing piece on top of the first shingle, bent 90 degrees so half is on the shingle and half is up the wall.
- Install the next shingle course over the top half of the step flashing piece, with the flashing piece sticking out 2 inches above the shingle.
- Place the next step flashing piece on top of the new shingle course, overlapping the first piece by 2 inches.
- Continue weaving step flashing and shingles up the entire wall length.
- Install counter flashing (separately covered below) over the top edge of the step flashing to seal the upper edge into the wall.
The classic step flashing error is laying one long continuous piece and shingling over it. Water landing on that metal has a clear path to the bottom of the wall, where it pools at the eave; real step flashing forces water off each piece onto the shingle below. Section R905.2.8.3 allows continuous or step base flashing, but the step form is the one that sheds water course by course.
Counter Flashing (Over Step Flashing)
Counter flashing covers the top 1 to 2 inches of the step flashing and either embeds into a reglet (a saw-cut slot) in masonry or tucks behind the siding on stud walls. R905.2.8.3 sends anchored masonry veneer walls to R703.8.2.2 for the counterflashing detail.
Without counter flashing, the top edge of each step piece is exposed to water running down the wall. On masonry, the reglet sits about 4 inches above the roof line and is filled with polyurethane sealant or lead wool to lock the metal in. Counter flashing nailed to the face of brick, by contrast, tends to pull loose.
On masonry walls (brick chimneys, stone walls, parapet walls on flat-roof tie-ins), counter flashing embeds into a reglet cut into the mortar joint about 4 inches above the roof line. The reglet is filled with polyurethane sealant or lead wool to lock the counter flashing in place. On stud walls (wood-framed dormers, vertical siding intersections), counter flashing tucks behind the siding (which is reinstalled over the top of the counter flashing).
The right counter flashing is independent from the step flashing. A common shortcut is to bend the top edge of the step flashing up against the wall and seal it with caulk. This shortcut survives the inspection but fails within 5 to 8 years as the caulk degrades and the joint opens. Independent counter flashing is the durable answer.
Chimney Flashing: The 4-Piece System
| Component | Location | Purpose |
|---|---|---|
| Apron flashing (front base) | Front (downslope) face of chimney | Sheds water around the front of the chimney onto the shingles below |
| Step flashing (sides) | Both side faces of chimney | Weaves into each shingle course to shed water down the sides |
| Saddle / cricket flashing (back) | Back (upslope) face of chimney | Diverts water around the chimney rather than letting it pile against the back |
| Counter flashing | Embedded into chimney masonry above all other flashing | Seals the top edge of every other flashing piece against the chimney face |
A chimney meets the roof on four faces, so it needs four components, one per face, plus the counter flashing over all of them. A lapped 4-piece system sheds water mechanically; single-piece pan flashing or caulk-only detailing relies on sealant that fails in 3 to 7 years (see the failure table below). The install-time cost difference is $200 to $500 per the editorial ranges in the cost table.
Over a 10 to 20 year horizon, a $200 to $500 premium for lapped flashing compares with the $800 to $2,000 standalone chimney repair in the cost table.
Apron Flashing (Front of Chimney)
The apron flashing is a single bent piece of metal at the front (downslope) face of the chimney, extending about 4 inches up the chimney face and 6 to 10 inches out onto the roof below. The apron sits over the top of the shingles below and is covered by the counter flashing above.
The apron sheds water that runs down the front face of the chimney onto the shingles below. Without it, that water enters the joint at the chimney front, where the roof meets the masonry head-on; under R905.2.8.4 its exact form follows the shingle maker’s printed instructions.
The apron should be wide enough that the side step flashing on the next course overlaps it by 2 inches at each side. The bottom edge of the apron should be cut to follow the shingle exposure pattern so the appearance is clean from the ground.
Cricket / Saddle Flashing (Back of Wide Chimneys)
A cricket (also called a saddle) is a small ridged structure on the upslope side of a chimney that diverts water around it. IRC R1003.20 requires one where the chimney dimension parallel to the ridgeline is over 30 inches and the chimney does not intersect the ridgeline; R903.2.2 uses the same 30 inch width.
The cricket height H is set by Table R1003.20 as a fraction of the chimney width W: 1/2 of W at 12:12, 1/3 at 8:12, 1/4 at 6:12, 1/6 at 4:12 and 1/8 at 3:12. A 40 inch wide chimney on a 6:12 roof therefore needs a cricket about 10 inches high (40 x 1/4).
Crickets are built with 2×4 framing covered with sheathing and underlayment, then flashed with step flashing pieces or one piece of pan flashing. Under R903.2.2 the cricket covering must be sheet metal or the same material as the roof covering. Per R1003.20, the cricket-to-chimney joint is flashed and counterflashed like any other roof-chimney intersection.
The most common chimney leak in older homes traces back to a missing cricket on a wide chimney. The fix is to build the cricket and re-flash the back of the chimney, which costs $400 to $1,200 as a standalone project and far less when bundled with a reroof. See roof flashing repair for the broader repair framework.
Valley Flashing: Open vs Closed Valleys
Valleys are the V-shaped channels where two roof planes meet at an inside corner. Each inch of rain on 1,000 square feet of roof sheds about 623 gallons (1,000 sq ft x 1/12 ft x 7.48 gallons per cubic foot), and a valley carries the share from both planes. Without proper valley flashing, this concentrated flow finds the smallest weakness and turns it into a major leak.
| Valley type | Description | Best for |
|---|---|---|
| Open valley | Metal valley flashing exposed; shingles cut back on both sides leaving a 4 to 6 inch metal channel | High-water-volume valleys; long valley runs; areas with heavy debris |
| Closed-cut valley | One roof plane’s shingles run through the valley; the other plane’s shingles are cut at the centerline | Standard residential; lowest material cost |
| Woven valley | Shingles from both planes weave through the valley alternately | Traditional 3-tab shingles; declining in modern use |
| California (long) valley | Variant of closed-cut with a starter row run up the valley to add water resistance | Moderate-water valleys, regional preference in west |
Open valleys give the most durable channel for high-water valleys, and some shingle makers require them in heavy snow or rain regions. R905.2.8.2 requires open-valley metal lining to be at least 24 inches wide, and Table R905.2.8.2 sets the minimums: aluminum 0.024 inch, galvanized steel 26 gauge (G90), 16 oz copper, 2.5 lb lead. Shingles are cut back 3 to 4 inches on each side of the centerline.
Closed-cut valleys are the dominant residential detail because they cost less at install and look cleaner from the ground. Section R905.2.8.2 accepts one ply of smooth roll roofing at least 36 inches wide, or self-adhering polymer-modified bitumen underlayment complying with ASTM D1970, as the lining; a centered layer of ice-and-water shield is the usual choice.
Vent Pipe Boot Flashing
Vent pipes (plumbing stacks, furnace vents, kitchen exhausts) protrude through the roof and must be flashed with a vent boot. The boot is a flat metal base with an integrated rubber or neoprene collar that fits tight around the pipe. A dryer vent through the roof uses its own dedicated cap and boot rather than a standard plumbing collar.
The base of the boot is installed under the upslope shingles and over the downslope shingles, just like step flashing. The pipe diameter and the boot collar must match: standard sizes are 1.5, 2, 3 and 4 inches inside diameter. The collar squeezes around the pipe to create the seal.
The rubber collar on a standard vent boot cracks from UV exposure, commonly in 10 to 15 years, then leaks at the pipe. Replacement runs $150 to $400 installed in the cost table below. Lead-collar and aluminum-collar boots cost more in materials ($30 to $80 against $5 to $15 for rubber) but can match a 25 to 30 year shingle life.
A lead-collar or no-caulk aluminum-collar boot has the same install labor as a rubber one, so the $25 to $65 materials premium is the whole extra cost.
Drip Edge as Flashing
Drip edge functions as flashing at the eaves and rakes. R905.2.8.5 requires it on shingle roofs, with segments lapped at least 2 inches, extended at least 1/4 inch below the sheathing and 2 inches back onto the deck, and fastened at no more than 12 inches on center.
The general flashing rules sit in R903.2 and R903.2.1 (wall and roof intersections, slope or direction changes, roof openings and the kickout at sidewall eaves), the cricket rule in R903.2.2, and the shingle flashing details in R905.2.8.1 through R905.2.8.4. Section references here were checked against the 2018 IRC text; confirm the edition your jurisdiction has adopted. See drip edge for the eave and rake detail.
Skylight Flashing
Skylights take their own flashing system, usually supplied by the skylight maker (Velux, Fakro, Sun-Tek): a head flashing at the top, step flashing at the sides and an apron at the bottom, like a small chimney. Maker kits run $150 to $400 per skylight in the cost table below.
Use the maker’s kit, because it is engineered to the curb profile of that skylight model; flashing cut on site often misses it.
A $150 to $400 maker kit is small against the $500 to $1,200 standalone skylight flashing repair. Skylight leak warranties are commonly tied to the maker’s own flashing components, so read the warranty text before substituting shop-made flashing. See skylight installation cost for pricing.
Material Options: Aluminum, Galvanized Steel, Copper, Lead
| Material | Cost/piece (step flashing 5×7) | Lifespan | Best for |
|---|---|---|---|
| Aluminum (.024-.032″) | $0.50-$1.20 | 30-50 years | Most residential; standard choice |
| Galvanized steel (26 ga) | $0.40-$1.00 | 20-30 years | Cold inland climates |
| Stainless steel (304 or 316) | $2.50-$5.00 | 50-100 years | Coastal salt air, copper roofs |
| Copper (16 oz) | $3.50-$8.00 | 50-100 years | Architectural; matches copper gutters |
| Lead (3 lb/sq ft) | $5.00-$10.00 | 75-150 years | Chimneys; historic; slate roofs |
Aluminum is the usual choice on asphalt shingle roofs, and copper on slate, cedar shake and copper standing-seam. Lead suits chimney aprons and counter flashing because it forms around irregular masonry, but copper and lead-coated copper have displaced it on many modern jobs. The 24 gauge minimums in R905.2.8.2 (aluminum 0.024 inch, 16 oz copper) apply to valley lining; step flashing in the table above is usually thinner.
Galvanic corrosion is the trap to avoid. When dissimilar metals touch in the presence of water, the less noble metal corrodes, and how fast depends on moisture, salt exposure and the relative surface areas, so there is no single timeline. Matching the fastener to the flashing is the simplest rule, but the compatible list is wider than same metal only. The Copper Development Association’s architectural design guidance lists copper, copper alloys such as brass or bronze, and neutral stainless steel as compatible fasteners for copper. For aluminum flashing, aluminum nails are the closest match; stainless and galvanized fasteners are also used, but a galvanic corrosion primer from Wiss, Janney, Elstner Associates lists stainless or galvanized steel fasteners with aluminum flashing among common galvanic trouble spots, so follow the flashing maker’s fastener instructions, especially near the coast. Keep copper from touching, or draining onto, aluminum or galvanized steel. Where two incompatible metals have to meet (a copper chimney cap above aluminum flashing, for example), separate them with a non-conductive barrier. For a metal-by-metal chart, see our guide to nails for flashing by metal.
Installation Sequence (the Order That Prevents Leaks)
The flashing install sequence on a typical reroof:
- Underlayment laid over sheathing, including ice-and-water shield in cold-climate eave and valley locations.
- Drip edge installed at eaves under the underlayment (eave drip edge actually goes on first, before the underlayment, then underlayment laps over it).
- Valley flashing installed over underlayment in valleys.
- Apron flashing installed at the front (downslope) face of chimneys, over the underlayment.
- Starter course of shingles laid.
- First course of shingles laid over starter.
- Step flashing woven into shingle courses at every wall, dormer, and chimney side as shingles are laid up the roof.
- Drip edge installed at rake edges over the underlayment.
- Vent pipe boots installed as the shingle courses approach each pipe.
- Cricket (if required by chimney width) constructed and flashed before shingles pass the chimney.
- Counter flashing installed over all step flashing, apron flashing, and cricket flashing, embedded into reglets in masonry or tucked behind siding on stud walls.
- Ridge cap installed over the ridge vent at the very top of the roof.
Each flashing piece depends on being lapped over the piece below it, because water flows downhill. Flashing slipped under existing shingles at the end of the job (step 7 of the 12-step sequence above is woven in as shingles go on) leaves entry points that take years to show as visible leaks. See parts of a roof for the anatomy reference.
The Caulk Question (When to Use, When to Avoid)
Caulk lasts 5 to 10 years in roof exposure, so polyurethane or butyl sealant belongs in three places only: filling the reglet that holds counter flashing in masonry, sealing fastener heads on the metal, and dressing visible edges.
Caulk is the wrong answer at three places: as the primary water seal in any flashing joint, as a substitute for proper layering of step flashing, and at any place where the joint will see thermal movement of more than 1/8 inch. Caulk has a 5 to 10 year lifespan in roof exposure; it dries, cracks, and pulls away. Any flashing detail that relies on caulk as the primary seal is a 5 to 10 year fix at most.
Flashing should work mechanically with no caulk at all; sealant is a backup at small openings, not the primary seal.
IRC R903.2 Code Requirements
IRC R903.2 (2021 and 2024) reads: “Flashings shall be installed in a manner that prevents moisture from entering the wall and roof through joints in copings, through moisture permeable materials and at intersections with parapet walls and other penetrations through the roof plane.”
R903.2.1 requires flashing at wall and roof intersections, wherever there is a change in roof slope or direction and around roof openings. The same section requires a flashing to divert water away from where the eave of a sloped roof meets a vertical sidewall, which is the kickout flashing (a common leak point on dormers and bay windows), and requires metal flashing to be corrosion resistant and at least 0.019 inch thick (No. 26 galvanized sheet). R903.2.2 requires a cricket or saddle on the ridge side of any chimney or penetration more than 30 inches wide measured perpendicular to the slope. Chimney, vent pipe and front wall flashing on shingle roofs follow the shingle maker’s instructions under R905.2.8.4.
| Code section | Coverage |
|---|---|
| R903.2 | General flashing requirement: keep moisture out at copings, parapets and roof penetrations |
| R903.2.1 | Wall and roof intersections, slope or direction changes, roof openings; kickout at sidewall eaves; metal at least 0.019 in, corrosion resistant |
| R903.2.2 | Cricket or saddle on chimneys or penetrations over 30 inches wide |
| R905.2.8.2 | Asphalt shingle valley linings |
| R905.2.8.3 | Sidewall base flashing, continuous or step, at least 4 in by 4 in |
| R905.2.8.4 | Front wall, vent pipe and chimney flashing per shingle maker’s instructions |
| R905.2.8.5 | Drip edge at eaves and rakes |
| R1003.20 | Cricket required on chimneys wider than 30 inches across the slope |
Where a reroof permit is required, inspectors can check these details under chapter 9 and R908.1, which sends reroofing materials and methods back to chapter 9. Fixing flashing after a failed inspection means pulling back finished shingles.
Common Flashing Failures
| Failure | Symptom | Lifespan if installed wrong |
|---|---|---|
| Continuous flashing instead of step flashing | Wall stain inside; leak at bottom of wall after heavy rain | 5-10 years |
| Caulk-only chimney flashing | Chimney leak appears in heaviest rains; stain on attic side of chimney | 3-7 years |
| Missing cricket on wide chimney | Water pools at back of chimney; leak appears at back face | 5-10 years |
| UV-cracked vent pipe boot | Ring-shaped stain around pipe on ceiling below | 10-15 years (then needs replacement) |
| Missing kickout flashing at wall termination | Saturated wall area at the wall-roof termination; siding rot | 3-8 years |
| Counter flashing nailed to face of brick | Loose counter flashing pulls free; reglet preferred | 5-12 years |
| Improper valley flashing (no centerline ice and water) | Valley leak in heavy rain; granule loss in valley | 10-15 years |
Most flashing failures, which the table above dates at 3 to 15 years for common mistakes, are visible only from inside: a ceiling or wall stain directly below the flashing point, moisture staining on the sheathing underside around a penetration, or an active drip in heavy rain.
The repair scope depends on how far the leak has traveled. Catching a flashing failure within the first leak event usually means a $200 to $800 spot repair. Letting the leak continue for years can mean sheathing replacement, insulation removal, drywall replacement, and mold remediation, easily reaching $3,000 to $15,000. See roof flashing repair for the detailed repair guide.
Manufacturer Warranty Position on Flashing
Shingle makers’ standard limited warranties (GAF, Owens Corning, CertainTeed, Atlas) cover the shingles; installation workmanship, which includes flashing, is normally the installer’s responsibility. Certified installer programs (GAF Master Elite, Owens Corning Platinum Preferred, CertainTeed SELECT ShingleMaster) are the route to enhanced workmanship coverage, so read the warranty document for what it lists on flashing.
Enhanced system warranties (the GAF Golden Pledge, the Owens Corning Platinum Protection) are issued through certified contractors; register the warranty and keep the contract and photos.
On a standard reroof by an uncertified contractor with only the baseline manufacturer warranty, flashing failures fall to the homeowner, and a spot repair runs $200 to $800 per the figures below. See how to choose a roofing contractor and signs you need a new roof.
Cost to Add Flashing During Reroof
The cost columns are editorial planning ranges, not a priced survey; get itemized bids that list each flashing component.
| Flashing component | Cost installed during reroof | Cost as standalone repair |
|---|---|---|
| Step flashing at one wall (10-15 LF) | $80-$200 | $300-$700 |
| Chimney flashing (4-piece system) | $300-$800 | $800-$2,000 |
| Cricket construction + flashing | $300-$900 | $700-$1,800 |
| Vent pipe boot (per penetration) | $30-$80 | $150-$400 |
| Open valley flashing (per valley) | $120-$350 | $400-$1,000 |
| Skylight flashing kit (per skylight) | $150-$400 | $500-$1,200 |
| Counter flashing into masonry reglet | $200-$500 | $500-$1,200 |
The standalone figures run about 2 to 4 times the reroof-time figures in the table because standalone work lifts and replaces shingles, adds masonry work for counter flashing and carries its own mobilization; a chimney costs $300 to $800 in a reroof against $800 to $2,000 standalone. Do every flashing piece during the reroof, even pieces with life left.
For the reroof cost line items, see how much does a new roof cost. Related water-management pieces: gutter installation, fascia board, roof sheathing and the roof maintenance schedule.
Frequently asked questions
What is roof flashing?
Roof flashing is sheet metal pieces installed at every roof penetration, valley, and intersection (chimneys, vent pipes, skylights, valleys, walls, and dormers) to direct water away from these joints and back onto the shingle surface, as required by IRC R903.2.1 at roof openings and wall intersections.
What causes most roof leaks?
Leaks most often start where the roof surface is interrupted: the flashing around chimneys, valleys, walls, skylights and vent pipes. On a roof that is not at the end of its life, a leak more often traces to a flashed joint or a pipe boot than to the open shingle field. IRC R903.2.1 lists the same locations. No public dataset we know of measures the exact share.
Is roof flashing required by code?
Yes. IRC R903.2.1 requires flashing at wall and roof intersections, slope or direction changes and roof openings, with metal at least 0.019 inch thick. R903.2.2 adds crickets on chimneys over 30 inches wide, and R905.2.8.5 requires drip edge on shingle roofs.
How long does roof flashing last?
Per the material table above, aluminum flashing lasts roughly 30 to 50 years and galvanized steel 20 to 30 years; copper and stainless steel last 50 to 100 years. The rubber collars on vent pipe boots last 10 to 15 years and need replacement before the shingles do.
What is step flashing?
Step flashing is the L-shaped pieces of metal (typically 5×7 inches each) woven into each shingle course where a roof plane meets a vertical wall or dormer. Each piece overlaps the piece below by 2 inches.
Can I install flashing myself?
Vent pipe boot replacement is a realistic DIY job at $30 to $80 in materials per the table above. Step flashing and chimney flashing on a reroof are pro jobs because the pieces must be woven course by course with the shingles.
What is a chimney cricket?
A cricket (also called a saddle) is a small ridged structure built on the upslope side of a chimney to divert water around it rather than letting water pile against the back face. IRC R1003.20 requires a cricket on any chimney wider than 30 inches across the slope.
What happens when flashing fails?
Leaks appear as water stains on the ceiling or wall below the flashing point. Caught early, the repair is $200 to $800. Allowed to continue for years, the damage spreads to sheathing, insulation, drywall, and framing, with repair costs reaching $3,000 to $15,000.