Counter (see our chimney flashing installation detail) flashing is the upper piece of the two-part wall-junction flashing system on a roof. It covers the top edge of step flashing or apron flashing where the roof transitions into a vertical wall, chimney, or parapet, so that the wall leg of the lower flashing is never exposed to direct water or UV. On masonry walls (brick, stone, stucco), counter flashing tucks into a reglet cut into the wall and is sealed inside the reglet with high-grade sealant. On wood-sided walls, the siding itself functions as counter flashing, lapping over the step flashing wall leg by 1 to 2 inches. IRC R905.2.8 implicitly requires it by prohibiting exposed step flashing wall legs at masonry walls. Done right, counter flashing outlasts the shingles. Done wrong (surface-mount with sealant only, no reglet), it leaks within 5 to 10 years.
The short version
- Counter flashing covers the wall leg of step flashing or apron flashing at vertical surfaces.
- Standard profile: 1-inch reglet bend at the top, 3 to 5 inch exposed face, hemmed bottom edge.
- Two install methods: reglet-mount (cut into masonry, the durable method) and surface-mount (screwed on, the retrofit method).
- Material: 26 ga galvanized or 0.025 in aluminum standard. Copper 16 oz or stainless 304/316 for premium.
- Sealant goes inside the reglet only, not on the face. Sealant on the face fails in 5 to 10 years.
- Surface-mount counter flashing is acceptable on stucco and EIFS retrofits but requires more frequent sealant maintenance.
- The step flashing wall leg should overlap onto the masonry by 4 inches; the counter flashing should lap down over the step flashing wall leg by 1 to 2 inches.
What counter flashing is and where it goes
Counter flashing solves the open top edge of step flashing or apron flashing. Step flashing comes up the wall 4 inches but its top edge is just bent sheet metal sitting against the wall surface. Water running down the wall would track behind that exposed top edge and into the wall cavity. Counter flashing covers that vulnerable top edge with a second piece of metal, integrating it into the wall instead of relying on caulk or hope.
The two-part wall-junction detail (step flashing below, counter flashing above) is the residential standard for any chimney, masonry parapet, or wall that won’t have siding installed over the step flashing. Where siding will cover the step flashing wall legs (most residential dormer sides, wood-sided wall transitions), counter flashing is not technically required because the siding itself does the job. For masonry, exposed walls, and any case where the wall finish stops at or near the step flashing, dedicated counter flashing is mandatory.
For the lower half of this wall-junction system, see our step flashing installation guide. For the broader cluster picture, see what is flashing on a roof.
Reglet vs surface-mount: the two install methods
Counter flashing installs one of two ways. Reglet-mount is the original, durable method. Surface-mount is the retrofit method and is shorter-lived but legitimate on some substrates.
Reglet-mount counter flashing
A reglet is a horizontal slot cut into the masonry wall, typically 1 to 1.5 inches deep and 3/8 to 1/2 inch wide. The top edge of the counter flashing is bent at 90 degrees to form a flange that slides into the reglet. The flange is held by lead wedges or compatible spring clips, and sealant fills the reglet on top of the flange. The sealant is the secondary defense; the mechanical grip of the reglet does the actual holding.
Reglet-mount counter flashing on new masonry walls is typically installed by cutting the reglet through one mortar joint with a diamond blade in a circular saw or with a dedicated reglet cutter. On existing brick where the mortar joints are full and tight, the cut goes through the brick face itself, typically 1/2 inch up from a mortar joint. The reglet cut is the labor-intensive part of the install; the flashing itself takes 10 minutes once the slot is cut.
Surface-mount counter flashing
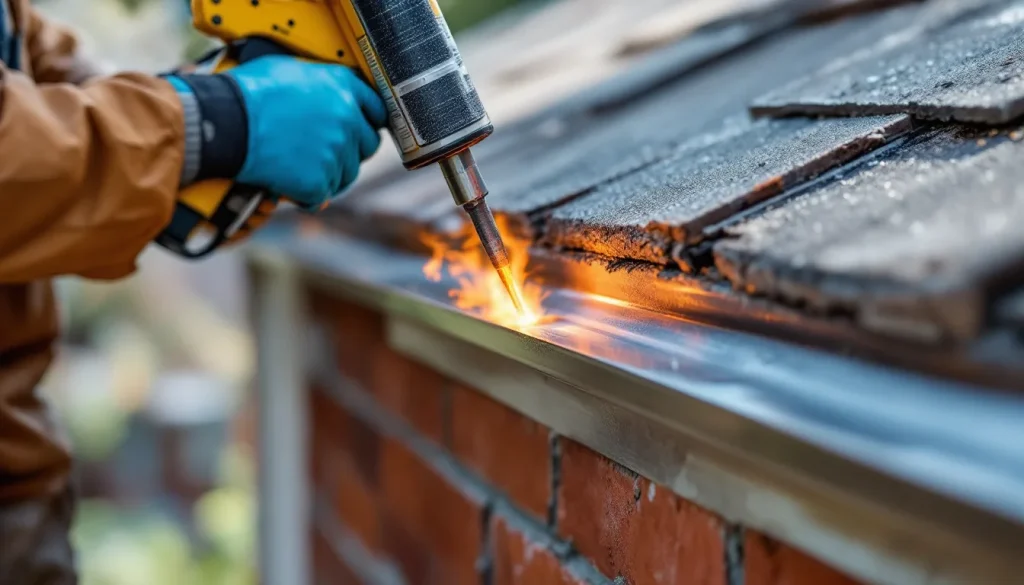
Surface-mount counter flashing is screwed or nailed directly onto the wall surface and sealed at the top with a continuous bead of high-grade sealant. There is no reglet cut. The flashing has a termination bar profile at the top (a Z-shape or hemmed J-shape) that catches sealant in a groove.
Surface-mount is faster, cheaper, and works on substrates where reglet cutting is impractical (EIFS, vinyl siding, fiber cement, some stucco). The tradeoff is sealant maintenance: the top-edge sealant is the only thing keeping water out, and it fails at 7 to 12 years. Reglet-mount with sealant inside the reglet typically goes 25 to 40 years before the sealant needs refresh, because the sealant is protected from UV and rain by the metal flange above it.
| Install method | Substrate | Lifespan | Sealant maintenance | Labor cost |
|---|---|---|---|---|
| Reglet-mount | Brick, block, stone, cast-in-place reglet | 30 to 50 yr | Every 25 to 40 yr (refresh in reglet) | Higher (cut required) |
| Two-piece reglet (receiver + flashing) | New masonry construction | 50 to 75 yr | Every 30 to 50 yr | Highest |
| Surface-mount with termination bar | Stucco, EIFS, fiber cement | 15 to 25 yr (limited by sealant) | Every 7 to 12 yr (top edge sealant refresh) | Lower |
| Saw-cut retrofit reglet | Existing brick, hard stucco | 25 to 40 yr | Every 20 to 30 yr | Medium |
Sizing chart
| Application | Reglet leg (top) | Face (exposed) | Hemmed return (bottom) | Gauge |
|---|---|---|---|---|
| Standard masonry chimney | 1 in | 3 to 4 in | 1/2 in hem | 26 ga galvanized or 0.025 in aluminum |
| Tall parapet wall | 1.5 in | 4 to 6 in | 1/2 in hem | 24 ga galvanized or 0.032 in aluminum |
| Stucco surface-mount | n/a (termination bar) | 4 to 5 in | 1/2 in hem | 26 ga galvanized or 0.025 in aluminum |
| Two-piece reglet (receiver + flashing) | 1.5 in receiver + 1 in flashing | 4 in | 1/2 in hem | 26 ga galvanized or 0.025 in aluminum |
| Premium copper on slate / cedar | 1 in | 4 to 5 in | 1/2 in hem | 16 oz copper |
| Steep slope / heavy snow | 1.5 in | 5 to 6 in | 1/2 in hem | 24 ga galvanized or 0.032 in aluminum |
The face dimension is what’s visible. On a chimney, 3 to 4 inches is enough to cover the step flashing wall leg with at least 1 inch of overlap. Going to 5 or 6 inches gains aesthetic visual weight and a little extra rain protection but increases material cost. The hemmed bottom return is non-negotiable: a hemmed (folded) bottom edge stops water from wicking up the back of the flashing by capillary action. Raw cut edges wick. Always hem.
Material comparison
| Material | Spec | Lifespan | Cost (per linear ft) | Best for | Watch out for |
|---|---|---|---|---|---|
| Galvanized steel | G-90, 26 ga | 30 to 40 yr | $3 to $5 | Standard residential, inland | White rust streaks on the wall; not for coastal |
| Aluminum | 3003-H14, 0.025 to 0.032 in | 40 to 60 yr | $4 to $7 | Coastal, standard residential | Avoid direct contact with copper or pressure-treated wood |
| Painted aluminum (Kynar 500) | 0.025 to 0.032 in, painted | 40 to 60 yr | $5 to $9 | Visible installations, color matching | Field-cut edges expose raw aluminum |
| Copper | 16 oz cold-rolled | 80 to 100+ yr | $12 to $18 | Premium residential, slate, cedar, heritage | Will stain stucco and painted siding below; never mix with steel or aluminum in contact |
| Lead-coated copper | 16 oz | 80 to 100+ yr | $18 to $24 | Heritage, no-staining premium | Cost; weight |
| Stainless steel | 304 inland / 316 coastal, 26 ga | 80+ yr | $10 to $15 | Coastal salt air, premium | Harder to bend in the field; cost |
For most residential chimneys, 26 gauge G-90 galvanized counter flashing on a masonry reglet is the right answer at $3 to $5 per linear foot. Coastal installations should jump to aluminum or stainless. Slate, cedar shake, and heritage installations should match copper roofing or copper step flashing with copper counter flashing. The mixed-metal galvanic corrosion rule is real: copper counter flashing over galvanized step flashing will accelerate corrosion of the galvanized below. Match metals or use a dielectric separator.
Install sequence (6 steps)
- Step 1: Confirm the step flashing or apron flashing is correctly installed first. Counter flashing is the second piece of a two-part system. Step flashing pieces should already be in place, one per shingle course, woven into the shingles, with 4-inch wall legs against the masonry. The wall legs should be straight, flat, and not wrinkled. Fix any step flashing issues before counter flashing goes on.
- Step 2: Cut the reglet (or prep the surface-mount line). For reglet-mount on existing brick: use a diamond-blade circular saw or a dedicated reglet cutter to cut a 1 to 1.5 inch deep slot horizontally, typically through a mortar joint at the right height to cover the step flashing wall leg by 1 to 2 inches. For new masonry, cast-in-place reglets or two-piece reglet receivers are set during bricklaying. For surface-mount on stucco or EIFS, mark a straight horizontal line on the wall 1 to 2 inches above the top of the step flashing wall leg.
- Step 3: Form (or order) the counter flashing pieces. Cut and bend the metal into a Z or J profile: top reglet leg (1 to 1.5 in), face (3 to 5 in), hemmed bottom return (1/2 in). For long runs, pieces are 10 ft stock; for short chimney faces, custom-bend to fit. Pre-formed counter flashing from suppliers like Berridge, Englert, Drexel Metals, and Petersen comes in stock profiles that match common situations.
- Step 4: Insert the top leg into the reglet (reglet method) or screw to the wall (surface-mount). For reglet: slide the bent top leg into the reglet slot. Use lead wedges (small folded lead pieces hammered into the reglet alongside the flange) or compatible stainless spring clips to hold the flange. Fill the rest of the reglet with high-grade polyurethane or modified silicone sealant. For surface-mount: screw a stainless or hot-dipped galvanized termination bar across the top of the flashing into the wall, then run a continuous bead of sealant along the top edge of the bar.
- Step 5: Lap pieces along long runs. Where counter flashing pieces meet end-to-end (long parapet walls, chimney faces wider than 10 ft), lap each piece over the next by 4 inches in the direction of water flow. Place a 1/2-inch bead of sealant between the laps but only at the lap, not the face. Pop-rivet or stitch-screw through the lap with stainless fasteners.
- Step 6: Cover corners with custom-formed pieces. Outside corners (chimney edges) and inside corners (where counter flashing meets another wall) need custom-formed corner pieces. Pre-formed corners are available; field-formed corners require a sheet metal brake and are typically the slowest part of the job. Avoid using sealant alone at corners; the geometry has to be metal.
Common failure modes
- Surface-mount installed where reglet was the right choice. A surface-mount counter flashing on a brick chimney is a 10-year fix at most. Brick wants a reglet. The job takes 20 extra minutes per chimney face but lasts 4x longer.
- Sealant on the face instead of in the reglet. The classic “I sealed it” failure: contractor runs a bead of caulk along the top edge of the surface-mount flashing exposed to direct rain and UV. It fails at 5 to 8 years. Sealant in a reglet, protected by the metal flange above, lasts 25 to 40 years.
- Counter flashing too short, doesn’t cover step flashing wall leg. If the counter flashing face is only 2 inches and the step flashing wall leg is 4 inches, there’s a 2-inch gap of exposed step flashing wall leg. Water tracks down that exposed leg behind the counter flashing.
- No hemmed bottom edge. A raw cut bottom edge wicks water up the back of the flashing by capillary action. Always hem the bottom 1/2 inch.
- Surface-mount sealant maintenance ignored. Surface-mount counter flashing relies on a continuous top-edge sealant bead. That sealant needs refresh every 7 to 12 years. Homeowners who don’t know to look for it discover the failure when interior wall stains appear.
- Galvanic corrosion from mixed metals. Copper counter flashing over galvanized step flashing, or aluminum counter flashing against copper. The less-noble metal corrodes accelerated. Match metals or use a dielectric separator (EPDM strip).
- Reglet cut through a structural brick course. Cutting a reglet through a load-bearing brick course can compromise the wall. Cut through mortar joints or just into the brick face, never deep into the brick.
- Reglet cut too low. A reglet cut below the top of the step flashing wall leg leaves the step flashing wall leg exposed above the counter flashing. Cut high enough to put the counter flashing bottom edge 1 to 2 inches below the top of the step flashing wall leg.
- No lap at piece joints. Counter flashing pieces butted edge-to-edge without overlap and sealed with caulk in the joint. The caulk fails in 5 to 7 years and water enters at the joint.
- Missing corner pieces. Chimney corners that wrap with a single bent piece work; corners cut with two flat pieces and a sealant joint at the corner fail at 5 to 10 years.
Cost
Counter flashing labor is most of the cost, not material. Cutting a reglet is the slow part.
- Counter flashing material: $3 to $7 per linear foot (galvanized or aluminum); $12 to $24 per linear foot (copper, stainless, lead-coated copper).
- Labor (reglet-mount on existing brick): $15 to $35 per linear foot, including reglet cut.
- Labor (surface-mount on stucco or EIFS): $10 to $20 per linear foot.
- Typical chimney counter flashing run (4 sides, 16 ft total): $250 to $600 installed.
- Wide masonry parapet (40 ft): $600 to $1,400 installed.
- Full chimney flashing system replacement (step + apron + counter + cricket): $800 to $2,500.
For broader chimney leak diagnosis, see our chimney flashing leak repair guide. For the downhill apron piece, see apron flashing install. For the bottom-of-the-wall piece that drops water into the gutter, see kickout flashing.
Sealant selection
Sealant in a counter flashing reglet has to handle: small substrate movement (mortar and metal expand differently), occasional water immersion (reglet fills with water in driving rain), and 25 to 40 years of UV exposure (when the reglet is open at the top). Three sealants meet that spec for residential work:
- Polyurethane (BASF Sonolastic NP1, Sika Sikaflex 1a, Tremco Dymonic 100): the contractor standard. 15 to 25 year lifespan, paintable, good UV resistance, ~$8 to $14 per tube.
- Modified silicone / silyl-terminated polyether (Geocel 2300, OSI Quad Max, NPC Solar Seal 900): longer lifespan (25 to 40 years), better adhesion to most substrates, ~$10 to $18 per tube.
- Pure silicone (Dow Corning 795, GE SilPruf, Sika Sikasil WS-295): longest lifespan (40+ years) but does not paint and does not bond to itself for re-application. ~$15 to $25 per tube. Best for premium long-life installs where painting is not needed.
Avoid acrylic latex caulk, butyl caulk, and asphalt-based roofing cement on counter flashing. All three fail in 5 to 10 years in this exposure.
Frequently asked questions
What is counter flashing on a roof?
Counter flashing is the upper piece of the two-part wall-junction flashing system. It covers the top edge of step flashing or apron flashing at vertical surfaces (chimneys, walls, parapets) so the step flashing wall leg is never exposed to direct water or UV.
What is the difference between step flashing and counter flashing?
Step flashing is the lower piece, installed one per shingle course where the roof meets a vertical wall. Counter flashing is the upper piece, tucked into a reglet or surface-mounted on the wall, that covers the wall leg of the step flashing. They work together; neither one alone is enough.
Do I need counter flashing on every roof?
Required at masonry walls, chimneys, and parapets. Not required at wood-sided walls where the siding itself overlaps the step flashing wall leg. On stucco walls, surface-mount counter flashing is the standard detail.
What is a reglet and why does it matter?
A reglet is a horizontal slot cut into a masonry wall to receive the top edge of counter flashing. The flashing’s bent top leg slides into the slot, gets held by lead wedges, and is sealed with sealant inside the slot. Reglet-mount counter flashing lasts 25 to 40 years before sealant refresh, versus 7 to 12 years for surface-mount with exposed top-edge sealant.
What material should counter flashing be?
Standard residential: 26 gauge G-90 galvanized or 0.025 to 0.032 in aluminum. Coastal: aluminum or 316 stainless. Premium / slate / cedar shake / heritage: 16 oz copper or lead-coated copper. Match the step flashing metal to avoid galvanic corrosion.
How long does counter flashing last?
Galvanized 30 to 40 years. Aluminum 40 to 60 years. Copper 80 to 100+ years. Stainless 80+ years. Surface-mount counter flashing lifespan is limited by the top-edge sealant (7 to 12 years for the sealant alone, requiring refresh).
Bottom line
Counter flashing is half of the two-part wall-junction detail that stops most chimney and wall-junction leaks. Reglet-mount is the durable answer on any masonry wall; surface-mount is the right answer on stucco, EIFS, and existing-wall retrofits where cutting a reglet isn’t practical. Spec 26 gauge galvanized or 0.025 in aluminum at minimum, copper or stainless for premium. Hem the bottom edge, lap face-to-face joints, and put sealant in the reglet only, never on the exposed face. The lower piece (step flashing) and the bottom termination (kickout flashing) complete the system that keeps the wall framing dry for the next 30 to 50 years.