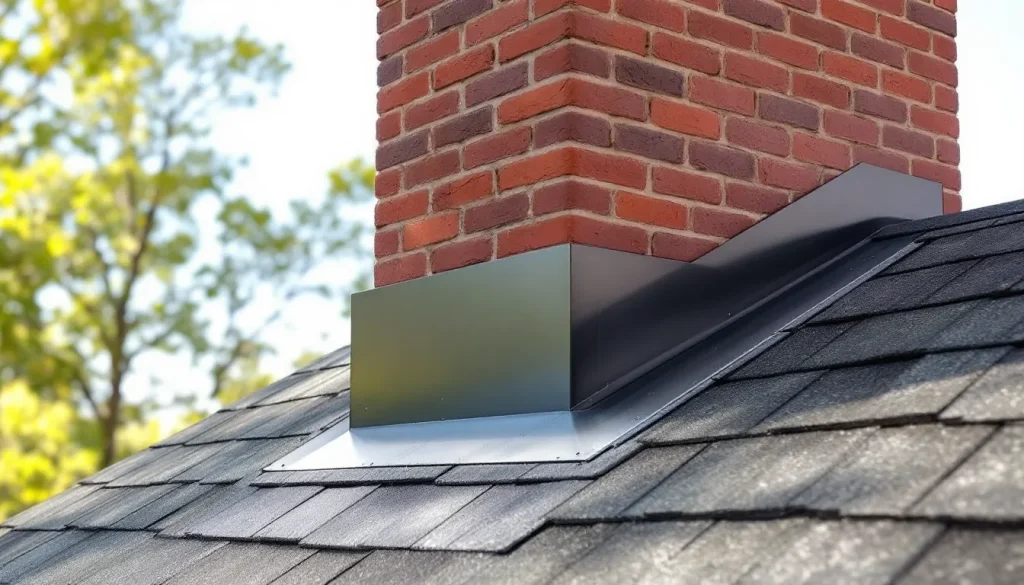
Apron flashing is the continuous L-shaped piece of sheet metal installed on the downhill (front) side of a chimney, dormer, or skylight where the roof meets a horizontal wall surface. Unlike step flashing (which is stepped, one piece per shingle course at sloped wall sides), apron flashing is a single continuous piece that runs the full width of the obstruction’s downhill face. The standard residential profile is a 4-inch vertical wall leg and a 6-inch horizontal roof leg, both extending 4 inches past each side of the chimney to integrate with the step flashing turning the corner. IRC R905.2.8 requires it at every downhill chimney face and skylight head; the broader NRCA detail specifies the geometry. Skip the apron, install it short, or rely on caulk to seal the wall leg, and you get the classic “chimney front leak” that shows up as a stain on the ceiling directly below the downhill face of the chimney.
The short version
- Apron flashing covers the downhill face of chimneys, dormers, and skylights.
- Standard size: 4-inch wall leg, 6-inch roof leg, extending 4 inches past each side of the obstruction.
- One continuous piece, not stepped. Step flashing handles the sides; apron flashing handles the front.
- Counter flashing covers the wall leg of the apron on masonry chimneys.
- Material: 26 ga galvanized or 0.025 to 0.032 in aluminum minimum. Copper 16 oz on premium.
- The roof leg must extend 6 inches onto the roof and tuck under the first shingle course above the chimney.
- Hem the bottom edge of the roof leg to stop capillary wicking under the shingle.
What apron flashing is and where it goes
Apron flashing solves the downhill side of any roof obstruction. Water running down the roof above hits the back (uphill) side of the obstruction, gets diverted around the sides by step flashing or a cricket, and rejoins on the downhill side. At the downhill face, water sheets off the obstruction and lands on the roof. Without apron flashing, that water runs against the unprotected wall-to-roof corner and goes under the shingles immediately downstream of the obstruction.
Apron flashing intercepts that water with a continuous metal piece. The wall leg goes up the downhill face of the obstruction. The roof leg sits on top of the roof underlayment and under the first shingle course downstream. Water hits the wall leg, sheds onto the roof leg, and runs onto the shingles below the apron just like the rest of the roof. The detail is sometimes called “head flashing” (a confusing name because the apron is on the downhill side, while step flashing handles the side conditions) or “front flashing.”
Apron flashing is one of three obstruction-related flashings: apron on the downhill, step flashing on the sides, and a chimney cricket or headwall flashing on the uphill side. For the full picture, see what is flashing on a roof.
Sizing chart
| Application | Wall leg (up) | Roof leg (out) | Side extension (each side) | Gauge / thickness |
|---|---|---|---|---|
| Standard chimney, 4/12 to 8/12 asphalt roof | 4 in | 6 in | 4 in past each side | 26 ga galvanized or 0.025 in aluminum |
| Steep pitch (9/12 to 12/12) | 5 in | 8 in | 4 in | 26 ga galvanized or 0.025 in aluminum |
| Very steep / heavy snow | 5 in | 10 in | 5 in | 24 ga galvanized or 0.032 in aluminum |
| Dormer face | 4 in | 6 in | 4 in | 26 ga galvanized or 0.025 in aluminum |
| Skylight head (downhill side) | 3 to 4 in (per skylight maker’s spec) | 6 in | Per manufacturer flashing kit | Per manufacturer kit |
| Cedar shake or slate roof | 5 in | 7 to 8 in | 5 in | 24 ga galvanized or 16 oz copper |
| Standing seam metal roof at chimney | 4 in | 6 to 8 in | 4 to 6 in | 24 ga matching panel material |
The 6-inch roof leg is the critical dimension. Anything shorter and water tracking down the wall leg can splash under the first shingle course downstream. Anything longer is wasted metal but harmless. The 4-inch side extension lets the apron tie into the bottom-most step flashing piece on each side with a 2-inch overlap, sealing the corner where most “chimney front leak” failures happen.
Material comparison
| Material | Spec | Lifespan | Cost (per chimney apron) | Best for | Watch out for |
|---|---|---|---|---|---|
| Galvanized steel | G-90, 26 ga | 30 to 40 yr | $25 to $50 | Standard residential, inland, asphalt shingle | White rust streaks on roof shingles; not for coastal |
| Aluminum | 3003-H14, 0.025 to 0.032 in | 40 to 60 yr | $30 to $65 | Coastal, standard residential | Avoid direct contact with copper or pressure-treated wood |
| Painted aluminum (Kynar 500) | 0.025 to 0.032 in | 40 to 60 yr | $40 to $85 | Visible installations, color matching to shingle | Field cuts expose unpainted edges |
| Copper | 16 oz cold-rolled | 80 to 100+ yr | $100 to $200 | Premium residential, slate, cedar shake, heritage | Will stain shingles and stucco below; never contact aluminum or steel |
| Lead-coated copper | 16 oz | 80 to 100+ yr | $160 to $260 | Heritage, no-staining premium | Cost; weight |
| Stainless steel | 304 inland / 316 coastal, 26 ga | 80+ yr | $80 to $150 | Coastal salt air, premium | Harder to bend in the field; cost |
For standard residential, 26 gauge G-90 galvanized or 0.025 to 0.032 in aluminum is the right answer at $25 to $65 per chimney. The cost gap to copper or stainless ($100+) is meaningful on a chimney count of 1 to 2 per house, but worth it on premium installs where the chimney crown and full chimney flashing system are getting copper anyway. Match the apron metal to the step flashing metal to avoid galvanic corrosion at the side overlaps.
Install sequence (6 steps)
- Step 1: Prep the substrate. Strip the roof deck on the downhill side of the chimney back to the deck. Run a strip of ice and water shield across the full chimney width, up the chimney face 6 inches and onto the deck 24 inches downstream. This is the secondary defense behind the apron flashing. Install the underlayment and field shingles up to the row immediately below where the apron will land. Stop shingles 4 inches short of the chimney face to leave room for the apron’s roof leg to lay on the deck/underlayment directly.
- Step 2: Cut and bend the apron flashing. Measure the chimney width plus 4 inches on each side (so a 30-inch-wide chimney gets a 38-inch apron flashing). Bend the metal into an L: 4-inch wall leg up, 6-inch roof leg out, with the bend angle matching the roof pitch (90 degrees plus the pitch angle, so on a 6/12 pitch the bend is about 117 degrees). Hem the bottom edge of the roof leg by 1/2 inch. Form 4-inch tabs at each end so the apron wraps the corners of the chimney by 4 inches on each side. Cut a relief at each end of the bend so the tab can fold around the chimney corner without tearing.
- Step 3: Set the apron on the chimney downhill face. Slide the apron flashing into place with the wall leg flat against the chimney face and the roof leg flat on the deck/ice and water shield. The 4-inch side tabs wrap the chimney corners. The roof leg should extend 6 inches downstream of the chimney face. Confirm the apron is straight, level (left-to-right), and seated tight against the chimney.
- Step 4: Nail the roof leg only, never the wall leg. Drive nails through the top edge of the roof leg only, near where it bends up to the chimney face. Two to four nails per apron, at the top of the roof leg where the next shingle course will cover them. Never nail through the wall leg; pinning the wall leg prevents the flashing from flexing with shingle and structure movement and creates leak paths.
- Step 5: Install the bottom-most step flashing pieces, lapping onto the apron’s side tabs. The first step flashing piece on each side of the chimney sits on top of the apron’s 4-inch side tab, overlapping it by 2 inches. The step flashing wall leg goes up the chimney side over the apron’s side tab where they meet at the corner. This is the most leak-prone corner on a chimney; get the overlap right and the leak path is closed. Continue installing step flashing up each side, one piece per shingle course, as described in our step flashing installation guide.
- Step 6: Install the next shingle course over the apron roof leg, then install counter flashing. The first shingle course downstream of the chimney lays on top of the apron flashing roof leg. The shingle covers the apron roof leg by at least 2 inches; the bottom of the shingle exposure sits at or below the bottom hem of the apron roof leg. After all shingles and step flashing are in place, install counter flashing down the downhill chimney face, covering the apron wall leg with a 1 to 2 inch lap. Counter flashing tucks into a reglet cut into the chimney brick or is surface-mounted on stucco.
Common failure modes
- Roof leg too short (3 to 4 inches). Apron flashing with a 4-inch roof leg can’t cover the first shingle course tab. Water tracking down the wall leg splashes under the first shingle. The 6-inch roof leg is non-negotiable.
- Side tabs too short or missing. An apron flashing that ends flush with the chimney corners (no side tabs) leaves the most leak-prone corner unsealed. Step flashing has nothing to lap onto. Caulk fills the gap for 2 to 5 years, then fails.
- Apron nailed through the wall leg. Pinning the wall leg prevents flex and creates leak paths at every nail head. Always nail the roof leg only.
- No counter flashing over the apron wall leg. Exposed apron wall leg is vulnerable to direct rain, UV, and water tracking down the chimney face. Counter flashing covers it; without it, the apron wall leg fails at the top edge in 10 to 20 years.
- Apron wall leg sealed to chimney with caulk only. Polyurethane or silicone caulk holding the apron wall leg to the chimney face is a 7-to-10-year fix at most. Counter flashing with sealant in a reglet is the durable detail.
- No ice and water shield behind the apron. Without ice and water shield on the deck behind the apron flashing, ice dams and wind-driven rain can push water under the apron and into the deck. Code requires it at all penetrations in cold climates (IRC R905.1.2).
- Bottom of roof leg not hemmed. A raw cut bottom edge wicks water by capillary action under the first shingle course downstream. Hem the bottom 1/2 inch.
- Apron material aluminum, step flashing galvanized (mixed metals). The lap at the chimney corner puts aluminum in contact with galvanized steel in a wet environment. Galvanic corrosion accelerates failure of both. Match metals.
- Apron installed before ice and water shield. Putting the apron’s roof leg under the underlayment instead of on top of it traps water against the deck behind the flashing. The apron should sit on top of ice and water shield on the deck.
- No cricket on the uphill side of wide chimneys. Apron flashing on the downhill side is half the chimney detail. Wide chimneys (over 30 inches across) also need a cricket on the uphill side to divert water around the chimney; without it, water dams behind the chimney and overwhelms the apron downstream.
Cost
Apron flashing material is cheap. The cost driver is labor and access to the chimney.
- Apron material: $25 to $65 per chimney (galvanized or aluminum); $100 to $200 (copper); $80 to $150 (stainless).
- Labor (new install during a full reroof): typically included in the per-square shingle price.
- Labor (retrofit on existing roof, replacing failed apron only): $400 to $1,200 per chimney.
- Replacement of full chimney apron during a leak repair (apron + side step + counter): $600 to $1,800 per chimney.
- Full chimney flashing system replacement (apron + step + counter + cricket + crown sealant): $1,200 to $3,500 per chimney depending on chimney size and access.
For the broader chimney leak diagnosis, see chimney flashing leak repair. For skylight head flashing (a close cousin of apron flashing), see skylight leak repair. For dormer-specific details that include apron flashing in the front-face condition, the broader roof flashing guide covers the integration.
How apron differs from headwall flashing
Apron flashing and headwall flashing are sometimes used interchangeably. Apron flashing sits on the downhill face of an obstruction (chimney, dormer front, skylight head). Headwall flashing sits at the top of a roof where the slope dies into a vertical wall (the roof slope ends, the wall continues up). The geometry is similar (continuous L-piece) but the relationship to water flow is opposite. On apron, water sheds off the obstruction onto the roof. On headwall, water sheds off the roof against the wall and the headwall flashing keeps it from going behind the wall.
The dimensional spec is the same: 4-inch wall leg, 6-inch roof leg, hemmed bottom. The integration is opposite: apron’s roof leg lays on top of the underlayment with shingles above lapping over it; headwall’s roof leg lays on top of the shingles below with the wall covering above. Most apron-flashing failures (short roof leg, missing side tabs, no counter flashing) repeat exactly on headwall installations.
Code references
IRC R905.2.8 requires flashing at all roof-to-vertical-surface transitions on asphalt shingle roofs. IRC R905.2.8.5 specifies sidewall (step) flashing requirements; headwall and apron conditions are covered by the broader R905.2.8 language. NRCA Roofing Manual: Steep-Slope Roofing details the recommended apron flashing geometry (4-in wall leg, 6-in roof leg, side tabs extending past the obstruction). Most major asphalt shingle manufacturer warranties (GAF, Owens Corning, CertainTeed, IKO) require apron flashing at downhill obstruction faces or void the warranty.
Frequently asked questions
What is apron flashing on a roof?
Apron flashing is a continuous L-shaped piece of sheet metal installed on the downhill face of a chimney, dormer, or skylight where the roof meets the obstruction’s vertical wall. The standard profile is a 4-inch wall leg, 6-inch roof leg, with 4-inch tabs extending past each side of the obstruction to integrate with step flashing.
What size apron flashing should I use?
Standard residential: 4-inch wall leg, 6-inch roof leg, 4-inch side tabs. Steep pitches and heavy snow regions: 5 in wall leg, 8 to 10 in roof leg, 5 in side tabs. Skylights typically use the manufacturer’s flashing kit which specifies dimensions.
What is the difference between apron flashing and step flashing?
Apron flashing is one continuous piece installed on the downhill (front) side of an obstruction. Step flashing is one piece per shingle course, installed on the sloped sides of an obstruction. They meet at the chimney corners with a 2 to 4 inch overlap; one alone is not enough.
Do I need apron flashing on a skylight?
Yes. Most skylight manufacturer flashing kits include an apron-style head flashing piece for the downhill side. Velux, Fakro, and other major skylight makers provide model-specific kits; using the kit (not generic apron flashing) is required to maintain the skylight warranty.
What material should apron flashing be?
Standard residential: 26 gauge G-90 galvanized or 0.025 to 0.032 in aluminum. Coastal: aluminum or 316 stainless. Premium / slate / cedar shake: 16 oz copper. Match the step flashing metal at the chimney corners to avoid galvanic corrosion.
How long does apron flashing last?
Galvanized 30 to 40 years. Aluminum 40 to 60 years. Copper 80 to 100+ years. Stainless 80+ years. Apron flashing typically outlasts the shingles when installed correctly with counter flashing covering the wall leg.
Bottom line
Apron flashing is the downhill-face piece of the chimney, dormer, and skylight flashing system. Spec the standard 4-in wall leg, 6-in roof leg, 4-in side tabs, in 26 gauge galvanized or 0.025 in aluminum for standard residential or copper for premium. Bend it before install, set it on top of ice and water shield over the deck, nail the roof leg only, lap step flashing onto the side tabs with 2 inches of overlap, and cover the wall leg with counter flashing. Do all of that and the “chimney front leak” that plagues most aging residential roofs essentially doesn’t happen.