A chimney (see our chimney flashing installation detail) flashing leak is one of the most common sources of interior water damage on a residential roof, and the repair cost in 2026 runs from $400 for a straightforward re-bed and seal up to $2,500 for a full counter-flashing rebuild with new step flashing and a chimney cricket. The wide spread tracks six distinct failure modes that look identical from the ground but require very different fixes. Most chimney leaks are not actually a flashing-metal failure. They are a sealant failure at the reglet joint, a cracked masonry crown above the flashing, or a missing cricket on the uphill side. Diagnose the failure mode first, then price the repair.
The short version
- The six failure modes: dried sealant at reglet, cracked mortar reglet joint, missing counter flashing, separated step flashing, masonry crack above flashing, missing cricket on uphill side.
- Repair cost ranges $400 to $2,500 depending on which mode and whether masonry work is needed.
- Sealant-only repairs last 5 to 8 years. Properly bedded reglet counter flashing lasts 25 to 40 years.
- A chimney wider than 30 inches on the uphill side requires a cricket per IRC 2024. No cricket means recurring leaks no matter how well the flashing is done.
- Most pros over-bid by including replacement when only re-bedding is needed. Get the diagnosis before you get the quote.
- The single biggest red flag: a roofer wants to seal the leak with caulk from above. That is a 2-year fix on a 25-year problem.
The six ways a chimney flashing leaks
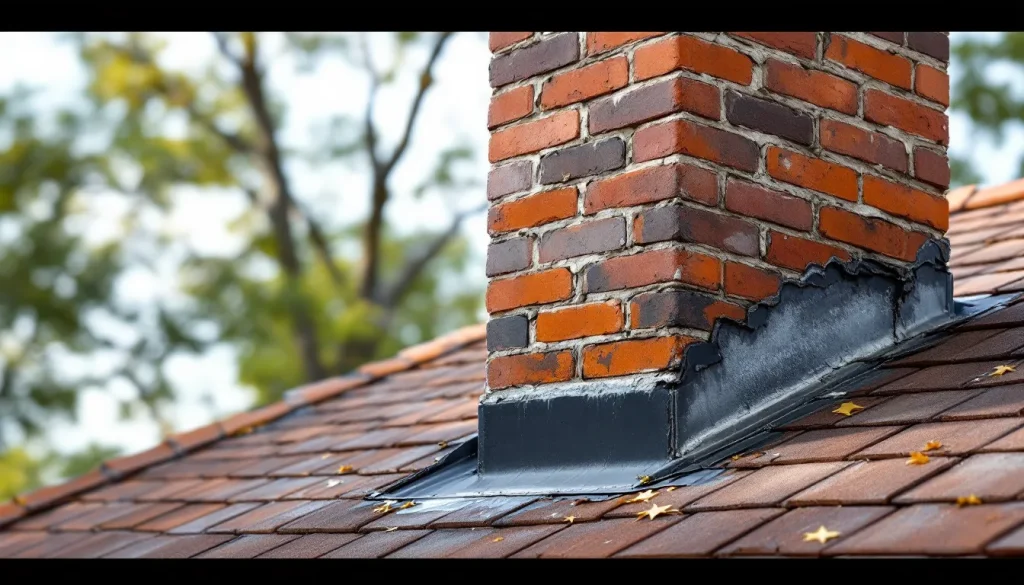
Chimney flashing is a two-piece system. Step flashing (also called base flashing) sits under the shingles and turns up onto the side of the chimney. Counter flashing (also called cap flashing) is bedded into a saw-cut groove in the masonry called a reglet, then folds down over the step flashing to shed water away from the joint. Both pieces are needed. When step flashing alone is installed and the top edge is just caulked to the brick, the assembly will leak within 5 to 10 years. That is the most common mistake on chimney work done by general contractors instead of roofers. For the full mechanics of how the two pieces interlock, see our guides on step flashing installation and counter flashing.
Mode 1: dried polyurethane or butyl sealant at the reglet
Modern counter flashing is bedded into the reglet with polyurethane sealant. Polyurethane has a service life of 10 to 20 years in vertical applications and shorter in horizontal exposure. When it dries out, hairline gaps form between the sealant bead and the metal flange, and capillary action pulls water in. This is the most common chimney leak mode and the cheapest to fix: rake out the old sealant, clean the reglet, reapply new polyurethane. Cost: $400 to $700.
Mode 2: cracked mortar at the reglet joint
On older chimneys (1950s through 1980s), counter flashing was often bedded into the mortar joint between brick courses rather than a saw-cut reglet, and held in place with lead wedges and mortar. When the mortar deteriorates, the entire counter-flashing flange loses its grip and water drives behind it. Tuckpointing alone will not fix this. The flashing has to come out, the joint has to be raked deeper, and new flashing has to be re-set with fresh mortar and sealant. Cost: $700 to $1,400 depending on chimney size.
Mode 3: missing counter flashing entirely
If you see step flashing turned up against the brick with a heavy bead of caulk sealing the top edge to the masonry, you have no counter flashing. This is the classic general-contractor or DIY job. It will leak within 5 to 10 years and there is no patch fix. The masonry has to be saw-cut for a proper reglet, new counter flashing has to be fabricated and bedded, and the step flashing usually has to come up too because the shingles are also wrong. Cost: $1,200 to $2,500.
Mode 4: separated or rusted step flashing
Step flashing is one bent piece of metal per shingle course. When one of those pieces rusts through, slips out of position, or was never lapped correctly over the piece below, water bypasses the system entirely. You will not see this from the ground. A roofer has to pull shingles back along the chimney sidewall to inspect. If the original step flashing was galvanized steel and the roof is over 20 years old, expect rust holes. Replacement step flashing should be aluminum or copper. Cost: $600 to $1,500 depending on how many courses need to come up.
Mode 5: masonry crack above the flashing line
If the flashing is intact and the leak still shows up after rain, the water is entering through the chimney itself. Common entry points: a cracked crown (the concrete cap on top of the chimney), spalled brick faces, deteriorated mortar joints in the field of the chimney, or a missing or damaged chimney cap. None of these are flashing problems. The chimney needs a mason, not a roofer. Crown repair runs $300 to $800. Tuckpointing runs $10 to $25 per square foot of chimney face. Crown replacement runs $1,000 to $2,500.
Mode 6: missing cricket on the uphill side
IRC 2024 Section R1003.20 requires a cricket (also called a saddle) on any chimney wider than 30 inches measured on the uphill side. The cricket is a framed peak that diverts water around the chimney instead of letting it pool against the uphill face. Without it, water and debris collect behind the chimney every storm, and even perfect flashing will eventually fail. If your chimney is wider than 30 inches and you do not have a cricket, you are going to have recurring leaks. The fix is to build one. See our chimney cricket install guide for the construction detail. Cost: $800 to $1,800 added to the flashing repair.
Chimney flashing leak repair cost by mode (2026)
| Failure mode | What gets done | Cost | Expected service life |
|---|---|---|---|
| Dried sealant at reglet | Rake out, clean, reseal with poly | $400-$700 | 10-20 years |
| Cracked mortar reglet | Remove flashing, deepen joint, re-bed | $700-$1,400 | 25-40 years |
| Missing counter flashing | Saw-cut reglet, fabricate, install | $1,200-$2,500 | 25-40 years |
| Separated/rusted step flashing | Pull shingles, replace step flashing | $600-$1,500 | 25-40 years |
| Masonry crack/crown failure | Mason: tuckpoint, crown repair | $300-$2,500 | 20-30 years |
| Add chimney cricket | Frame, sheath, ice and water, flash | $800-$1,800 | 25-40 years |
How to diagnose the leak yourself before calling a pro
Walking through these five steps before you call gives you something concrete to describe and prevents a $300 service call that ends with the roofer recommending the most expensive fix. None of them require going on the roof.
Step 1: confirm the leak is actually the chimney
Water travels along framing members before it shows up on a ceiling. A stain near the chimney is not proof the chimney is the source. Look first at any roof penetrations within 6 feet uphill: skylights, vent pipes, satellite mounts. A leaking skylight or vent pipe boot uphill will run down a rafter and exit at the next penetration, which is often the chimney chase. See our water stain on ceiling guide for tracing leak paths.
Step 2: attic inspection in daylight
Go into the attic on a sunny day with a flashlight. Look at the framing around the chimney chase. Dark stains, white mineral deposits, or rotted wood tell you the leak is active and recurring. Note where the staining is concentrated: uphill side means missing cricket or step flashing on the upper rake, downhill side means apron flashing failure, sidewall means step or counter flashing failure.
Step 3: sunny-day hose test
Have a helper inside the attic with a flashlight while you spray the roof with a garden hose. Start at the downhill apron and work your way up, 5 minutes per zone. When the helper reports water inside, you have found the source. Spray the brick face above the flashing line last. If water shows up only when you spray the brick, the chimney itself is the source, not the flashing.
Step 4: photo documentation
From a ladder at the gutter line, photograph the chimney from multiple angles. Get close-ups of the reglet line, the step flashing courses, the crown, the cap. Send these photos to two or three roofers. A reputable roofer will diagnose from photos and tell you what mode the leak is before they show up.
Step 5: pull permit history
If the roof was replaced in the last 10 years, the chimney flashing was probably touched. Permits will tell you if it was a full reflash or a tie-in. Most municipalities have online permit lookups now. If the roof was reflashed under warranty by the original roofer, the repair may be covered.
Why most “caulk fix” repairs fail within 2 years
The cheapest fix a roofer can offer is to climb the roof with a tube of urethane caulk and trowel a heavy bead over the entire flashing line. It looks like a repair. It is not. The caulk seals the symptom (visible gaps) without addressing the cause (failed reglet, missing cricket, separated step flashing). Polyurethane caulk in horizontal exposure to UV and freeze-thaw has a 2 to 5 year service life when not properly bedded. The roofer who quoted you $250 to “seal the chimney” will be back in 2 years. The roofer who quoted you $1,400 to rebuild the counter flashing will not. For more on getting honest quotes, see our guide on questions to ask a roofing contractor.
Real product specs for chimney flashing
The metal you use matters as much as the install detail. Five materials see field use:
Aluminum
The default for residential reflash work. 0.024 to 0.040 inch thickness. Inexpensive, easy to bend on site, will not rust. Service life 25 to 40 years. Do not use aluminum in direct contact with treated lumber or copper (galvanic corrosion). Common brand: Amerimax stock coil.
Copper
The premium choice. 16 oz weight (0.0216 inch) for residential. Develops a verdigris patina but never corrodes through. Service life 75+ years, often outlasting the roof itself. Cost is roughly triple aluminum. Worth it on architectural homes where the chimney is visible. Common suppliers: Berridge custom fabrication, Englert custom flashings, Revere Copper Products.
Pre-formed flashing kits
Lifetime Tool makes a pre-formed chimney flashing kit that ships as stamped pieces sized to common chimney widths. The advantage is consistent geometry and a properly hemmed top edge for the reglet. The disadvantage is that masonry chimneys are rarely perfectly square, so on-site adjustment is still needed. Cost: $180 to $400 per kit depending on chimney size.
Lead
Standard in the UK and on historic restorations in the US. Excellent malleability and service life. Largely phased out in new US residential work due to handling concerns. Code 4 lead (1.8 mm) is the residential standard.
Galvanized steel
Original equipment on most 1960s through 1980s homes. Rusts through at 25 to 40 years. If you see galvanized step flashing on a home over 20 years old, plan on full replacement at the next roof.
When to call a roofer vs a mason vs both
This is the call most homeowners get wrong. The chimney is a roof penetration but it is also a masonry structure, and the failure can be in either system or both.
Call a roofer when
- Flashing is visibly separated, rusted, or missing
- The reglet sealant is dried and pulling away
- Step flashing is exposed because shingles have lifted (also see shingles blowing off)
- The chimney is wider than 30 inches uphill and has no cricket
- The leak is at the chimney base, not the chimney face
Call a mason when
- The crown is cracked or spalled
- Mortar joints in the chimney field are recessed or missing
- Brick faces are spalling (face popping off)
- The leak appears only when wind-driven rain hits the chimney from a specific direction
- There is no chimney cap
Call both when
- You have a 50+ year old chimney with original flashing
- You are reroofing and the chimney is in poor condition
- The crown needs replacement and the flashing needs replacement (sequence: mason first, then roofer)
What a proper chimney flashing rebuild looks like
If you are quoted a full reflash, here is the sequence a competent roofer will follow. Watch for shortcuts.
- Pull shingles back along all four sides of the chimney, exposing the deck and old step flashing.
- Remove old step and counter flashing. Inspect the deck for rot. Replace any soft sheathing.
- Install ice and water shield membrane in a 12-inch band around all four sides of the chimney, lapping onto the brick at least 4 inches.
- If a cricket is needed and not present, frame and sheath the cricket now. Membrane the cricket fully.
- Install an apron flashing across the downhill face, hemmed at the front edge to stop capillary action.
- Install step flashing one piece per shingle course up both sidewalls, each piece lapped 2 inches over the piece below, nailed only to the deck and only on the high side.
- Install a head flashing across the uphill face (or top of cricket), running up under the shingles above.
- Saw-cut a reglet groove into the masonry at least 1.5 inches deep, level and continuous around all four sides.
- Fabricate counter flashing in segments with hemmed lower edges and tabs that fold into the reglet at 1.5 inches.
- Bed counter flashing into the reglet with polyurethane sealant, tab the lower hem over the step flashing.
- Replace and seal shingles using sealed laps and proper offsets.
If your roofer skips the reglet cut and just turns counter flashing up against the brick face, the job is wrong. If they reuse old step flashing instead of replacing it, the job is wrong. If they hand the chimney to a “trim and caulk” subcontractor, the job is wrong.
Insurance and chimney flashing leaks
Homeowner insurance covers sudden and accidental water damage from a roof leak but generally does not cover the cost of repairing the flashing itself, which is considered maintenance. The exception: storm damage. If a windstorm or hailstorm physically damages the flashing or the chimney, the repair is covered. Document the storm with NOAA records (date, wind speed, hail size) and photograph the damage before any repair. See our filing an insurance claim for roof damage guide for the full claim sequence. For chimney leaks discovered during routine inspection without an associated storm event, the repair is on you.
How to prevent the next chimney leak
Once the flashing is rebuilt correctly, the goal is to keep it that way. Three habits extend service life by a decade or more.
Annual visual inspection
Every spring, look at the chimney from the ground with binoculars. Photograph the reglet line, the cap, and the crown. Compare year over year. Cracks, gaps, or rust streaks are early warning. The 30-point roof inspection checklist covers what to look for.
Crown sealer every 5 to 7 years
Brushable masonry crown sealers (ChimneySaver CrownCoat, Saver Systems CrownSeal) bond to the concrete and seal hairline cracks. Apply every 5 to 7 years. This costs under $50 in materials and prevents the most expensive crown failure mode.
Keep the cap in place
A chimney without a cap takes in water, snow, leaves, and small animals. A stainless steel cap costs $40 to $150 and pays for itself the first year. Caps lift off in storms. Replace any that are missing or visibly tilted.
FAQ
How do I know if my chimney needs a cricket?
Measure the chimney width on the uphill side, parallel to the ridge. If it is more than 30 inches, IRC 2024 requires a cricket. Older codes (IRC 2018 and earlier) used the same threshold. If your chimney is wider than 30 inches and lacks a cricket, you will have recurring uphill-face leaks no matter how good the flashing is.
Can I repair chimney flashing myself?
Sealant replacement at an existing reglet is a reasonable DIY job if you are comfortable on the roof and the existing flashing is sound. Anything that involves saw-cutting masonry, fabricating sheet metal, or pulling shingles is pro work. The risk of doing it wrong (and creating a worse leak) is too high.
Why does the leak only show up sometimes?
Chimney flashing leaks are usually wind-driven. They only show up when rain hits the failed area at the right angle and intensity. Light rain rarely drives water past a partial failure. A 30 mph wind from the right direction will. That is why a sunny-day hose test from multiple angles is so useful for diagnosis.
How long should a chimney flashing repair last?
A sealant-only repair lasts 5 to 10 years. A re-bedded reglet with new polyurethane lasts 15 to 25 years. A full reflash with new step and counter flashing properly bedded into a saw-cut reglet should last 25 to 40 years, matching the life of a quality shingle roof.
Is it worth replacing the chimney flashing during a reroof?
Almost always yes. Labor and access are already on site. The incremental cost of replacing chimney flashing during a reroof is $400 to $1,200 versus $800 to $2,500 as a stand-alone call. A reroofing quote that does not include chimney reflash should raise questions, and you should not accept a job where the existing flashing will just be reused.
Bottom line
A chimney flashing leak is six different problems wearing the same costume. Before you accept a quote, force the diagnosis. Walk through attic and hose tests. Photograph the chimney from a ladder. Ask the roofer which of the six modes they think it is and why. If the answer is “we will just seal it up,” find a different roofer. The correct fix at $1,200 buys you 25 to 40 years. The shortcut at $300 buys you 2. For a broader view of flashing on the rest of the roof, see roof flashing and roof flashing repair. If the chimney itself is failing alongside the flashing, expect to coordinate a mason and a roofer on the same project.