Valley flashing details break down into three competing methods: open-metal valleys (a continuous strip of pre-formed valley metal exposed in the center, shingles trimmed back on each side), woven valleys (field shingles interlaced from both planes across the valley), and closed-cut valleys (shingles from one plane run across, shingles from the other plane cut along a chalk line 2 inches off center). All three are code-legal under IRC R905.2.8.2. They differ in cost, lifespan, water capacity, and what kind of inspector flag they generate when they fail. Open-metal lasts longest and handles the most water, woven is fastest but is failing inspectors more often in 2026, and closed-cut is the residential default because it splits the difference.
The short version
- Open-metal valleys (pre-formed valley metal in copper, painted steel, or aluminum) carry the most water and last the longest. The visible standard on premium roofs.
- Woven valleys interlace shingles from both planes. Fastest install but failing inspections in 2026 because of mat-cracking at the fold.
- Closed-cut valleys are the residential default. Less material than open-metal, more durable than woven, easier to install correctly than either.
- Ice and water shield is mandatory in every valley under IRC: minimum 36 inches wide, centered on the valley line, full length from eave to ridge.
- The single biggest valley failure mode is inadequate underlayment, not the flashing method. Get the membrane right and most valleys outlast the field shingles.
- Open-metal in copper or galvalume lasts 50+ years. Painted steel lasts 30 to 40. Aluminum lasts 25 to 30. Match metal life to field shingle life or you’ll be redoing the valley before the roof.
The short answer: pick the method, then build the stack
Valleys are where two roof planes meet at an internal angle and concentrate water flow. A 24-foot valley on a typical hip roof carries roughly four times the water volume of an equivalent field section during a heavy rain. That concentrated flow drives every failure mode in valley design: granule erosion, ice damming, wind-driven water under shingles, and shingle mat fatigue at the fold line. The three valley methods (open-metal, woven, closed-cut) each address that concentrated flow differently. The underlayment stack below the visible surface is identical and is what actually keeps water out of the deck.
The three valley methods compared
| Method | What it looks like | Install time per valley | Material cost | Typical lifespan | Best for |
|---|---|---|---|---|---|
| Open-metal | Visible 5 to 8 inch strip of metal down the center | 2 to 3 hours | $8 to $16 per linear foot | 40 to 50+ years | Premium installs, heavy snow, slate or designer shingle |
| Woven | Shingles interlaced, no visible metal | 30 to 60 minutes | Field shingle only | 15 to 20 years | Budget reroofs, 3-tab installs, low-pitch |
| Closed-cut | Single straight cut line, no visible metal | 1 to 2 hours | Field shingle plus underlayment | 20 to 30 years | Residential default for architectural shingles |
Costs assume a typical 16-foot valley on a 6:12 pitch. Lifespan is for the valley specifically (the field shingles around it may outlast or underperform the valley depending on climate and underlayment).
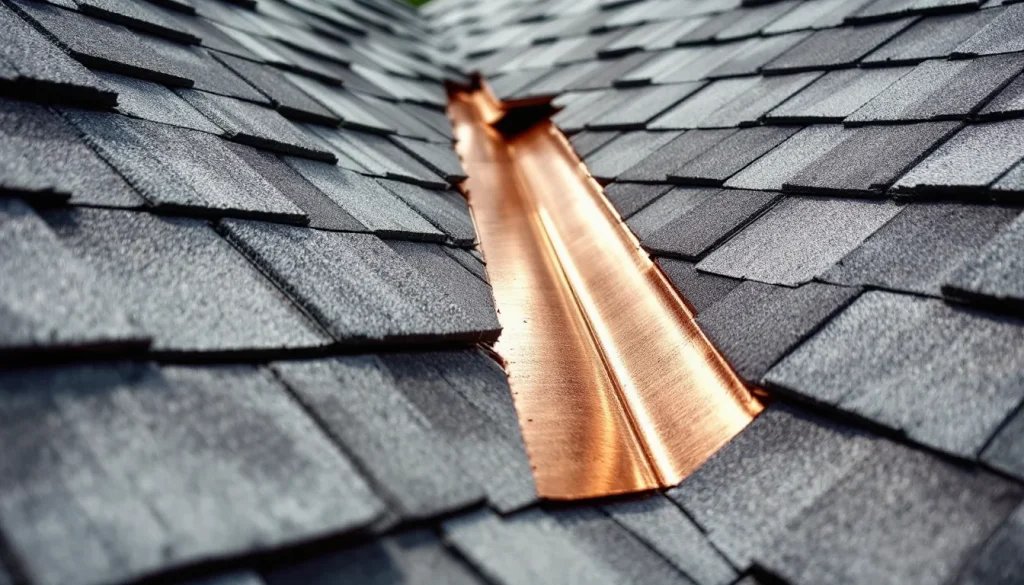
Open-metal valleys
Open-metal is the original residential valley method and still the standard on premium and commercial installs. A pre-formed valley pan (typically 24 to 26 gauge painted steel, 16 oz copper, or galvalume) runs the length of the valley with a center crimp that channels water to the eave. Field shingles are trimmed back to leave a 5 to 8 inch exposed strip of metal in the center. The metal does the heavy lifting on water transport.
The pre-formed valley metal options
- Painted galvanized steel (24 to 26 gauge). The mainstream residential option. 30 to 40 year lifespan. Available from MBCI, Berridge, Englert, and most metal supply yards in 5, 10, and 20 foot lengths. $4 to $9 per linear foot.
- Galvalume steel. Same gauge, longer corrosion warranty. 35 to 45 year lifespan. Slightly more expensive ($6 to $12 per linear foot).
- 16 oz copper. The historical standard. 75+ year lifespan. Develops a patina that homeowners either love or hate. $18 to $30 per linear foot.
- Aluminum (.032 to .040 inch). Lightweight, cheaper. 25 to 30 year lifespan. Less rigid; can ripple between fasteners on long valleys.
Open-metal install sequence
- Strip the valley clear and install ice and water shield the full length, minimum 36 inches wide centered on the valley line. Two strips overlapping at center is better than one wide strip.
- Run a second course of underlayment (synthetic or 30 lb felt) over the ice and water shield, extending past the membrane edges by at least 6 inches.
- Roll out the pre-formed valley metal, centering the crimp on the valley line. Splice longer runs with a 6-inch overlap and bed each splice in roof cement.
- Fasten the metal with cleats or clips along the edges. Do not nail through the metal field. Cleats allow thermal expansion. Two cleats per linear foot on each side.
- Snap chalk lines 3 inches off center on each side. This is where the shingles will be trimmed.
- Run field shingles across the valley toward the chalk line. Trim each shingle along the chalk line with a utility knife at the time of install, not after.
- Bed the cut shingle edge in a 1-inch wide bead of roof cement (ASTM D4586). The cement is non-negotiable; without it, wind-driven water tracks under the cut edge and reaches the underlayment.
- Optional: clip the upper corner of each cut shingle at a 45-degree angle to deflect water back toward the center of the valley.
The 3-inch chalk line offset gives a 6-inch wide exposed metal strip. On steep roofs (above 8:12) where water flow is fast, the offset can be reduced to 2 inches for a 4-inch strip. On low-slope roofs (below 4:12) the offset must be 4 inches or more for an 8-inch wide channel.
The clipped-corner detail
Pros clip the upper outer corner of each shingle along the cut at a 45-degree angle, roughly 1 inch in each direction. This small clip diverts any water that tracks down the cut shingle edge back toward the center of the valley instead of letting it run along the cut line and back under the shingles above. It takes 5 extra seconds per shingle and prevents the most common open-metal failure mode.
Woven valleys
Woven valleys are the fastest method. Field shingles from both roof planes are interlaced across the valley: a shingle from the left plane, then a shingle from the right plane, then a shingle from the left plane, weaving up the valley. No metal is visible, no cutting is required, and the install time is roughly 30 to 60 minutes per valley.
Woven valleys are also failing inspections more often in 2026 because the asphalt mat in mid-tier and premium architectural shingles is stiffer than the old 3-tab shingles for which woven was designed. Bending an architectural shingle across the valley fold causes microcracks in the mat that telegraph into leaks within 10 to 15 years.
When woven still makes sense
- 3-tab field shingles (the original design intent)
- Low-pitch valleys (4:12 to 6:12) where water flow is gentler
- Warm climates with no freeze-thaw stress on the fold
- Budget reroofs where the labor savings matter
Why pros are walking away from woven
- Most architectural shingle manufacturers (GAF, OC, CertainTeed) recommend closed-cut or open-metal in their install guides, not woven
- The mat crack at the fold line is invisible until it leaks
- Replacing a woven valley requires tearing into both roof planes, not just one
- Insurance adjusters increasingly flag woven valleys as installation defects on hail claims
Closed-cut valleys
Closed-cut is the residential default for architectural shingle installs in 2026. The sequence: shingles from one roof plane run uncut across the valley center; shingles from the other plane stop 2 inches short of the valley center along a chalk line. No metal is visible. No shingle is folded across the valley center.
Which plane gets the uncut shingles
The “under” plane (uncut shingles running across the valley) should be the plane with less water flow. On unequal-pitch valleys (the most common case), that’s typically the steeper plane because water sheds faster. On equal-pitch valleys, the choice is aesthetic; most pros run the more visible plane uncut so the cut line falls on the less-seen side.
Closed-cut install sequence
- Install ice and water shield 36 inches wide centered on the valley line, full length.
- Install second course of underlayment (synthetic or 30 lb felt) over the membrane.
- Run shingles on the under plane across the valley, extending at least 12 inches onto the opposite plane. Do not nail within 6 inches of the valley centerline.
- Snap a chalk line 2 inches off the valley center on the cut plane side.
- Run shingles on the cut plane up to the chalk line, trimming each as installed.
- Clip the upper outer corner of each cut shingle at a 45-degree angle to deflect water back to center.
- Bed the cut edge in a continuous bead of roof cement.
The nail-free zone
No nails within 6 inches of the valley centerline. Nails in the valley flow path are direct leak paths because water collects around the nail head and shank. This applies to both planes regardless of cut or uncut. The shingle laps and the cement bead hold the shingles down within the no-nail zone.
Underlayment stack: where most valley leaks come from
The visible flashing method (open-metal, woven, closed-cut) is what inspectors and homeowners see. The underlayment stack is what actually keeps water out of the deck. A leaking valley almost always traces to the underlayment, not the surface method.
The 2026 minimum underlayment stack
| Layer | Spec | Width | Coverage |
|---|---|---|---|
| Deck | 7/16 inch OSB or 1/2 inch plywood minimum | n/a | n/a |
| Ice and water shield | ASTM D1970 self-adhering membrane | 36 inches minimum | Full valley length, eave to ridge |
| Underlayment (felt or synthetic) | 15 or 30 lb felt, or synthetic per ASTM D8257 | 36+ inches | Full valley length, extending 6+ inches past membrane edges |
| Valley metal (open-metal only) | Pre-formed pan, 24 to 26 gauge or 16 oz copper | 20 inches typical | Full valley length, splice every 10 to 20 feet |
| Field shingles | Per manufacturer install instructions | n/a | To chalk line |
The ice and water shield is mandatory in every valley under IRC, not just in cold climates. The membrane self-seals around fasteners and provides redundancy if the surface flashing fails. See our ice and water shield guide for product comparison.
Ice and water shield placement details
The mistake we see most often on inspection: the membrane (see our peel-and-stick underlayment guide) is too narrow. IRC requires a minimum 36 inches wide centered on the valley, which works out to 18 inches on each side. On valleys where snow load is heavy or where two large planes converge, 48 inches is the better spec (24 inches each side).
Two-layer membrane method
For premium installs and any home in a freeze climate, use two strips of 36-inch ice and water shield overlapping 6 inches at the valley center. This doubles the membrane thickness at the valley line where it matters most and eliminates any seam at the bottom of the trough.
Eave intersection detail
Where the valley meets the eave, the ice and water shield in the valley must overlap the eave membrane by at least 6 inches. The eave membrane goes down first; the valley membrane laps over it. Reverse order and water tracks under the membrane at the intersection.
Water flow math: why valley width matters
The simplest valley water calculation: total flow at the eave end equals the contributing area on both planes times the rainfall rate. A 24-foot valley with 200 square feet of contributing roof on each plane, in a 2-inch-per-hour rain, carries roughly 400 gallons per hour at the eave end.
That flow concentrates into a 4 to 8 inch wide channel at the bottom of the valley. Velocity exceeds 5 feet per second on a 6:12 pitch in a heavy rain. The wider the exposed flow channel (8-inch open-metal) and the smoother the surface (metal vs shingle), the better the system handles peak flow. This is why open-metal is the only acceptable choice on long, steep valleys with high contributing area, and why woven valleys fail first at the bottom of the run.
Common valley failure modes
1. Underlayment too narrow
Standard residential reroofs sometimes use a 18-inch wide roll of ice and water shield instead of 36-inch. The membrane only covers the bottom 9 inches of the valley on each side. Wind-driven water reaches the deck above the membrane and the deck rots over time. The repair is a full valley tear-out.
2. Nails in the flow path
Any nail driven within 6 inches of the valley centerline becomes a leak point within 5 to 10 years. The most common cause is rushed installs where the installer is nailing shingles by feel without checking the centerline distance.
3. Missing or thin cement bead on closed-cut
The cut shingle edge in a closed-cut valley must be bedded in roof cement. Without the cement, wind-driven water tracks up under the cut edge and reaches the underlayment. This is the #1 failure mode on residential reroofs.
4. Woven valley mat cracking
Architectural shingles bent across the valley fold develop microcracks in the asphalt mat within 5 years. The cracks are invisible from above until they leak. By the time the leak appears, both planes need replacement.
5. Open-metal pan nailed through the field
Pre-formed valley metal must be fastened with cleats or clips along the edges, not nailed through the metal field. Field nails punch holes through the primary water barrier and prevent thermal expansion. Pans buckle within 1 to 2 cold seasons.
6. Kickout flashing missing at the bottom of the valley
Where a valley meets a sidewall (a wall on one of the planes), kickout flashing diverts the concentrated valley flow away from the wall. Without it, the valley dumps directly into the wall cavity. This is the most common cause of “mystery” interior wall stains traced to a roof leak.
7. Mixing aluminum and copper
Aluminum valley metal in contact with copper flashings elsewhere on the roof causes galvanic corrosion. The aluminum dissolves first. Pick one metal family and stick with it across all flashings on the same roof.
Metal valley pan: nailed vs cleated
Pre-formed valley metal has two acceptable fastening methods. Cleats (or clips) are the right answer for any valley over 10 feet. Cleats are small metal tabs nailed to the deck along the edge of the pan; the pan slides under the tabs and is held without being penetrated. This allows thermal expansion (steel and aluminum expand 1/8 to 1/4 inch over a 16-foot run between summer and winter).
Direct nailing through the pan edge is acceptable on short runs (under 10 feet) in stable climates. The pan must have nail holes pre-punched at slots, not round holes, to allow some expansion. Round holes plus direct nails plus a long pan equals buckled metal by year 3.
Valley flashing on metal roofs
Metal roof valleys use the same pre-formed pan concept as open-metal asphalt valleys, with two differences: the pan is typically integral to the panel system (matching the panel profile), and the field panels are not trimmed at a chalk line but are field-cut to match the valley angle.
The critical detail on metal roof valleys is the panel-to-valley sealant. A continuous bead of compatible sealant (typically butyl tape or tripolymer) runs the full length of the valley where the panel laps the pan. Without it, capillary action draws water up between the panel and pan. See our corrugated metal roofing guide for the panel-side detail.
Repair vs replace a leaking valley
If a valley is leaking and the rest of the roof is sound:
- Localized repair (under 3 years old). Cement bead refresh, replacement of one or two shingles, valley metal patch. $300 to $700 typical service call.
- Full valley rebuild (5 to 15 years old). Strip both planes back 24 inches from the valley center, install new membrane and flashing, re-shingle. $1,500 to $3,500 per valley depending on length and access.
- Full reroof recommended (valley failure plus 15+ years of field shingles). The valley failure is usually a symptom of underlayment age affecting the whole roof.
For homeowner diagnosis of valley leaks vs other roof leaks, see our how to fix a roof leak guide. Also see the broader roof flashing guide for the flashing system context.
FAQ
What’s the best valley flashing method?
Open-metal for premium installs, heavy snow climates, and any roof with designer or slate-look shingles. Closed-cut for residential reroofs with architectural shingles in mainstream climates. Woven only for 3-tab installs or budget reroofs in warm climates. Open-metal lasts longest, closed-cut is the best cost-to-lifespan tradeoff, woven is fastest but is increasingly flagged on inspection.
Do I need ice and water shield in a valley?
Yes, mandatory under IRC R905.1.2 regardless of climate. Minimum 36 inches wide centered on the valley line, full length from eave to ridge. In freeze climates and on long valleys, 48 inches and a two-layer overlap at the centerline is the better spec.
How wide should the exposed metal strip be on an open-metal valley?
5 to 8 inches typical. 6 inches is the standard on architectural shingle installs (chalk line snapped 3 inches off center on each side). Reduce to 4 inches on steep roofs (above 8:12) where water flow is fast. Increase to 8 inches on shallow roofs (4:12 to 6:12) or any valley with large contributing roof area.
Can I add valley metal under existing shingles without a full reroof?
No. Open-metal valley install requires stripping both planes back from the valley center, installing membrane and metal, then reinstalling shingles. The work cannot be done without disturbing the shingles. Localized cement-bead repairs and shingle replacement can extend a closed-cut valley life by 3 to 5 years without a full rebuild.
Are nails allowed in the valley?
Not within 6 inches of the valley centerline on either plane. Any nail in the concentrated flow path becomes a leak source within 5 to 10 years. This rule applies to all three valley methods. The closed-cut method specifically calls for a nail-free zone with the shingles held by laps and roof cement.
Bottom line
Valley flashing is the part of the roof system where small details compound into big problems. A 36-inch ice and water shield instead of 18-inch, a clipped corner on each cut shingle, a cleated metal pan instead of nailed, and a properly sequenced eave intersection: each of those takes 2 to 3 extra minutes during install and prevents a 5-year leak that costs $1,500 to fix.
If you’re hiring out, write “minimum 36-inch ice and water shield, closed-cut or open-metal method per manufacturer specification” into the contract and check the eave intersection on completion day. If you’re DIY, the underlayment stack is what matters most. Pick open-metal or closed-cut (skip woven on architectural shingles), get the membrane right, keep nails 6 inches off center, and bed every cut edge in roof cement.