A dryer vent through roof installation is the right call when an exterior wall path is more than 25 feet (the IRC M1502.4.5.1 maximum, formerly M1502.2 in older code editions) or impractical due to home layout, such as a second-story laundry room with no exterior wall access. The 2026 installed cost ranges from $300 to $800 for new construction or retrofit, including the roof penetration, vent cap with damper, rigid metal duct routing, and flashing. Here is the full breakdown: when through-roof is required by code, the right cap and duct choices, the fire risk math, and how the cost varies by roof type.
The short version
- 2026 installed cost: $300 to $800 for a standard asphalt shingle install. Tile roofs run $600 to $1,200. Standing seam metal runs $700 to $1,400.
- IRC M1502.4.5.1 limits dryer vent duct length to 35 feet for typical setups, reduced by 5 feet per 90-degree elbow. Most through-roof installs are needed when the wall path exceeds these limits.
- Required materials: 4-inch smooth-wall rigid metal duct (galvanized or aluminum), no flex duct in concealed spaces, roof-rated vent cap with damper, and proper flashing.
- Bird guards are banned in some jurisdictions because they catch lint. Use a vent cap with a backdraft damper and no screen.
- Annual lint cleaning is mandatory. Roof installs are harder to clean than wall installs, which is the main downside.
- NFPA reports roughly 13,800 home dryer fires per year, with 27% caused by lint buildup. Through-roof installs have a slightly higher lint accumulation rate due to elbow count.
Short answer and 2026 cost
If you need a dryer vent and the wall path is impractical, the through-roof install is a code-compliant solution that costs $300 to $800 done properly. The work involves cutting a 4 to 6 inch hole through the roof deck, installing a flashed vent cap, running rigid metal duct from the dryer to the roof, and sealing the penetration to prevent leaks.
The three reasons you would route a dryer vent through the roof:
- The laundry room is on an interior wall and the closest exterior wall path exceeds 35 feet (IRC M1502.4.5.1 maximum, with deductions for elbows).
- The laundry room is on a second story with no eave-level exterior wall (a finished basement build-up scenario, or a top-floor laundry over a garage).
- The exterior wall path would cross structural elements (a steel I-beam, a brick chimney chase, a tankless water heater flue) that make horizontal routing impractical.
For homes where a wall vent is possible, that is almost always the better choice. Wall vents are cheaper ($150 to $400), easier to clean, and have fewer elbows in the duct run. Through-roof is the second choice when wall is not possible.
When through-roof is required
The IRC permits dryer vent termination through any exterior wall or roof, with the same code requirements for cap type, duct material, and length. Through-roof is required (not just preferred) in a few specific situations:
| Situation | Why through-roof is required |
|---|---|
| Interior laundry, wall path over 35 ft | IRC M1502.4.5.1 length limit exceeded |
| Second-story laundry, no eave wall | No physical wall path available |
| Laundry over crawl space, no wall | Floor joists block all horizontal routing |
| HOA prohibits wall caps on visible elevations | Code-compliant alternative needed |
| Existing wall path has multiple 90s | Each elbow subtracts 5 ft from the 35 ft limit |
The length calculation under IRC M1502.4.5.1 treats every 90-degree elbow as 5 feet of duct, and every 45-degree elbow as 2.5 feet. A 30-foot duct with three 90-degree elbows equals 30 + 15 = 45 feet of effective length, which exceeds the 35 foot maximum. In this scenario, you either reduce elbows, upsize to a dryer rated for longer runs, or route through the roof to shorten the path.
IRC M1502.4 length limits explained
The full IRC M1502.4 section covers dryer exhaust requirements. The key paragraphs for through-roof installs:
- M1502.3 – Duct termination. Termination must be at least 3 feet from any building opening (door, window, intake vent). On a roof, this means the vent cap should be at least 3 feet from any roof-level intake or skylight.
- M1502.4.1 – Material. 4-inch minimum diameter, smooth interior, metal duct. Galvanized steel or rigid aluminum. No flex duct in concealed spaces (walls, ceilings, attics).
- M1502.4.4 – Support. Duct must be supported at least every 12 feet.
- M1502.4.5 – Length limitation. Maximum 35 feet equivalent length, reduced by 5 feet per 90-degree fitting and 2.5 feet per 45-degree fitting. Some dryer manufacturers (Whirlpool, LG, Samsung) publish longer maximums for their specific models, which take precedence under M1502.4.5.2.
- M1502.4.5.2 – Manufacturer exception. If the dryer manufacturer publishes a maximum exceeding 35 feet, that value applies. Many modern dryers allow 65 to 90 feet of effective length.
- M1502.4.6 – Termination. Must terminate outside the building. Must include a backdraft damper. No screen or louver that catches lint.
The flexible interpretation of M1502.4.5.2 is the most useful for retrofit work. Check your dryer’s installation manual for the published maximum length. Modern condenser and heat-pump dryers often allow 60 to 100 feet of effective duct, which can eliminate the need to vent through the roof.
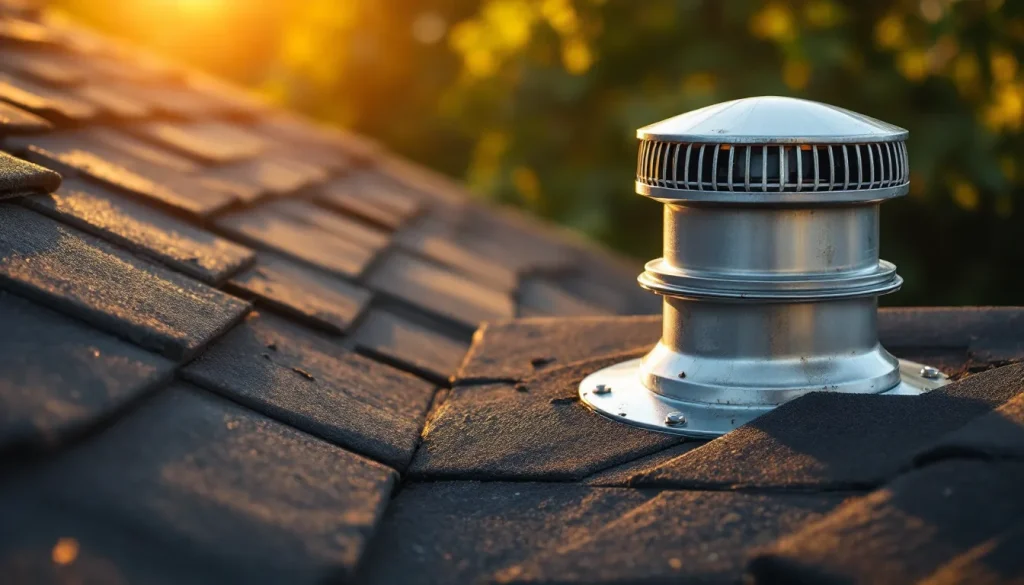
Vent cap types: damper, no screen
The vent cap is the most failure-prone component in a through-roof install. The wrong cap causes lint buildup, water intrusion, and pest entry. Three cap categories:
| Cap type | How it works | Pros | Cons |
|---|---|---|---|
| Open vent with backdraft damper | Spring-loaded flap opens when dryer runs, closes when off | Code-compliant, low lint catch, weatherproof | Damper can stick in cold weather, occasional inspection |
| Bird guard with damper | Damper plus a screen or louver | Keeps birds out | Screen catches lint, code violation in many jurisdictions, fire risk |
| Open vent, no damper | Just a hooded opening | Cheapest, easiest install | Not code-compliant, allows cold air infiltration year-round |
The right choice is an open vent with a backdraft damper, no screen. Brands to look at: Heartland Industries DRC-4 (about $35), Builder’s Best ProGuard 4 (about $25), and Famco RV-4DG (about $55). All three are roof-rated, include a damper, and have no lint-catching screen.
The pest-entry argument for bird guards is a real concern in some regions. The right answer is not a screen but a heavier-spring damper that closes firmly when the dryer is off and a manufacturer’s “wildlife-resistant” cap that uses larger spaces between protective elements (not fine mesh).
Rigid duct routing and installation
The duct between the dryer and the roof cap is where most installation errors happen. The non-negotiables:
- Material: 4-inch smooth-wall rigid metal duct, galvanized steel or aluminum. Foil flex duct and plastic accordion duct are not permitted in concealed spaces (M1502.4.1). The only acceptable flex section is the maximum 6-foot transition from the dryer to the rigid duct, and only if listed as a transition duct (UL 2158A).
- Connection: pop-rivet or sheet-metal screws no more than 1/4 inch into the duct interior. Long screws snag lint and create fire hazards. Pop rivets are cleaner.
- Sealing: foil tape (UL 181B-FX) on every joint. Duct tape (the cloth-backed kind) is not approved and fails in heat.
- Slope: minimum 1/4 inch per foot back toward the dryer if running horizontally. Vertical runs (the through-roof section) should be plumb.
- Elbows: minimize count, use long-radius (sweep) elbows where possible. Each 90 subtracts 5 ft from the allowable length and adds to the lint accumulation rate.
- Support: hanger straps every 4 to 6 feet on vertical runs, every 8 to 12 feet on horizontal runs.
The typical through-roof routing path from a first-floor laundry room: dryer to rigid 90 up into the attic via interior wall, vertical run through attic, rigid 90 to vertical riser through the roof, flashed cap on the roof. Two 90s, 20 to 30 feet of total length. Well within the 35-foot M1502.4.5.1 limit after elbow deductions.
Roof flashing for the dryer vent
The roof penetration for a dryer vent is just another roof penetration, like a plumbing stack or skylight. The flashing has to keep water out for the life of the roof. The basic install sequence:
- Cut a 4 to 5 inch round hole through the roof deck at the chosen location, using a hole saw. Mark from below by drilling a pilot hole through the deck and using it as a reference on the roof side.
- Pull back two courses of shingles above the penetration. Cut shingles only as needed; do not pull more than necessary.
- Set the vent cap base in place. The base should have a 4-sided flange that lays on the deck.
- Apply a continuous bead of polyurethane roofing sealant under the upslope half of the flange. Set the cap in place.
- Slide the upper flange under the existing upper shingles. The lower flange sits on top of the lower shingles.
- Drive roofing nails through the upper flange (under the next shingle course, never exposed). 4 nails minimum.
- Replace the upper shingles. Use a small amount of roofing cement under any cut shingles to seal them.
- Verify the cap is plumb (within 5 degrees of vertical) so the damper seats correctly.
For more on roof flashing principles that apply to all roof penetrations, see /roof-flashing/. For drip-edge interaction at the eave, see /drip-edge/.
Lint cleaning schedule
Annual lint cleaning is mandatory for all dryer vents. Through-roof installs are slightly harder to clean than wall installs because access to the cap requires a ladder and roof work. The cleaning schedule:
| Frequency | Task |
|---|---|
| Every load | Clean dryer lint screen |
| Quarterly | Check airflow at vent cap (a properly-vented dryer pushes a noticeable wind out of the cap) |
| Annual | Full duct cleaning, brush kit from cap end, vacuum from dryer end |
| Every 3 to 5 years | Inspect cap damper for stuck or worn condition, replace if needed |
| If drying time has doubled | Immediate cleaning, do not run dryer until cleared |
The standard cleaning tool is a 30 to 40 foot dryer vent brush kit, sold for $40 to $80. The kit includes a brush head, multiple flexible extensions, and a drill adapter. Run from the cap end on the roof (the brush will push lint into the dryer area below) and vacuum from the dryer end at the same time. For 2-story through-roof installs, this is a two-person job: one on the roof, one at the dryer.
Pro cleaning runs $100 to $200 for a through-roof install (vs $80 to $150 for wall installs). The extra cost is the roof access. Schedule before the heating season, when you start running the dryer more often.
Fire risk and prevention
Dryer fires are a meaningful residential fire risk. NFPA data shows roughly 13,800 home dryer fires per year, with 27% caused by lint buildup. Through-roof installs sit slightly higher on the fire risk curve than wall installs because:
- The vertical run promotes lint accumulation at the cap (gravity pulls some lint back down into the cap area).
- Cleaning is harder, so lint cleaning is more often skipped.
- Hidden ducts in attic or wall spaces are not visible for visual inspection.
The fire prevention checklist:
- Clean the lint screen after every load.
- Annual professional duct cleaning, no exceptions.
- Never operate the dryer while away from home (the leading cause of dryer fires escalating to structure fires).
- Install a smoke detector in or near the laundry room.
- If drying time increases, clean immediately.
- Check the vent cap quarterly for damper function.
- Never use plastic or vinyl flex duct anywhere in the run.
The NFPA also recommends a dryer-specific exhaust temperature sensor or thermal cutoff in commercial installations. For residential use, this is not required, but it is available as an aftermarket add-on for high-use households.
Tile roof considerations
Tile roofs (clay barrel, concrete S-tile, flat concrete tile) require a different install approach than asphalt shingles. The cap base cannot be flashed under the next course because tile is not overlapping the same way. The two acceptable methods:
| Method | How | Cost premium |
|---|---|---|
| Pan flashing under tile | Remove tiles above penetration, set lead or copper pan flashing, replace tiles over pan | $200 to $400 over asphalt cost |
| Tile-vented cap (Boral, Eagle, Westile) | Replace one or two tiles with a matched vent tile that includes the duct opening | $300 to $500 (special-order tile) |
The tile-vented cap is the cleaner finish but requires special-order tiles matched to your existing roof. Lead time is 2 to 6 weeks. For an older tile roof where matching is hard, the pan flashing method is more practical.
Cost breakdown by install scenario
The detailed 2026 cost ranges for new and retrofit through-roof dryer vent installs:
| Scenario | Labor hours | Materials | Total installed |
|---|---|---|---|
| New construction, asphalt shingle, single story | 3 to 4 | $60 to $120 | $300 to $500 |
| Retrofit, asphalt shingle, single story | 4 to 6 | $80 to $160 | $400 to $650 |
| Retrofit, asphalt shingle, second story | 5 to 8 | $80 to $160 | $500 to $800 |
| Retrofit, tile roof | 6 to 10 | $200 to $400 | $600 to $1,200 |
| Retrofit, standing seam metal | 5 to 8 | $250 to $500 | $700 to $1,400 |
| Pro lint cleaning, ongoing | 1 to 2 annually | $5 | $100 to $200/yr |
The single biggest cost variable is the duct routing distance from the dryer to the roof. A first-floor laundry room with a clean path to the roof through an open chase costs the low end. A second-floor laundry that requires routing around plumbing and HVAC ducts in the attic costs the high end.
For comparison context with roof penetration work generally, see /roof-flashing/. For broader roofing cost benchmarks, see /how-much-does-a-new-roof-cost/.
Energy Star and ENERGY-related considerations
Energy Star does not directly certify dryer vent caps, but the program does set requirements for whole-house ventilation that affect dryer vent placement. The key rules:
- Dryer exhaust caps must not be located within 10 feet of any HVAC fresh-air intake. M1507.2.1 sets the code minimum at 3 feet; Energy Star recommends 10 feet to avoid cross-contamination of conditioned air.
- For homes with heat recovery ventilators (HRVs) or energy recovery ventilators (ERVs), the dryer cap should be downwind of any intake under prevailing wind direction.
- In airtight homes (Passive House, net-zero, deep-energy retrofits), the makeup air for the dryer’s exhaust load must be considered. A typical electric dryer pulls 100 to 200 CFM of conditioned air out of the house during operation, which must be replaced by infiltration, dedicated makeup air, or by switching to a condenser or heat-pump dryer (which does not exhaust outside).
Condenser and heat-pump dryers (Bosch, Miele, LG, Whirlpool) collect moisture in an internal reservoir and require no external venting. For tight new construction or deep retrofits, this can be a better answer than a through-roof vent, with no penetration and no makeup-air load. The trade-off is a longer dry cycle (60 to 90 minutes vs 35 to 50 minutes for vented).
DIY vs pro for a dryer vent through roof
This is a borderline DIY project. The competency requirements:
- Comfort with ladder work and roof walking at the pitch of your roof.
- Ability to cut a clean hole through the roof deck without compromising structural members.
- Ability to flash a roof penetration to a water-tight finish.
- Knowledge of dryer vent code requirements and your dryer manufacturer’s specifications.
If you have done any roof work before (a flashing repair, a skylight install), this is within DIY reach for $80 to $160 in materials. If you have never done roof work, this is the wrong project to start with. A leak at the dryer vent flashing can soak attic insulation for months before you notice it, and the repair cost (insulation removal, drywall repair, dryer wall repair) easily exceeds $2,000.
For most homeowners, paying $400 to $800 for a competent installer is the right call. Look for an HVAC contractor or general contractor with both roofing and ventilation experience. See /how-to-choose-a-roofing-contractor/ for vetting criteria.
FAQs
Is venting a dryer through the roof better than through a wall?
Wall venting is the default better choice when possible: cheaper to install, easier to clean, fewer elbows. Roof venting is the right choice when the wall path exceeds 35 feet (IRC M1502.4.5.1), or when the laundry is on an interior wall or second floor with no exterior wall access.
How long can a dryer vent be through the roof?
35 feet of equivalent length under IRC M1502.4.5.1, with 5 feet subtracted per 90-degree elbow and 2.5 feet per 45-degree elbow. Some dryer manufacturers publish longer maximums (60 to 100 feet) for specific models. Check your dryer’s manual under M1502.4.5.2.
Can I use flex duct for a dryer vent?
Only the maximum 6-foot transition from the dryer to the rigid duct, and only if listed as a transition duct (UL 2158A). All concealed sections (in walls, ceilings, attics) must be 4-inch smooth-wall rigid metal. Foil flex duct in concealed spaces is a code violation and a fire risk.
Do I need a bird guard on a roof dryer vent?
No, and many jurisdictions prohibit screened bird guards because they catch lint. Use a backdraft damper cap without a screen. Some manufacturers offer wildlife-resistant designs that block pests without using fine mesh, which is acceptable.
How often should I clean a roof-vented dryer duct?
Annually at minimum, more often if you notice longer drying times. NFPA recommends professional duct cleaning every year for residential dryers. Roof-vented installs accumulate slightly more lint than wall installs due to elbow count and gravity, so do not stretch the cleaning interval.
Can I install a roof dryer vent myself?
Possible if you have prior roof flashing experience. The risk of a hidden leak makes this a borderline DIY project. Most homeowners are better served paying $400 to $800 for a professional install. If you DIY, follow IRC M1502.4 to the letter and flash the penetration as carefully as you would a skylight.
What size hole do I cut for a dryer vent through the roof?
4-inch interior duct uses a 5 to 5-1/4 inch hole through the roof deck, sized to match the cap base. Confirm the exact hole size on the cap manufacturer’s data sheet before cutting. A hole that is too large compromises the deck and complicates flashing.
For more roof and ventilation coverage, browse the full /learn/ library. Related reads: /bathroom-vent-through-roof/, /roof-flashing/, /attic-ventilation/, and /roof-leak-repair/.