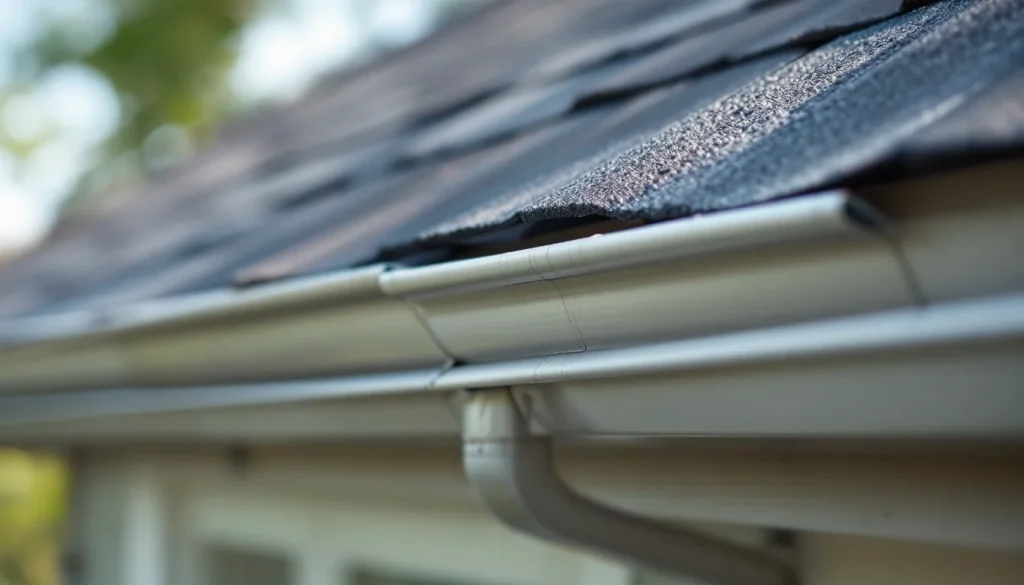
Drip edge is the metal flashing installed at the eaves and rakes of a roof to direct water away from the fascia and into the gutter rather than letting it wick back under the lowest shingle course. The 2018 IRC R905.2.8.5 code update made drip edge a mandatory requirement on all asphalt shingle roofs, ending decades of optional or regional-only installation. In 2026, adding drip edge to an existing roof costs $1.50 to $4.00 per linear foot installed during a reroof and dramatically reduces fascia rot, eave leaks, and ice dam damage. The ASTM D8347 standard specifies the material thickness, profile, and corrosion resistance the code requires, and most building inspectors now reject any reroof inspection that lacks compliant drip edge at the eaves.
The short version
- Drip edge is metal flashing installed at the eaves and rakes that pushes water past the fascia and into the gutter or off the rake.
- IRC R905.2.8.5 has required drip edge on all asphalt shingle roofs since the 2018 code cycle. Most jurisdictions have adopted this code by 2026.
- Cost runs $1.50 to $4.00 per linear foot installed during a reroof. Standalone retrofit is rare because it requires lifting the lowest shingle course.
- The four common profiles are D-style, F-style (hemmed), L-style, and T-style. F-style is the most common on residential reroofs.
- Aluminum is the right material for almost every home. Galvanized steel is regional, copper is architectural, vinyl is rare and not code-compliant in most jurisdictions.
- The installation order matters: at the eave, drip edge goes under the underlayment; at the rake, drip edge goes over the underlayment. Overlap is 2 inches minimum.
The Short Answer: What It Does + Code Requirement
Without drip edge, water running off an asphalt shingle roof has two paths: down the front face of the shingles into the gutter (the intended path), or wicking back under the shingle by surface tension and capillary action onto the top of the fascia (the failure path). The wicked water saturates the fascia top edge, runs back into the soffit cavity, and over time rots the fascia, the rafter tails, and the lowest course of roof sheathing.
Drip edge interrupts the wicking path. The metal flashing extends past the fascia by about 1/4 to 1/2 inch and bends downward, forcing water to drop off the metal rather than follow the underside of the shingle back onto the fascia. The IRC R905.2.8.5 code requires drip edge at all eaves and at all rake edges, with a minimum 2-inch lap and 2-inch overhang past the building line.
The code change matters. Before 2018, drip edge was a regional best practice. In hot, dry climates (Arizona, Nevada, southern California) it was often omitted. In cold climates (New England, upper Midwest) it was standard. The 2018 code unified the requirement nationally, and most jurisdictions had adopted it by 2021. Today, roofs reroofed without drip edge fail inspection in most U.S. jurisdictions.
IRC R905.2.8.5 Code Requirements (the 2018 Change)
The code text reads: “A drip edge shall be provided at eaves and rake edges of shingle roofs. Adjacent pieces of drip edge shall be overlapped a minimum of 2 inches. Drip edges shall extend a minimum of 1/4 inch below roof sheathing and extend up the roof deck a minimum of 2 inches.” The fastener specification calls for nails spaced no greater than 12 inches on center.
| Code requirement | Specification |
|---|---|
| Locations | All eaves and rake edges of asphalt shingle roofs |
| Minimum overlap between pieces | 2 inches |
| Minimum extension below sheathing | 1/4 inch (creates the drip lip) |
| Minimum extension up the deck | 2 inches (under or over underlayment per location) |
| Fastener spacing | 12 inches on center maximum |
| Material standard | ASTM D8347 (corrosion-resistant metal) |
| Order at eave | Drip edge under underlayment |
| Order at rake | Drip edge over underlayment |
Some local jurisdictions have stricter requirements than the IRC minimum. Florida coastal counties (Miami-Dade, Broward) often require larger fastener patterns and specific aluminum thicknesses for hurricane resistance. See Florida roofing contractor license for the licensing context that goes with the stricter code, and best roof for hurricane for the broader hurricane-zone considerations.
Drip Edge vs Rake Edge (Eave vs Gable Application)
Drip edge has two roles, and the installation order differs at each.
At the eave (the horizontal lower edge of the roof where the gutter sits), drip edge directs water into the gutter and protects the fascia top edge. At the rake (the sloped edge of the roof along the gable end), drip edge directs water off the rake side of the roof and protects the rake fascia and barge board.
The order of installation flips between the two locations. At the eave, drip edge goes on first (directly on the sheathing), then underlayment is laid over the top of the eave drip edge. This sequence prevents wind-driven water from getting under the drip edge and onto the sheathing top surface. At the rake, the underlayment goes down first, then drip edge is installed over the underlayment along the rake. This sequence keeps water that lands on the underlayment from running off the rake side back under the drip edge.
This sequence is the most-asked question in residential roofing forums, and getting it wrong cuts the protective benefit roughly in half. The mnemonic that helps: eaves under, rakes over.
Profiles: D-Style, F-Style (Hemmed), L-Style, T-Style
| Profile | Shape | Best for | Cost premium |
|---|---|---|---|
| L-style (also called Type C) | Simple 90-degree bend, 2 inches up the deck and roughly 1.5 inches down the fascia | Sheds and outbuildings; older homes | Baseline (cheapest) |
| D-style (also called Type D, sometimes “drip cap”) | L-shape with an extra kick-out at the bottom that pushes water further off the fascia | Most residential reroofs in moderate climates | +5-10% |
| F-style (hemmed, also called Type F) | D-style with a hemmed front lip (a folded-over edge for extra stiffness and a deeper kick-out) | Most modern residential reroofs, especially over gutters | +10-15% |
| T-style | D-style with a top deck flange that extends both up and across the deck for added wind resistance | Hurricane and high-wind zones | +15-25% |
F-style hemmed drip edge is the practical standard in most U.S. residential markets in 2026. The hem (the folded-over edge at the bottom) adds rigidity, eliminates the sharp metal edge that exposed L-style leaves at the gutter line, and creates a deeper kick-out that pushes water 1/2 inch or more past the fascia. T-style is worth the upcharge in hurricane zones because the upper flange resists wind uplift on the eave more effectively than L or D profiles.
Material Options: Galvanized Steel, Aluminum, Copper, Vinyl
| Material | Cost/LF (material only) | Lifespan | Corrosion resistance | Best for |
|---|---|---|---|---|
| Aluminum (.024-.032″) | $0.75-$1.75 | 30-50 years | Excellent (anodized) | Most residential homes |
| Galvanized steel (29 ga) | $0.65-$1.50 | 20-30 years | Good (zinc coating) | Cold climates, inland homes |
| Copper (16 oz) | $4.50-$8.00 | 50-100 years | Excellent (patinas) | Architectural, historic |
| Painted/Kynar steel | $1.25-$2.50 | 30-40 years | Excellent | Color match with metal roofs |
| Vinyl | $0.50-$1.00 | 10-15 years | UV-degrades | Not code-compliant most jurisdictions |
Vinyl drip edge is widely available at home improvement retailers but is increasingly rejected by inspectors under the ASTM D8347 standard, which the IRC references. The standard calls for corrosion-resistant metal, which vinyl does not satisfy. Vinyl also becomes UV-brittle and cracks within 10 to 15 years, which is well short of the asphalt shingle lifespan it is meant to protect.
Aluminum vs Steel: The Best Choice for Most Homes
For 80 percent of U.S. homes, aluminum drip edge is the right answer. It is corrosion-proof in coastal salt air, paints well for color matching, lasts 30 to 50 years, and costs only a few cents per linear foot more than galvanized steel. The .024 inch thickness is the builder-grade default; the .027 to .032 inch thickness is the upgrade that handles wind uplift better in storm-prone regions.
Galvanized steel has two advantages: it is roughly 10 to 20 percent cheaper than aluminum and it is stiffer at any given thickness, which is useful in heavy-snow zones where the eave can flex under load. The disadvantage is that the zinc coating eventually fails (especially at cut edges and fastener penetrations), and rust streaks down the fascia within 15 to 25 years of installation. Galvanized is still the right answer in dry, inland cold climates where corrosion is slow, but it is rarely the right choice in coastal or high-humidity regions.
Copper is reserved for architectural homes and historic restorations where the patina is part of the aesthetic. At $4.50 to $8.00 per linear foot for material alone, copper drip edge costs 4 to 6 times what aluminum costs, but it pairs with copper gutters, copper standing seam roofs, or slate roofs that are themselves multi-century investments. See metal vs asphalt shingle roof for the broader metal roof context.
Color Selection: Match Fascia or Roof?
Drip edge is visible from the ground along the entire eave and rake length, so color selection matters more than most homeowners realize. The two standard approaches are matching the fascia color (so the drip edge visually disappears into the trim) or matching the roof color (so it visually extends the roof line).
Match-the-fascia is the dominant choice for residential homes because it visually shortens the roof and emphasizes the trim line, which is usually painted white or a contrasting body color. Match-the-roof is more common on metal roofs and on homes where the roof color is meant to be a strong visual element. White drip edge is the default off-the-shelf color and works on roughly 60 percent of homes where the fascia is white or off-white.
For custom color matching, painted Kynar-coated steel offers the widest palette and the longest color retention (typically 30 to 40 year warranty against fade and chalking). The cost premium over standard aluminum is about 30 to 60 percent.
Installation Order: Underlayment First or Drip Edge First?
This is the question that defines a correct installation. The rule is location-specific:
- At the eave: Drip edge first, then underlayment over the top of the drip edge top flange. The underlayment laps onto the drip edge by at least 2 inches. This sequence protects against wind-driven water that would otherwise blow up under the drip edge and onto the sheathing.
- At the rake: Underlayment first, then drip edge over the top of the underlayment along the rake. The drip edge top flange covers and seals the underlayment edge. This sequence prevents water that has landed on the underlayment from running off the rake side back under the drip edge.
Getting this sequence wrong creates one of the most common reroof callbacks: ice dam meltwater pushing back up under the drip edge at the eave and dripping into the soffit cavity, or rain water running down the rake and entering the fascia top through reversed drip edge layering. Both problems are invisible until rot shows in the fascia 3 to 7 years later.
For the broader underlayment selection that pairs with the drip edge install, see felt vs synthetic underlayment.
Eave Installation: Under the Underlayment
The eave installation sequence:
- Inspect and prep the fascia and the top inch of the roof sheathing for rot or damage.
- Lay the first piece of drip edge along the eave, with the top flange sitting flat on the sheathing and the bottom kick-out hanging 1/4 to 1/2 inch past the fascia.
- Fasten with roofing nails through the top flange, 12 inches on center maximum.
- Overlap the next piece by 2 inches. At corners, miter or wrap the drip edge to create a continuous water-shedding line.
- Once all eave drip edge is in place, install the ice-and-water shield (in cold climates) over the drip edge top flange, then the underlayment over the ice-and-water shield.
- Shingles install on top of the underlayment, with the starter course aligned to the bottom edge of the underlayment (roughly 1/4 inch back from the kick-out of the drip edge).
In ice dam regions, the ice-and-water shield extends from the drip edge top flange up the roof to at least 24 inches inside the warm wall plane (the exterior wall location). This combination of drip edge plus ice-and-water shield plus underlayment is the modern standard for eave protection against ice dams and wind-driven rain.
Rake Installation: Over the Underlayment
The rake installation sequence:
- Lay the underlayment over the sheathing, including the rake area, allowing it to overhang the rake edge by 1 to 2 inches (it will be trimmed flush later).
- Trim the underlayment flush with the rake edge.
- Install the rake drip edge over the top of the underlayment, with the top flange covering the trimmed underlayment edge and the bottom kick-out hanging 1/4 to 1/2 inch past the rake fascia.
- Fasten with roofing nails through the top flange, 12 inches on center maximum.
- Overlap the next piece by 2 inches. Coordinate the rake-to-eave transition at the corner so the eave drip edge sits under the rake drip edge.
The rake-to-eave corner is the most-problematic detail in the entire drip edge install. The correct sequence is eave drip edge first (under underlayment at the eave), underlayment, then rake drip edge over the corner with a 2-inch lap over the eave drip edge. This puts the rake drip edge as the topmost element at the corner, which is correct because water at the corner is shedding off the rake side. Skip this lap and water finds its way into the corner fascia within a year.
Overlap Requirements (2-inch Minimum)
The 2-inch overlap is the code minimum and the practical minimum for shedding wind-driven rain. Some manufacturers recommend 3-inch laps on hurricane and high-wind installations, and some specs call for sealant in the lap zone (typically butyl tape or polyurethane caulk) in hurricane zones.
Overlap orientation matters: the upper piece (in the direction of water flow) goes on top of the lower piece. At the eave, the upper piece is the one further along the eave run; at the rake, the upper piece is the one closer to the ridge. This shingles-on-the-deck logic applies to drip edge laps as well as to underlayment and shingle laps.
For specialty wind zones, see best roof for hurricane for the broader high-wind detailing including the role of drip edge in resisting uplift at the eave.
Fastener Pattern
The code minimum is one fastener every 12 inches along the top flange. In high-wind zones and in regions with significant snow load, tighten to 8 inches on center. Use roofing nails matched to the metal type (galvanized or stainless for galvanized steel drip edge; aluminum nails for aluminum drip edge to prevent galvanic corrosion).
The nail should penetrate the top flange and at least 3/4 inch into solid sheathing. Avoid overdriven nails: a nail driven hard into thin aluminum drip edge dimples the metal and creates a stress point that will crack within a few thermal cycles. The right pneumatic nailer setting drives the nail flush without crushing the metal.
Never nail through the kick-out (the bottom downward bend) or the front face below the sheathing line. Fasteners in these areas create water entry points that defeat the drip edge function.
Common Installation Mistakes
| Mistake | Consequence |
|---|---|
| Eave drip edge installed over underlayment (instead of under) | Wind-driven water gets under drip edge onto sheathing top; eave rot |
| Rake drip edge installed under underlayment (instead of over) | Water on underlayment runs onto rake fascia; rake fascia rot |
| Less than 2-inch overlap at joints | Wind-driven water enters joint; fascia stains and rot |
| Kick-out too close to fascia (less than 1/4 inch) | Water surface tension wicks back onto fascia anyway; defeats purpose |
| Vinyl drip edge in code-required jurisdiction | Inspection failure; reroof not certified; insurance complication |
| Galvanic corrosion (aluminum nails in steel, steel nails in copper) | Premature corrosion at every fastener point; staining |
| No drip edge at rake (only at eave) | Rake fascia rot within 5-10 years |
| Missing rake-to-eave corner overlap | Corner fascia leak; localized rot |
Most of these mistakes survive the final inspection because they are not visible from the ground. They show up 2 to 7 years later as fascia rot, ceiling stains, or attic moisture. The diagnostic challenge is that by the time the symptom appears, the drip edge problem is buried under the underlayment and the shingles, and fixing it usually requires lifting the first 2 or 3 courses of shingles to access.
Retrofit Cost ($1.50-4/LF Installed)
Standalone drip edge retrofit (adding drip edge to an existing roof without a reroof) is uncommon because the install requires lifting the lowest shingle course, sliding the drip edge under it, and resealing. The labor approaches the cost of a reroof in some cases, and most contractors recommend timing the drip edge add-on with a reroof.
| Project type | Cost/LF installed | 150 LF perimeter |
|---|---|---|
| Drip edge included in reroof | $1.50-$3.00 | $225-$450 |
| Drip edge retrofit (existing roof) | $3.50-$8.00 | $525-$1,200 |
| Hurricane-zone enhanced drip edge during reroof | $3.00-$5.00 | $450-$750 |
| Copper drip edge during reroof | $6.00-$12.00 | $900-$1,800 |
For homes within 5 years of a reroof, defer the drip edge work to the reroof. For homes with 10 or more years of useful shingle life and ongoing fascia damage, the standalone retrofit pays back in fascia protection within 3 to 5 years. See how much does a new roof cost for the broader reroof budget and gutter installation cost for the related gutter pricing.
Manufacturer Warranty Connection
GAF, Owens Corning, and CertainTeed shingle warranties all reference IRC and ASTM-compliant installation as a condition of warranty coverage. Reroofs done without drip edge in jurisdictions where the code requires it can be denied warranty claims on shingle failures at the eave, even when the failure is unrelated to the eave detail.
GAF’s Golden Pledge and Owens Corning’s Platinum warranties go further by requiring documented compliance with the full IRC installation requirements. Drip edge is one of the items the inspecting contractor checks during certification. A reroof done by a non-certified contractor without drip edge will not qualify for the enhanced warranty levels.
For specific brand warranty terms and the broader certification framework, see how to choose a roofing contractor and signs you need a new roof. For the related flashing systems that work with drip edge, see roof flashing and parts of a roof.
Frequently asked questions
What is drip edge?
Drip edge is metal flashing installed at the eaves and rake edges of a roof to direct water away from the fascia and into the gutter. It prevents water from wicking back under the lowest shingle course onto the fascia top edge.
Is drip edge required by code?
Yes. IRC R905.2.8.5 requires drip edge at all eaves and rake edges of asphalt shingle roofs. The code took effect in the 2018 IRC cycle and is adopted by almost all U.S. jurisdictions by 2026.
What is the difference between eave and rake drip edge installation?
At the eave, drip edge goes on first (directly on the sheathing) and underlayment laps over the top. At the rake, underlayment goes down first and drip edge is installed over the underlayment. The mnemonic is “eaves under, rakes over.”
How much does drip edge cost?
During a reroof, drip edge runs $1.50 to $3.00 per linear foot installed. Standalone retrofit on an existing roof runs $3.50 to $8.00 per linear foot because the install requires lifting the lowest shingle course.
What material is best for drip edge?
Aluminum is the right answer for most homes: corrosion-proof, 30 to 50 year lifespan, and only slightly more expensive than galvanized steel. Galvanized steel is appropriate in dry inland cold climates. Copper is for architectural and historic homes. Vinyl is not code-compliant in most jurisdictions.
Can I install drip edge myself?
Drip edge install on a new build is straightforward and credible DIY for a confident homeowner. Drip edge retrofit on an existing roof is harder because it requires lifting and resealing the lowest course of shingles, which most homeowners should leave to a roofer.
What happens if I skip drip edge?
Without drip edge, water wicks back under the shingle onto the fascia top edge, saturating the fascia from above. Within 5 to 10 years, the fascia rots and water enters the soffit cavity. In ice dam regions, the problem accelerates dramatically.