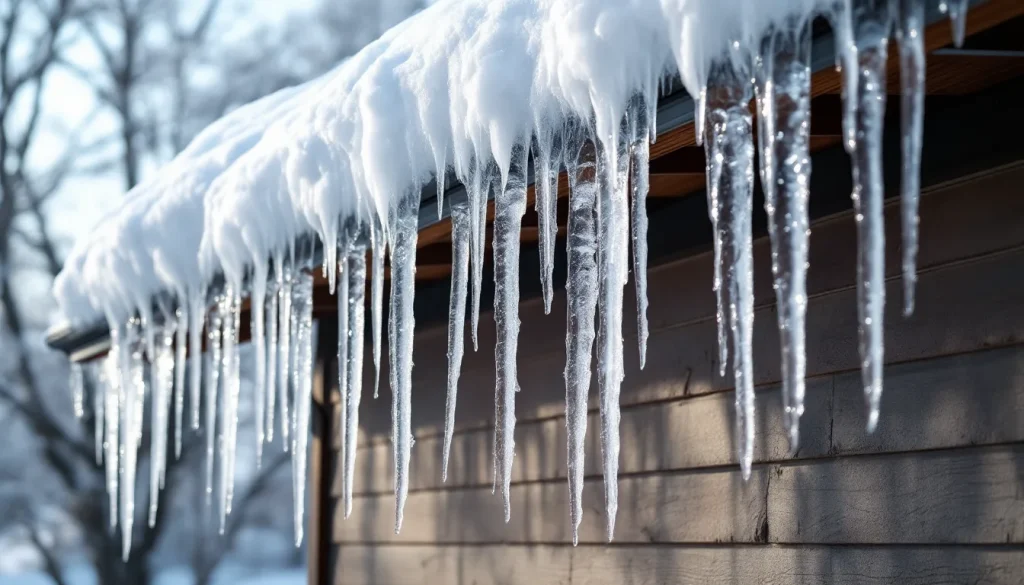
A heat cable for roof applications is a low-voltage resistance cable that runs along the eave edge and into the gutter and downspout to melt a drainage channel through ice dams so meltwater can escape instead of pooling and pushing under the shingles. Done right, with the cable run in a tight zig-zag pattern that puts the triangle apex 18 to 24 inches above the warm wall line, it works. Done wrong, and it gets installed wrong on roughly half of residential jobs, the cable melts a shallow trough at the eave and creates a brand new ice dam right above the top of the cable. The fix is not more cable. The fix is the cable PLUS attic insulation and ventilation correction, because heat cable treats a symptom of a heat-loss problem, not the cause.
The short version
- Heat cable is a band-aid, not a fix. It treats the symptom (ice dam) but does not address the cause (warm attic air melting snow from underneath).
- Top products: Easy Heat Roof and Gutter De-Icing Cable (5 to 200 ft kits), Frost King RC60 (60 ft), HeatTape Pro (heavy-duty constant-wattage).
- Install in a zig-zag (triangle) pattern with apex 18 to 24 in above the warm wall line, base running the full eave length, plus a continuous run inside the gutter and down each downspout.
- GFCI required by NEC 426.28. Dedicated 15-amp circuit minimum. Most kits draw 5 to 8 watts per linear foot.
- A cable installed without an insulation and ventilation fix can move the dam line higher up the roof, not eliminate it.
- Cost: $30 to $200 per kit material; $400 to $1,200 installed on a typical residential eave run with circuit work included.
How heat cable works and what it is actually doing
A roof heat cable is a low-voltage resistance heating element wrapped in a UV-stable jacket. When energized, it produces 5 to 12 watts per linear foot of heat, depending on the product and the type (self-regulating cables produce more wattage when cold, constant-wattage produce a fixed output). The heat melts snow and ice directly in contact with the cable and creates a channel for meltwater to flow.
What the cable does NOT do: it does not warm the entire roof, prevent snow accumulation, or stop ice dams from forming. It creates a drain path through ice that has already formed. In a healthy install, the channel melted by the cable runs from the apex of the zig-zag triangle down to the gutter, through the gutter, and out the downspout. Meltwater follows the channel and exits the roof system. In a bad install, the channel ends partway and the water re-freezes, the gutter is cold and re-freezes, or the downspout is unheated and plugs solid with ice.
The root cause of an ice dam is heat loss from the attic warming the roof deck under the snow. The snow melts from below, runs down the cold eave overhang (which is unheated because it overhangs the wall plate), refreezes at the eave, and the dam grows from there. The permanent fix is to seal attic air leaks, add insulation, and balance attic ventilation so the deck stays cold. See our attic ventilation guide for the long-term solution.
The product lineup
| Product | Type | Length options | Watts/ft | Typical cost |
|---|---|---|---|---|
| Easy Heat ADKS Roof and Gutter | Constant wattage | 5, 10, 20, 30, 40, 60, 80, 100, 120, 160, 200 ft | 5 W/ft | $35 to $200 |
| Frost King RC60 | Constant wattage | 30, 60, 100, 200 ft | 5 W/ft | $45 to $180 |
| HeatTape Pro (Radiant Solutions) | Self-regulating | Cut-to-length, 6 to 250 ft | 5 to 12 W/ft | $8 to $14 per ft installed |
| Heatizon Roof and Gutter | Self-regulating | Cut-to-length | 5 to 10 W/ft | $10 to $15 per ft |
| Briskheat HSTAT | Self-regulating | Cut-to-length | 5 to 12 W/ft | $10 to $15 per ft |
The big distinction is constant-wattage versus self-regulating. Constant-wattage cables (Easy Heat, Frost King) come in pre-set lengths and draw the same wattage regardless of temperature. They are cheaper, simpler, and they work, but they waste energy when it is not cold enough to need full output. Self-regulating cables (HeatTape Pro, Heatizon) automatically vary their output based on the temperature at each section, drawing more in cold zones and less in warm zones. They cost two to four times more material but use 30 to 50 percent less electricity over a season.
Install sequence (8 steps)
- Plan the layout. Measure the full eave length. Mark the location of the warm wall line (the wall directly below). The triangle apex of the zig-zag will land 18 to 24 inches inside the warm wall line. Measure how much cable that consumes. Then add gutter length and downspout length. For a 30-foot eave with a 1-foot overhang, total cable need is roughly 60 to 75 linear feet (zig-zag pattern plus gutter plus 6 to 10 feet of downspout drop).
- Verify electrical capacity. Heat cable on a 30-foot eave at 5 W/ft draws 360 watts (3 amps at 120V). On a 100-foot run with downspouts you may exceed 15 amps, requiring a dedicated 20A circuit. NEC 426.28 requires GFCI protection on all roof and gutter de-icing circuits. Do not piggyback off an existing outdoor outlet.
- Install GFCI outlet at the eave or in the attic. Mount a weatherproof GFCI outlet within reach of the cable’s plug end. If routing through the attic, drill through the eave with a downward-angled hole and seal with sealant after cable feed.
- Install the zig-zag clips first. Most kits include shingle clips (plastic or aluminum tabs that slide under shingle tabs without nail penetration). Mark the zig-zag pattern with chalk: apex spacing 12 to 18 inches along the upper edge, base at the eave. Install clips at every apex and base point.
- Run the cable in the zig-zag pattern. Starting at the eave plug end, route the cable up to the first apex, down to the eave base, up to the next apex, and so on across the full eave width. The triangles should be tall enough that the apex is 18 to 24 inches above the warm wall line, NOT just above the eave edge.
- Run cable through the gutter. When the zig-zag pattern reaches the corner, drop the cable into the gutter and run it the full gutter length back to the downspout opening. The gutter cable melts the channel that the roof zig-zag is feeding into.
- Drop cable into each downspout. At every downspout opening, feed the cable down the full length of the downspout to the discharge end. A blocked downspout is the most common single-point failure: the cable melts a channel through the roof and gutter, the water reaches the top of the downspout, the downspout is solid ice, and the meltwater backs up.
- Test and seasonal-cycle the system. Plug in. The cable should feel warm to the touch within 5 minutes. Verify GFCI does not trip. Install a thermostat controller (Easy Heat ATCS-300, Radiant Solutions snow-sensor controller) so the system runs only below 38 degrees F. Manual on/off wastes power and shortens cable life.
Common mistakes
Heat cable is the roof product with the highest install-error rate we see. It looks simple, it is not.
- Apex of zig-zag too low. Many installs put the apex 6 inches above the eave edge. That melts a channel through the bottom 6 inches of snow at the eave but leaves a dam at the wall-plate line, which is exactly where insulation and ventilation problems cause the worst dams. Apex needs to be 18 to 24 inches above the warm wall line.
- No cable in the gutter. The roof cable melts a channel down to the gutter. Water hits the cold gutter and freezes solid. The gutter becomes the new dam. ALWAYS run cable continuously into the gutter and through the full length.
- No cable in the downspout. Same problem one step down. Cable in the gutter melts a channel to the downspout opening. The downspout is solid ice. Water backs up, overflows the gutter, refreezes against the fascia. ALWAYS drop cable to the discharge end of every downspout.
- Cable nailed through the jacket. Some installers use roofing nails to hold the cable in place. Penetrating the cable jacket creates a short circuit, a fire risk, and immediate failure. Use the included clips, period.
- Cable in contact with itself. Crossing cable runs or overlapping cable creates hot spots that exceed jacket temperature ratings. Most products are rated 150 to 200 degrees F at the surface. Overlap and you cook the jacket and start a fire.
- No GFCI protection. NEC 426.28 requires it. Non-GFCI installs are a code violation, a shock risk, and most insurance carriers will deny a fire claim where the cause traces back to non-GFCI heat cable.
- Skipping the thermostat controller. Manual-switch operation either runs all winter (huge electric bill) or runs only when someone remembers (most dams form during the storm before anyone realizes). A thermostat that activates below 38 degrees F is $40 and saves hundreds in winter electricity.
- Treating heat cable as the solution instead of a band-aid. The dam keeps coming back? Your attic insulation and ventilation are losing heat to the deck. Fix the attic with air sealing and balanced ventilation per our attic ventilation guide. Then the cable is supplemental, not primary.
- Cable left up year-round on shingle clips. UV exposure shortens cable life by 40 to 60 percent. Pull and store the cable each spring, reinstall each fall. The clips can stay; the cable comes down.
- Constant-wattage cable in mild climates. A 5 W/ft constant cable in Cleveland uses 80 percent more energy than a self-regulating equivalent because the constant cable cannot back off when it is 35 degrees out. Self-regulating pays back the higher upfront cost in 3 to 5 winters.
Cost
Material cost for a constant-wattage kit covering a 30-foot eave (60 to 75 ft of cable counting gutter and downspouts) runs $80 to $200. The same coverage with self-regulating cable runs $400 to $800. Installation by an electrician adds $300 to $700 for circuit and GFCI outlet work, plus $200 to $500 for cable routing and clip install. Total installed cost on a typical residential eave run is $600 to $1,500.
Operating cost: a 60 W/ft total system running 300 hours per winter (average for northern climates) consumes 90 to 180 kWh, which is $12 to $30 at typical residential rates. That is the cheap part. The expensive part is electricity wasted on a system left manually on for the entire season, which can run $150 to $400 in additional draw.
Where heat cable fits in the bigger fix
The right way to think about heat cable: it is the third item on a three-step priority list, not the first.
- Air seal the attic. Stop warm interior air from leaking into the attic. Top plates, can lights, plumbing chases, bath fans, attic hatches are the primary leak paths. This is the single highest-value fix.
- Insulate the attic floor to R-49 or higher. Code in cold climates is R-49. Many houses have R-19 to R-30. Adding R-30 of blown cellulose costs $1,500 to $3,000 and pays back in energy savings within 5 to 8 years while also stopping the heat loss that creates ice dams.
- Balance attic ventilation. Soffit intake and ridge exhaust at a 1:1 net free area ratio (or 50 percent more soffit than ridge in cold climates) keeps the deck cold. Most older houses have inadequate or unbalanced ventilation. See the ridge vent install guide for the exhaust side.
- Install heat cable as supplemental protection. After steps 1 to 3 are done, heat cable handles the residual ice that still forms in the worst storms. It is now doing 20 percent of the work instead of 100 percent.
A heat cable installed without the attic work is fighting a battle it cannot win, because more snow keeps melting from underneath as long as the deck stays warm. For chronic leak symptoms see how to fix a roof leak. For metal roof condensation issues that share the same root cause see metal roof condensation.
FAQ
Will heat cable damage my shingles? Not if it is installed correctly with shingle clips that do not penetrate the shingle. The localized heat at the cable contact line is well below the temperature that softens asphalt. Crossing or overlapping cable runs is what damages shingles, not the cable itself.
Should heat cable be left on all winter? No. Use a thermostatic controller that activates below 38 degrees F. Leaving it on continuously wastes 60 to 80 percent of the electricity and shortens cable life.
Why is my ice dam worse with heat cable installed? Almost always because the cable melts a channel at the eave but the gutter, downspout, or attic insulation is unaddressed. The water has nowhere to go and freezes higher up the roof. Add cable in gutters and downspouts, fix the attic.
Can I install heat cable myself? Cable installation, yes, with care. The dedicated GFCI circuit work should be done by a licensed electrician for code compliance and safety. NEC requires GFCI protection and most jurisdictions require permit and inspection for new circuits.
How long does roof heat cable last? 5 to 10 years for constant-wattage product if removed each spring. 10 to 15 years for self-regulating. Year-round outdoor exposure cuts those numbers roughly in half.
Bottom line
Heat cable works when it is installed in a proper zig-zag pattern with apex above the warm wall line, run continuously through gutters and downspouts, protected by a GFCI on a dedicated circuit, and controlled by a thermostat. It does not work as a substitute for attic insulation and ventilation. If you are buying heat cable and you have not first sealed attic leaks and added insulation, you are going to be calling someone for a re-install in two seasons. Get the attic right first, then add cable for supplemental protection. That order saves money, energy, and roof life.