Correct drip edge installation follows a single rule that contractors still get backward roughly half the time on residential reroofs: at the eaves, the underlayment lays OVER the drip edge, and at the rakes, the drip edge lays OVER the underlayment. That sequence is not a preference. It is what makes water drain off the roof instead of behind the fascia (see our soffit and fascia replacement cost). Drip edge has been a code requirement since the 2012 International Residential Code (IRC R905.2.8.5) on every asphalt shingle roof at both eaves and rakes, with specific lap dimensions, fastener spacing, and profile geometry that distinguishes Type C (rake) from Type D (eave) metal. The detail below covers the install order, the two profile types, the fastener pattern, and the eight failure modes inspectors flag most often.
The short version
- IRC R905.2.8.5 (2012 and later) requires drip edge at all eaves and rakes on asphalt shingle roofs.
- At the eave: underlayment lays OVER drip edge. At the rake: drip edge lays OVER underlayment.
- Type D (eave) has a 2 in vertical leg with an extended 4 in horizontal hem; Type C (rake) is a simpler 1.5 in by 1.5 in L-profile.
- Fastener spacing: 12 in on center max, galvanized roofing nails or stainless in coastal zones. End laps overlap 2 in minimum.
- Top brands: Amerimax (mill-finish aluminum), Drexel Metals (custom-formed), Berger Building Products, Quality Edge.
- Material cost: $1.50 to $4.50 per linear foot installed, depending on profile and metal type.
What drip edge is and why code requires it
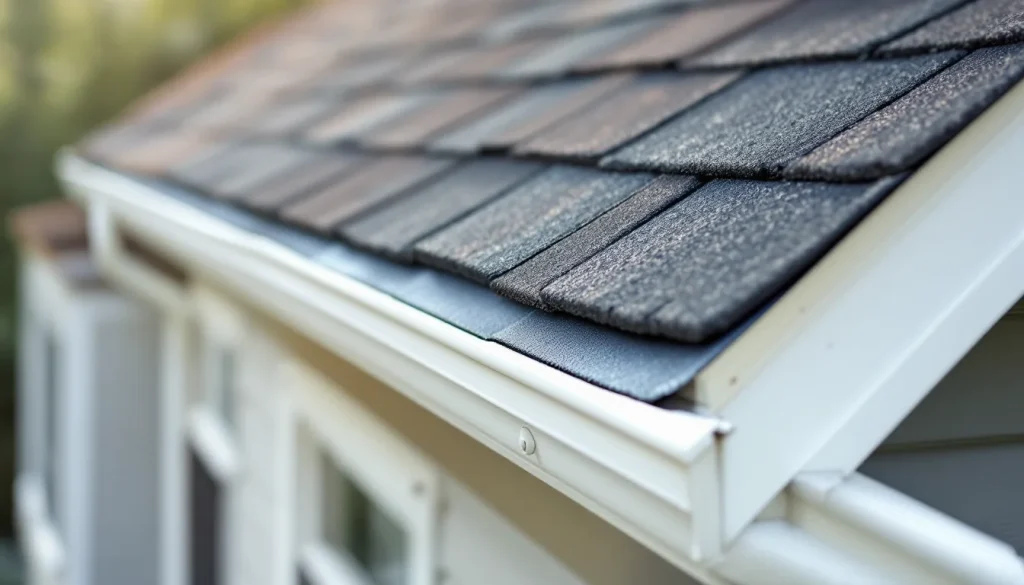
Drip edge is a metal flashing strip that runs along the eave and rake edges of a roof, with one leg covering the roof deck and a second leg projecting out and down over the fascia. The geometry does two things: it shields the fascia and sheathing edge from water, and it directs runoff away from the building so it does not wick back behind the gutter or trickle down the wall. Without drip edge, water runs off shingles, hits the underside of the shingle overhang, and follows surface tension straight back to the wood. With drip edge, the water hits a metal lip with a kicked-out hem and falls into the gutter.
The code requirement was added in the 2012 IRC because investigations into chronic fascia and sheathing rot kept coming back to the same root cause: no drip edge or wrong-order drip edge. By 2018 the code language tightened to specify lap length, fastener spacing, and that overlaps must be at least 2 inches and joined with appropriate sealant or fasteners. For the broader context of edge flashing, see our explainer on drip edge and the flashing overview.
Type C vs Type D: profile geometry
| Profile | Where it goes | Vertical leg | Horizontal leg / hem | Notes |
|---|---|---|---|---|
| Type C (also called “L” style) | Rakes (gable edges) | 1.5 in | 1.5 in horizontal flange | Simple L-shape, sits over underlayment, under shingles |
| Type D (also called “T” style or “extended”) | Eaves | 2 in | 4 in extended horizontal hem with kick-out | Long horizontal hem reaches into the gutter, kick-out throws water 1/2 in away from fascia |
| Type F | Gambrel or specialty | 3 in | 5 in hem | For deeper overhangs or specific architectural details |
The eave Type D profile is the critical one. Its extended horizontal hem reaches past the fascia and into the gutter trough so meltwater and runoff land in the gutter rather than behind it. The kick-out at the end of the hem creates a drip line that prevents capillary wicking back to the fascia. Anyone selling you Type C for an eave application is either a homeowner from a big-box store or a contractor who is cutting $30 off the job.
Materials and brands
Drip edge comes in three metals: aluminum (the standard), galvanized steel (used in some commercial work), and copper (for premium installations and architectural work). Aluminum is the right answer for almost every residential application: it does not rust, it forms cleanly, and it costs less than the others. Standard residential pieces are 10 feet long with a mill or painted finish, sold by the piece or by the bundle of 50.
- Amerimax Home Products: the most-stocked residential brand at Home Depot and Lowe’s. Aluminum 1.5 in x 1.5 in Type C and 2 in x 4 in Type D in white, brown, mill, and bronze finishes. $7 to $12 per 10-foot piece.
- Drexel Metals: custom-formed in any color, any profile, any length. Used by specifying architects and high-end residential. $1.50 to $3 per linear foot for stock profiles.
- Berger Building Products: commercial-grade extruded and roll-formed in heavier gauge (0.024 in aluminum or 26 ga steel).
- Quality Edge / TruEdge: matched to TruDefinition shingle colors, used by Owens Corning preferred contractors.
For coastal applications, switch to 0.040-inch aluminum or specify 316 stainless steel. Standard 0.019-inch aluminum dents and creases easily, and on salt-air exposures the painted finish chalks within five years. Heavier gauge holds the install profile and outlasts the shingles above it.
Install sequence (8 steps)
- Inspect and prep the deck edge. The fascia and sheathing edge must be intact and plumb. Rotten fascia gets replaced before any metal goes up. Any sheathing that overhangs the fascia inconsistently gets cut to a straight line with a circular saw so the drip edge lies flat.
- Install eave drip edge FIRST, before underlayment. Run Type D drip edge along the entire eave. The horizontal leg sits on top of the roof deck. The vertical leg covers the fascia. The hem extends past the fascia and angles down toward the gutter. Fasten with galvanized roofing nails or 1.25-in cap nails at 12 inches on center max, no more than 1 inch from the leading edge of the horizontal leg.
- Lap eave pieces 2 inches minimum. Overlap each successive piece by at least 2 inches in the running direction. Some specs and most coastal codes call for 3 inches. Run a bead of polyurethane sealant or butyl tape between the laps if water can pool at the seam.
- Roll underlayment OVER the eave drip edge. The ice and water shield or felt extends down over the horizontal leg of the eave drip edge and stops 1/4 inch short of the kick-out. This is the sequence that drains meltwater onto the drip edge instead of behind it.
- Install rake drip edge AFTER underlayment. At the rakes (gable edges), the underlayment goes down first and runs to the edge of the deck. Then Type C drip edge lays OVER the underlayment, with the horizontal leg pressed flat to the underlayment surface. Fastener spacing is the same 12 inches on center, also 1 inch in from the leading edge.
- Cut corners at 45 degrees and overlap. Where eave and rake meet, miter both pieces at 45 degrees so the joint is tight and water cannot escape. Standard practice has the eave piece sit under the rake piece at the corner so water sheds off the rake onto the eave run, never behind it.
- Run starter strip over rake drip edge. The first course of shingles (the starter strip) goes over both eave and rake drip edge. At the rake, the starter sits on top of the rake drip edge. At the eave, the starter is flush with the edge of the drip edge, never overhanging beyond it.
- Verify kick-out direction. Sight down the eave from one end. The hem and kick-out should angle the runoff out and away from the fascia. If you can see the hem flipping back toward the fascia, the drip edge is upside down or the installer crimped it wrong during install. Pull and re-do that section.
Common mistakes
The same handful of errors account for nearly every fascia rot, sheathing rot, and stained-soffit complaint that ends up in court.
- Underlayment under the eave drip edge instead of over it. This is the single most common mistake, and it is invisible from the ground. Water gets behind the drip edge, runs down the fascia, and rots the sheathing edge. Fix: tear off shingles and underlayment at the eave, re-set the order, redo.
- Type C at the eave. The L-profile rake drip edge has no extended hem and no kick-out. Water runs off the shingles, hits the short hem, surface-tension wicks back to the fascia. The L profile belongs at the rake only.
- No drip edge at the rake at all. Common on older homes where the rake just has a shingle overhang of 1/2 inch. Water and wind drive moisture into the rake fascia and the gable end soffit. Code violation post-2012.
- Fastener spacing too wide. Drip edge nailed at 24 to 36 inches on center flutters in the wind, opens up at the laps, and lifts during storms. Spec is 12 inches on center maximum.
- Wrong sequence at the corners. Rake piece tucked under the eave piece at the corner causes water from the rake to dive behind the eave drip edge. Eave piece must sit under, rake piece over at the corner.
- Drip edge tucked behind the gutter. The kick-out should land INSIDE the gutter trough or overhang it slightly. If the gutter was hung first and the drip edge tucks behind it, water can run between the gutter back and the fascia.
- Drip edge nailed through the vertical leg into the fascia. Nailing through the vertical fascia leg telegraphs through the metal and creates a row of dimples that pool water against the wood. Nail only through the horizontal leg into the deck.
- End laps not sealed in coastal or windy zones. Wind-driven rain finds its way through unsealed 2-inch laps. Add butyl tape or polyurethane sealant at each lap on the windward side of the house.
Cost
Drip edge material cost runs $7 to $12 per 10-foot piece for standard residential aluminum at the big-box store, which works out to roughly $0.70 to $1.20 per linear foot. Custom-formed or heavier-gauge product (Drexel, Berger) is $1.50 to $3 per linear foot. Installed cost, including labor and fasteners, is typically $1.50 to $4.50 per linear foot on a reroof. On a typical 30-square house with 160 to 220 linear feet of eave and rake combined, that is $250 to $1,000 in drip edge on the roof estimate.
For comparison, the cost of NOT having drip edge is roughly $400 to $1,200 in fascia replacement plus $1,500 to $4,000 in sheathing rot repair when the failure becomes visible 8 to 15 years later. The economics are not close.
Order of operations cheat sheet
The full edge sequence on a standard reroof:
- Tear off and clean deck
- Replace any rotten fascia or sheathing
- Install Type D eave drip edge
- Run ice and water shield from eave UP, overlapping the eave drip edge by 4 inches
- Run synthetic underlayment in the field, lapping OVER the upper edge of ice and water
- Run field underlayment to the rake edges
- Install Type C rake drip edge OVER the field underlayment
- Install starter strip over both eave and rake drip edge
- Lay shingles starting from the eave going up
That sequence keeps every overlap pointing in the water-shedding direction. For the specific underlayment behavior in the ice-barrier zone, see the peel and stick underlayment install detail. For starter strip technique, the asphalt shingle starter detail is in our broader asphalt shingle install guide.
When the existing roof has no drip edge
Many homes built before 2012 have no drip edge. If you are not reroofing but want to add drip edge anyway, it can be retrofitted by carefully lifting the first course of shingles, slipping the drip edge under them, nailing it down through the deck, then re-sealing the shingles. The retrofit is fiddly, the shingle seal is never as strong as factory, and the corner detail is hard to get right. It is worth doing on a roof with 5+ years of life remaining. Below that threshold, just plan it into the reroof.
FAQ
Does code require drip edge on every roof? On asphalt shingle roofs, yes. IRC R905.2.8.5 has required drip edge at eaves and rakes since the 2012 cycle. Local jurisdictions adopt different IRC versions, so verify with your AHJ, but every major residential code now mandates it.
Can I use the same drip edge profile at eave and rake? Technically you can run Type C everywhere, but you lose the eave kick-out and risk water wicking back to the fascia. Use Type D at eaves, Type C at rakes. The cost difference is roughly $1.50 per linear foot.
Does drip edge go before or after underlayment? Both. Eave drip edge first, then underlayment OVER it. At the rakes, underlayment first, then drip edge OVER the underlayment. The reason is water sheds direction.
What size nails should I use? 1-1/4 inch galvanized roofing nails for most decks. 1-1/2 inch in cold climates with thicker sheathing. Stainless steel in coastal zones. Aluminum nails are corrosion-compatible with aluminum drip edge and prevent galvanic corrosion.
How far should drip edge overhang the fascia? The horizontal hem should extend 1/2 to 1 inch past the fascia and into the gutter trough. Less than that and water can wick back. More than that and the hem looks heavy and catches wind.
Bottom line
Drip edge is a $300 to $1,000 line item on a $15,000 reroof that prevents $5,000 worth of sheathing and fascia rot a decade later. The two rules that matter: Type D at the eave, Type C at the rake; underlayment over eave drip edge, underlayment under rake drip edge. Fastener spacing 12 inches on center, end laps at least 2 inches, kick-out angled into the gutter. Verify the install before the first course of shingles goes down, because once it is buried it is invisible until the fascia starts to rot.