How to install evaporative cooler roof jack, in sequence: build or buy a curb sized to the cooler’s downflow duct opening (typically 14 by 14 inches for residential models from MasterCool, Phoenix, Champion, and Aerocool), cut a matching hole through the roof deck centered between rafters, attach the curb to the deck with corrosion-resistant lag bolts through structural blocking, install two-piece step or saddle flashing (see our step flashing guide) to weave the curb into the existing shingle or panel field, seal every joint with compatible roof cement and butyl tape, mount the cooler on top of the curb with the manufacturer’s hold-down bolts, and run the supply duct down through the opening to the supply plenum below. The job is half carpentry, half flashing detail. The flashing is where leaks come from. The structural support is where ceilings collapse from.
The short version
- Roof jacks for evaporative coolers are not the same as plumbing vent jacks. They are curbs sized for the cooler’s downflow duct (typically 14 by 14 or 16 by 16 inches).
- Curb height matters: minimum 6 inches above the roof surface for shingles, 8 inches for metal, to keep the cooler base out of standing water and snow.
- The opening must be cut between rafters and reinforced with double 2×6 or 2×8 headers on all four sides to carry the cooler weight (150 to 350 lb dry, more when running).
- Two-piece base flashing weaves into the shingle field exactly like a chimney: step flashing on the sides, base flashing at the down-slope edge, counter-flashing or saddle at the up-slope edge.
- The supply duct seal at the ceiling plenum is the second leak path: condensation from the cooler runs back down the duct in fall shoulder season.
- Mastercool, Phoenix, Champion, and Aerocool ship optional pre-formed metal curbs sized to their coolers. Buying the matched curb saves 90 minutes of carpentry and prevents 80% of install errors.
The short answer: what an evap cooler roof jack actually is
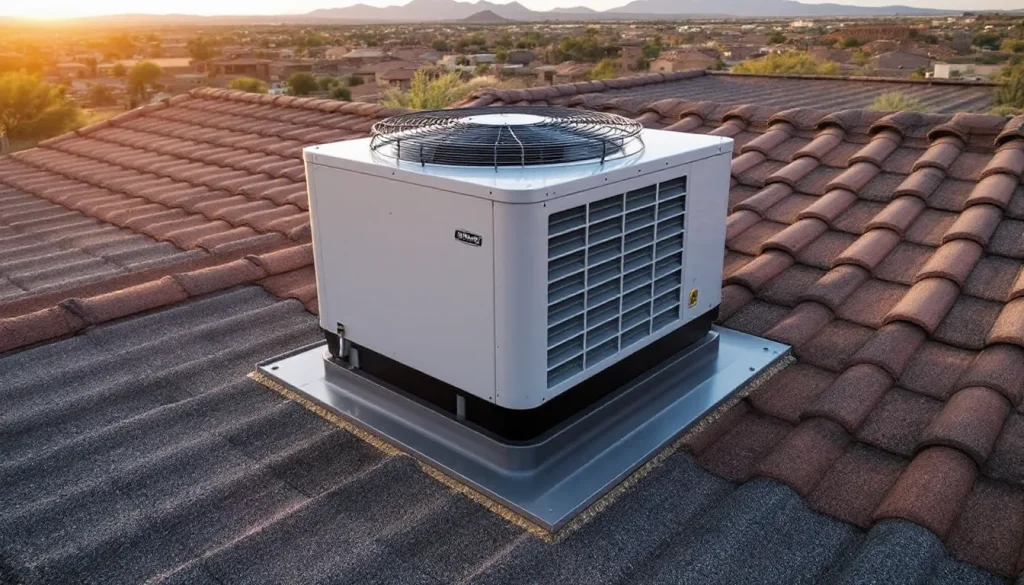
“Roof jack” in residential plumbing means a small flashing collar (see our roof vent pipe boot guide) for a vent stack. In evaporative cooler context, it means something different: a structural curb that sits on the roof, holds the cooler at the right height, channels water around the cooler base, and carries the supply duct down through the deck to the ceiling plenum below. The curb is typically a sheet metal box 14 to 18 inches square and 8 to 12 inches tall, fastened to a reinforced opening in the roof framing. The cooler bolts to the top of the curb. The flashing weaves into the existing roof finish on all four sides. Done correctly, the curb lasts as long as the roof. Done incorrectly, it leaks within 12 to 18 months.
Roof jack vs roof curb: terminology
The terms are used interchangeably in evap cooler context. Strictly, a “curb” is the structural box that supports the cooler. A “jack” is the flashing assembly that integrates the curb into the roof. In practice, the prefab kit you buy includes both, and pros use the terms loosely. This guide uses “curb” for the structural support and “flashing” for the weatherproofing detail, because that’s what matters for the install.
Tools and materials
| Item | Spec | Cost range |
|---|---|---|
| Pre-formed curb (recommended) | Matched to cooler model (Mastercool, Phoenix, Champion, Aerocool) | $120 to $260 |
| OR site-built curb materials | 2×6 or 2×8 lumber, 22 gauge galvanized sheet metal | $50 to $90 |
| Base flashing | 22 to 26 gauge galvanized or aluminum, two-piece | $25 to $60 |
| Step flashing pieces | 4×4 or 5×7 inch galvanized | $15 to $30 per set |
| Saddle flashing (up-slope crickets above 4 ft wide) | 22 gauge galvanized, custom-bent | $40 to $90 |
| Lag bolts | 3/8 x 4 inch galvanized, 8 to 12 pieces | $15 to $25 |
| Roof cement | ASTM D4586 | $8 to $15 per tube |
| Butyl tape | 1 inch wide, 1/16 inch thick | $10 to $20 per roll |
| Ice and water shield | ASTM D1970, 36 inch wide | $50 to $90 per roll |
| Reciprocating saw with wood blade | For cutting deck opening | Tool |
| Drill, hammer drill, impact driver | For curb fastening | Tool |
| Caulk gun, utility knife, tin snips | Standard | Tool |
The pre-formed curb option from Mastercool or Phoenix is typically 30% to 50% of the total job cost but saves the most time and produces the most consistent result. Site-built curbs are appropriate for non-standard cooler sizes or custom configurations where no matched curb exists.
Step 1: locate the opening
Site the cooler over a structural opening that splits the difference between three constraints:
- Centered between rafters. The opening must fit between two rafters with at least 1.5 inches of clearance on each side. Cutting a rafter is structural work that requires a header double the size of the cut member.
- Above the duct run. The supply duct drops straight down from the cooler through the opening into a plenum or branch duct below. Wandering ducts through joist bays add static pressure and reduce airflow.
- Reasonable roof position. Center of mass over a load-bearing wall is best. Long offsets from a wall increase rafter deflection under cooler weight.
From inside the attic, measure off a known reference point (a ridge, an end gable, a plumbing stack) to locate the rafters and mark the centerline of the planned opening on the underside of the sheathing. Drive a small marker nail up through the sheathing at the four corners of the planned opening. On the roof, those four nail tips locate the cut lines exactly.
Step 2: cut the roof opening
From the roof, snap chalk lines connecting the four marker nail tips. Use a circular saw or reciprocating saw to cut through the shingles, underlayment, and sheathing along the chalk lines. Cut depth: just through the sheathing, not into the rafters.
Standard opening sizes for residential coolers:
- 3,000 to 4,500 CFM coolers: 14 by 14 inch opening
- 4,500 to 6,500 CFM coolers: 16 by 16 inch opening
- 6,500 to 8,500 CFM coolers: 18 by 18 inch opening
Match the opening exactly to the curb’s interior duct opening. The curb can be slightly larger than the opening on the outside (it sits on top of the shingles) but the duct opening through the curb has to align with the deck cut.
Step 3: reinforce the framing
The structural support most installers skip. An evap cooler weighs 150 to 350 lb dry, and 30 to 60 lb more when the pads are saturated. The load is concentrated on a 14 by 14 or 16 by 16 inch opening. Without reinforcement, the rafters on either side carry the load through the sheathing alone, which over time causes ceiling (see our water stains on a ceiling guide) cracks, deflection, and (in extreme cases) failure.
Header detail
From the attic, install double 2×6 or 2×8 headers across the up-slope and down-slope sides of the opening, spanning between the two adjacent rafters. Nail the headers to the rafters with three 16d common nails per joint, or use joist hangers (Simpson LU26 or equivalent) for a stronger connection. The headers carry the cooler load into the rafters, which then transfer it down to the wall plates.
Side blocking
Add 2×6 blocking between the headers along the sides of the opening, flush with the underside of the sheathing. This gives the curb base a continuous surface to lag-bolt into and prevents the curb edges from rocking on the sheathing alone.
Cooler weight check
| Cooler model | Dry weight | Operating weight (pads wet) |
|---|---|---|
| Mastercool MCP44 (4,300 CFM) | 140 lb | 175 lb |
| Phoenix PHWC4801 (4,800 CFM) | 175 lb | 220 lb |
| Champion ASA6112 (6,500 CFM) | 235 lb | 295 lb |
| Aerocool TrophyAire 6000 | 210 lb | 265 lb |
| Mastercool AD1C71 (down-discharge, 7,000 CFM) | 250 lb | 320 lb |
For coolers above 4,500 CFM, double 2×8 headers or single LVL (laminated veneer lumber) headers are the conservative spec. If you’re unsure, have a framing carpenter or structural engineer sign off on the header.
Step 4: install ice and water shield
Before the curb goes down, install ice and water shield around the opening, extending at least 12 inches in every direction beyond the curb footprint. The membrane is the secondary water barrier in case the surface flashing fails. Self-adhering ASTM D1970 membrane bonds to the deck and self-seals around any fasteners that penetrate it.
On shingle roofs, the existing shingles and underlayment around the opening should be lifted back, ice and water shield installed against the deck, and the shingles re-laid over the membrane. On metal roofs, the membrane goes under the existing panels in the same way the original underlayment was installed.
Step 5: set the curb
Place the curb over the opening, aligning the curb’s interior duct hole with the deck cut. The curb base flange sits on top of the ice and water shield. Apply a continuous bead of butyl tape between the curb flange and the membrane (or use a thicker bead of roof cement for the same purpose). The butyl tape provides the primary seal between the curb base and the deck.
Lag-bolt the curb to the framing through the curb flange, into the headers and side blocking. Use 8 to 12 lag bolts (3/8 by 4 inch), spaced 4 to 6 inches around the perimeter. Torque to spec; over-torquing crushes the butyl tape.
Step 6: install base flashing
The flashing detail is where most installs leak. The flashing is two-piece: a base flashing (one piece) for the down-slope edge and counter-flashing or step flashing for the sides and up-slope edge.
Down-slope base flashing
The down-slope flashing is a single L-shaped piece of 22 to 26 gauge galvanized sheet metal. One leg runs up the curb wall by at least 4 inches and is fastened to the curb with sheet metal screws or rivets. The other leg runs down-slope onto the shingle field by at least 6 inches. The shingles below the curb are not lifted; the flashing simply runs over them.
Step flashing on the sides
The side flashing is a series of small step flashing pieces (4 by 4 or 5 by 7 inch L-shaped pieces), one per shingle course. Each piece runs up the curb wall by 4 inches and out onto the shingle field by 3 to 4 inches. The shingle above each step piece overlaps and conceals it. Same technique as step flashing at a wall.
Up-slope detail (the leak point)
The up-slope edge is the highest-risk leak point because water from the roof above flows directly into the curb. Two acceptable methods:
- Diverter or saddle flashing. A small cricket or saddle behind the curb that diverts water around both sides. Required when the curb is more than 24 inches wide. Made of 22 gauge sheet metal, custom-bent to shed water away from the curb’s up-slope wall.
- Counter-flashing. A piece of L-flashing fastened to the curb wall above the shingle course, with the shingle above tucked under the L. Water from the roof above runs onto the L and is diverted around the curb sides.
The saddle method is required for any curb more than 24 inches wide and recommended for any curb more than 12 inches wide. Without the saddle, the curb dams water in a heavy rain and the up-slope flashing edge is overwhelmed.
Step 7: seal everything
Every flashing joint gets sealed with roof cement (ASTM D4586) or compatible butyl/polyurethane sealant. Specifically:
- Where step flashing pieces overlap each other (1 inch overlap minimum, bedded in cement)
- Where step flashing meets base flashing at the corners (cement and overlap)
- Where flashing meets the curb wall (continuous bead along the top edge of the flashing leg)
- Around every fastener that penetrates the flashing
- The cap of the saddle flashing where it meets the curb back wall
Use the right sealant for the substrate. Roof cement bonds well to bitumen and most painted metal. Polyurethane bonds to most surfaces but has a 5 to 10 year service life vs roof cement’s 10 to 15 years. Silicone is generally a bad call for flashing seal because most other materials don’t bond to silicone and the seal fails when other repairs are attempted.
Step 8: mount the cooler
The cooler sets on top of the curb with the manufacturer’s hold-down bolts (typically 4 bolts through the cooler base into the curb). Use the bolts that came with the cooler or matching grade-5 hardware. The bolts should pass through a compressible gasket (often supplied with the cooler) that seats the cooler firmly on the curb without crushing the cooler base.
Vibration isolation
Evap coolers generate low-frequency vibration from the blower motor. Vibration transmitted through the curb into the framing causes ceiling rumble and over time loosens fasteners. Vibration isolation pads (rubber or neoprene) between the cooler base and the curb top cut the transmission by 60% to 80%. Many higher-end coolers ship with these pads included; cheaper models often need them added separately.
Step 9: connect the supply duct
The supply duct drops from the cooler down through the curb opening to the supply plenum or branch duct below. Two details:
Duct-to-curb seal
The duct must be sealed to the curb opening with mastic or foil tape. Air leaks here put cool air into the attic instead of the conditioned space, killing cooling performance.
Plenum or ceiling drop
The duct terminates at the supply plenum, which mounts to the ceiling joists below. The ceiling cut for the plenum should be sealed around the perimeter with mastic. A ceiling damper at the plenum opening lets you close the cooler vent in winter to prevent attic air infiltration. See our attic ventilation guide for the related winter sealing detail.
Step 10: water supply, drain, and overflow
Evap coolers need a water supply line (1/4 inch copper or PEX, typically tapped off the cold water line at a nearby outdoor hose bib or attic plumbing tee), a drain line (3/8 inch tubing to a downspout or roof drain), and an overflow tube. All three penetrate the roof or sidewall, and each is a potential leak source.
Water supply
Run the supply through a separate sealed penetration, not through the cooler curb. A small roof penetration boot or a sealed sidewall penetration is the right detail. Add a ball valve at the attic or basement so the line can be shut off for winter drain-down.
Drain and overflow
The bleed-off drain (typically 3/8 inch tubing) carries away mineralized water during operation. Route it to a downspout, gutter, or roof drain. Do not drain directly onto the roof field; the mineral content stains shingles and corrodes panels over time.
Common installation mistakes
1. No structural reinforcement
Curb lag-bolted directly to the sheathing with no header support. Within 2 to 5 years, the ceiling drywall around the cooler shows cracks. Within 10 years, deflection causes a noticeable dip. The fix is opening the ceiling and adding the headers retroactively, at 3 to 5 times the cost of doing it during install.
2. No saddle on a wide curb
Curb 24 inches or wider with no up-slope saddle flashing. Water dams against the curb in heavy rain and overwhelms the up-slope flashing. Leak shows up as a stain on the ceiling along the up-slope edge of the curb, often diagnosed as a different leak entirely.
3. Step flashing with the wrong overlap direction
Step flashing pieces installed so that the up-slope piece overlaps the down-slope piece (instead of the other way around). Water runs under the overlap and reaches the deck. Same as backwards roof flashing anywhere else.
4. Silicone caulk used as primary flashing seal
Silicone fails as a flashing material because nothing else bonds to it. Future repairs become impossible without complete removal. Use roof cement or polyurethane sealant instead.
5. Drain water on the roof field
Bleed-off drain emptying directly onto shingles or panels. Mineral content stains, accelerates granule loss, and corrodes painted metal. Always route to a downspout or roof drain.
6. No winter sealing
The cooler sits on the curb year-round, with the supply duct open to the attic. In winter, cold attic air infiltrates the conditioned space through the open duct. The fix is a ceiling damper at the supply plenum and a cover for the cooler itself. Many homeowners skip this and accept the heat loss.
7. Cooler tilted off level
Curb installed without verifying level. The cooler’s water pan tips to one side, causing pads to dry unevenly and water to pool at one corner. Check the curb top with a level before mounting the cooler and shim as needed.
Roof-mounted vs side-discharge evap coolers
Coolers come in two main configurations: down-discharge (the cooler sits on a roof curb and discharges air straight down through the deck) and side-discharge (the cooler sits on the ground or a wall bracket and discharges air horizontally into the building). Roof-mounted down-discharge is the dominant residential configuration in Arizona, Nevada, New Mexico, and Texas because the duct run is short, the cool air falls naturally into the conditioned space, and the cooler is out of sight.
Side-discharge has advantages: easier service access, no roof penetration, and easier winterization. The tradeoff is more visible ductwork inside the building and typically less efficient cool air distribution.
Climate considerations
| Climate | Curb height | Special considerations |
|---|---|---|
| Arizona desert (Phoenix, Tucson) | 6 to 8 inches | UV degrades neoprene gaskets; specify silicone-free EPDM |
| Las Vegas / Nevada | 6 to 8 inches | Mineral-heavy water requires more frequent bleed-off; route drain carefully |
| New Mexico (Albuquerque, Santa Fe) | 8 to 10 inches | Occasional snow load; size headers conservatively |
| West Texas (El Paso, Lubbock) | 8 inches | High wind; double the saddle flashing fasteners |
| California Central Valley | 6 inches | Coastal salt air; specify stainless lag bolts and aluminum flashing |
Cost to install
| Scope | DIY cost | Contractor cost |
|---|---|---|
| Pre-formed curb + flashing kit only | $220 to $400 | n/a |
| Full install including cooler (new construction) | $800 to $1,400 materials | $2,500 to $4,500 turn-key |
| Replacement on existing roof opening | $300 to $600 materials | $900 to $1,800 |
| Add structural headers retroactively | $150 to $350 materials | $600 to $1,200 |
The contractor cost premium reflects the structural work (headers), roofing work (flashing), HVAC work (duct connection), plumbing work (water supply), and electrical work (cooler wiring). Most homeowners can DIY the cooler mounting on an existing curb but should hire out the initial roof opening and structural work.
When to call a pro
- New roof opening on a high-pitch (8:12 or steeper) roof
- Roof has any active leak history near the planned cooler location (diagnose first, see how to fix a roof leak)
- Structural framing requires modification (any rafter cut)
- Metal roof install (metal flashing requires panel matching and is harder to retrofit)
- Coolers above 6,500 CFM (heavier than most homeowners want to lift onto a roof)
FAQ
What size roof opening do I need for an evaporative cooler?
Match the opening to your cooler’s downflow duct dimension. Standard sizes: 14 by 14 inches for 3,000 to 4,500 CFM coolers, 16 by 16 inches for 4,500 to 6,500 CFM, and 18 by 18 inches for 6,500 to 8,500 CFM. The exact dimension comes from the cooler manual; don’t guess.
Do I need a roof curb or can I just bolt the cooler to the shingles?
You need a curb. Bolting directly to the shingles concentrates the cooler weight on the sheathing alone (no structural support), leaves the cooler base sitting in standing water, and provides no flashing path for the supply duct. Every manufacturer specifies a curb in the install instructions.
Can I install an evaporative cooler on a metal roof?
Yes, with the right curb. Most major panel manufacturers (McElroy Metal, Mueller, ABC) make matching curbs for their panel profiles. The curb integrates with the panel ribs and uses butyl tape at the panel-to-curb seal. Don’t try to flash a square curb into a corrugated panel field with shingle techniques; the geometry doesn’t work.
How do I winterize an evap cooler on the roof?
Three steps: (1) drain the water pan and disconnect the supply line at the attic shutoff, (2) install a winter cover over the cooler to keep snow and water out, and (3) close the ceiling damper at the supply plenum to block attic air infiltration. Most coolers will outlast a non-winterized install by 5 to 10 years.
What happens if the curb leaks?
Water enters the attic through the deck opening, runs along framing, and shows up at the ceiling either directly under the cooler or at a low point downstream. The fix depends on where the leak originates. Most curb leaks are at the up-slope flashing or where step flashing transitions to base flashing. The repair is to lift the affected shingle courses, replace the failed flashing piece, and re-bed in roof cement.
Bottom line
The curb is the part of an evap cooler install that homeowners and even some contractors skip details on, then pay for in five years with ceiling stains and rotted sheathing. The structural reinforcement, the saddle flashing on wide curbs, the proper step flashing direction, and the sealed duct connection at the plenum are the four details that separate a 20-year install from a 5-year one.
If you’re DIY, buy the pre-formed manufacturer curb and flashing kit. It costs more than site-built materials but produces a more reliable install and saves several hours of carpentry. If you’re hiring out, ask the contractor to specify the curb manufacturer in writing, confirm headers are part of the scope, and inspect the up-slope saddle before the cooler goes on. For broader roof penetration context, see our bathroom vent through roof guide for the smaller-scale version of the same flashing logic.