A peel and stick underlayment is a self-adhered rubberized asphalt or butyl membrane (see our ice dam protection membrane code) that bonds directly to the roof deck and seals around every nail driven through it, used in the high-risk zones where standard underlayment fails: valleys, eaves at risk of ice dams, low-slope sections under 4:12, and around chimneys, skylights, and dormers. It is mandated by IRC R905.1.2 as an ice barrier from the eave to a point 24 inches inside the warm wall line in any region where the average January temperature is 25 degrees Fahrenheit or lower. Real product names matter here: Grace Ice and Water Shield, CertainTeed WinterGuard, GAF StormGuard, Owens Corning WeatherLock, and a handful of others define the category. The differences come down to mil thickness, surface texture, max exposure window, and price per square.
The short version
- Code requires ice and water shield from eave to 24 in inside the warm wall line in any climate with average January temp at or below 25 degrees F (IRC R905.1.2).
- Best installed in valleys, at eaves over ice-dam-prone zones, on low-slope sections (2:12 to 4:12), and around all penetrations.
- Top brands by mil thickness: Grace Ice and Water Shield (60 mil), CertainTeed WinterGuard (40 mil), GAF StormGuard (40 mil), Owens Corning WeatherLock (40 mil).
- Two surface types: granular (walkable, for ice-barrier zones) and smooth (high-temp, for metal roof underlayment).
- Max exposure window is 30 to 180 days depending on brand. UV degrades the adhesive long before the membrane fails.
- Cost: $90 to $180 per square (100 sq ft) for residential ice and water products; $5 to $9 per linear foot in valley rolls.
What peel and stick underlayment is
Peel and stick underlayment is a self-adhered roof membrane: one side is a rubberized asphalt or butyl-based adhesive protected by a release liner, the other side is either granular (for walkability and as a primary surface) or polymer-film (for use under finish roofing). When the release liner comes off, the adhesive bonds permanently to a primed or clean roof deck. The defining trait, the one that separates it from any felt or synthetic, is that the membrane self-seals around every fastener driven through it. Drive a nail through 30-pound felt and you have an open hole. Drive a nail through 60-mil ice and water shield and the rubberized layer closes around the shank.
That self-sealing behavior is the reason code requires it in ice-dam zones. When meltwater backs up under shingles at the eave, it pools above the underlayment. A felt or synthetic underlayment will leak at every nail hole. A self-adhered membrane will not. For more on how peel-and-stick fits into the broader underlayment category, see our ice and water shield guide and the comparison with conventional products in felt vs. synthetic underlayment.
Where code requires it (IRC R905.1.2)
The 2018 and 2021 International Residential Code R905.1.2 require an ice barrier on roofs in areas where there is a history of ice forming along the eaves causing backup of water. The technical trigger is an average January air temperature of 25 degrees Fahrenheit or lower. The barrier must extend from the eave edge to a point at least 24 inches inside the exterior wall line of the building, measured along the roof slope. On wider overhangs, that distance compounds. A 24-inch overhang with a 4:12 slope needs roughly 48 inches of ice barrier from the eave to clear the wall plate plus the 24-inch interior margin.
Beyond the eave, every responsible installer puts peel and stick in three other places code does not strictly mandate but every roof should have: open valleys, around all penetrations (chimneys, skylights, plumbing stacks), and on any roof section with a slope under 4:12. The valley flashing detail guide covers the valley application in depth.
The product lineup
| Product | Mil thickness | Surface | Max exposure | Typical cost |
|---|---|---|---|---|
| Grace Ice and Water Shield | 60 mil | Granular | 30 days | $140-180/sq |
| Grace Select | 40 mil | Granular | 30 days | $90-120/sq |
| CertainTeed WinterGuard HT | 40 mil | Granular | 30 days | $95-130/sq |
| GAF StormGuard | 40 mil | Granular | 90 days | $90-120/sq |
| Owens Corning WeatherLock G | 40 mil | Granular | 30 days | $95-125/sq |
| Sharkskin Ultra Mat | 30 mil | Polymer film | 180 days | $130-160/sq |
| Tyvek Protec 200 with self-stick edge | Synthetic + butyl edge | Polymer film | 180 days | $110-140/sq |
Grace Ice and Water Shield is the original and still the reference standard at 60 mil. CertainTeed WinterGuard, GAF StormGuard, and Owens Corning WeatherLock are the manufacturer-branded equivalents that ship with the matching shingle warranty system, which matters for warranty registration. Sharkskin Ultra Mat and a handful of polymer-faced products serve a different niche: high-temp metal roof underlayment, where the membrane needs to survive 240-degree deck temperatures under standing-seam panels.
Granular vs smooth surface
The surface texture is not cosmetic. A granular-faced product (Grace Ice and Water Shield, WinterGuard, StormGuard, WeatherLock) has a sand or polymer grit topcoat that is walkable when wet and is designed to be covered by asphalt shingles. The granules also keep the membrane from sticking to itself in the roll. A smooth-faced or polymer-film product is for use under metal roofing, slate, or tile, where the underlayment surface needs to slide against the finish material as it expands and contracts with temperature.
Picking the wrong surface causes specific failures. Granular product under standing seam metal will tear as the panels move. Smooth product as an exposed ice barrier is slippery and unsafe to walk on.
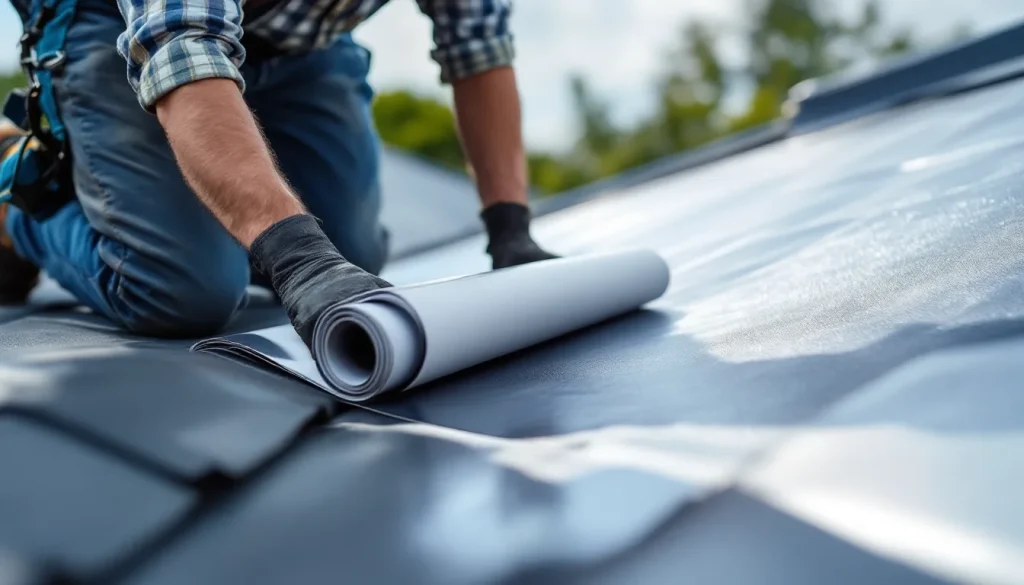
Install sequence (8 steps)
- Deck prep. The deck must be clean, dry, and smooth. Sweep off all sawdust and grit. Knock down any nail heads sitting proud. Plywood with knots or splinters needs to be replaced or the membrane will not adhere. Deck moisture above 19 percent will prevent bond.
- Set the chalk line. Snap a chalk line parallel to the eave at the upper edge of where the ice barrier will land. For a typical 24-inch overhang with a code-required 24-inch interior margin, the line is 48 to 54 inches up from the eave edge. The first course of membrane lands below this line.
- Drip edge at the eave first. Install the metal drip edge at the eave before any underlayment. Standard practice and most product instructions put peel and stick OVER the eave drip edge so meltwater that gets under shingles drains onto the drip edge, not behind it. Read the specific product instructions: a few brands now spec underlayment under drip edge.
- Start at the low corner. Cut the first course to length, position it with the lower edge at the drip edge top flange, and peel back about 24 inches of release liner. Press the exposed adhesive to the deck and work outward from the bond line, peeling the liner as you go. Use a stiff roller or J-roller to seat the membrane and squeeze out air.
- End laps and side laps. End laps (vertical seams) need 6 inches of overlap. Side laps (horizontal courses) need 3.5 to 6 inches depending on the product. Always lap upper course OVER lower course so water sheds. Roll every lap with a J-roller to ensure full bond.
- Valley application. Run a single 36-inch wide strip down the centerline of the valley first, with the membrane bonded to the deck. Then lap roof-field courses 6 inches onto the valley strip from each side. This puts three layers of waterproofing at the valley centerline where water concentration is highest.
- Penetrations. Around chimneys, skylights, and plumbing stacks, cut the membrane to wrap up the penetration 4 to 6 inches and bond the upturn to the vertical surface. Combine with metal step flashing per the step flashing install guide.
- Cover within the exposure window. Every product has a maximum exposure window: 30 days for Grace and most ice-barrier products, 90 days for StormGuard, up to 180 days for high-temp polymer-faced membranes. After the window, UV degrades the adhesive system and the product loses warranty.
Common mistakes
The failures we see most often are not material failures. They are application errors that turn an expensive premium membrane into an expensive way to leak.
- Installing on a wet or dirty deck. Deck moisture above 19 percent or a layer of sawdust kills the bond. The membrane appears to stick on day one and then peels off in sheets a year later when the deck dries or settles.
- Skipping the J-roller. Hand pressure does not seat the adhesive. Every course, every lap needs to be rolled. Air pockets become future blisters and delamination zones.
- Wrong lap direction. Lower course laid over upper course, or end laps oriented against the shingle exposure direction, creates a water dam that pools meltwater at the seam.
- Side lap too narrow. A 1-inch side lap looks fine in summer but opens up under thermal cycling. Stick to the 3.5 to 6 inch range the product spec calls for.
- Missing the warm wall line measurement. Code says 24 inches INSIDE the warm wall. Crews routinely measure 24 inches from the eave edge instead, leaving an unprotected zone over the wall plate where the worst ice dams form.
- Drip edge under instead of over (or vice versa) when product spec is opposite. Read the specific product instructions every time. The default convention is peel-and-stick OVER eave drip edge, but a handful of brands have changed in the last five years.
- Exceeding the exposure window. The membrane left exposed for 60 days when the spec says 30 has degraded adhesive and may not bond to the next course or the shingles above it.
- Re-using cut-off scraps for the valley. The valley needs full-width 36-inch material running continuous. Pieced-together scraps create seam after seam in the highest-water zone of the roof.
- No primer on OSB. Most ice barriers spec a primer (Grace Bituthene Primer, CertainTeed Primer) on OSB to ensure full adhesion. Skipping it cuts bond strength by half.
- Installing in cold temperatures without a heat assist. Below 40 degrees F, the adhesive does not flow. The product still releases from the liner but it sits on the deck. Tack the corners with cap nails and let the sun cure it, or use a propane torch dwell to activate the bond.
Cost
Material cost for a standard 40-mil granular ice and water shield runs $90 to $130 per square (100 sq ft). The 60-mil Grace Ice and Water Shield is $140 to $180 per square. Coverage per roll varies: a Grace roll is 65 linear feet by 36 inches, covering about 195 square feet per roll. Most residential reroofs use 4 to 8 squares of ice and water shield: two squares per eave line (varying with overhang), one square per valley, and additional material around chimneys and skylights.
Installed cost adds another $40 to $80 per square in labor. A typical reroof with proper ice barrier at all eaves plus valley protection on a 30-square house adds $800 to $1,400 to the total roof price over what felt-only or basic synthetic would cost. That premium is non-negotiable in climate zones where code mandates it and pays for itself the first time an ice dam tries to push meltwater under the shingles.
When to use peel and stick across the entire roof
Standard residential practice uses peel and stick only in the code-required zones plus valleys and penetrations, with synthetic felt covering the field. Three situations justify going wall-to-wall with self-adhered membrane:
- Low-slope roofs under 4:12. Every square foot is at higher water risk. Many code jurisdictions require ice and water shield over the entire roof when slope is below 2:12.
- Hurricane and high-wind zones. Florida’s High Velocity Hurricane Zone and similar coastal codes effectively require self-adhered underlayment over the full deck to maintain water integrity when shingles blow off in a storm.
- Roofs with marginal ventilation that cannot be fixed during the reroof. If the attic ventilation deficiency cannot be corrected, full-coverage ice and water shield is insurance against the moisture problems that result.
For most well-ventilated, normal-slope roofs in non-coastal climates, full-coverage peel and stick is overkill that traps moisture in the deck. Use it where the risk justifies it.
Compatibility with synthetic underlayment
Peel and stick at the eaves and valleys, synthetic in the field is the standard 2026 spec. The synthetic field underlayment must lap OVER the upper edge of the ice barrier by 6 to 8 inches so water cannot get behind it. If the synthetic is laid first and the ice barrier is added after, the lap direction is wrong and the entire system leaks. The synthetic underlayment brand comparison covers the field products that pair best with each ice barrier brand.
FAQ
Is peel and stick underlayment the same as ice and water shield? Yes, in common usage. Ice and water shield is the most common type of peel and stick roof underlayment. Some smooth-faced peel and stick products are designed for metal roofing rather than as ice barriers, but if someone says “peel and stick” without specifying, they usually mean ice and water shield.
Can I install peel and stick over old felt? No. The membrane needs direct deck contact for full bond. Old felt also traps moisture against the new membrane. Strip the deck clean.
How long can peel and stick stay exposed before shingles go on? Brand-dependent. Grace Ice and Water Shield: 30 days. GAF StormGuard: 90 days. Sharkskin Ultra Mat: 180 days. After the window the warranty voids and the adhesive can degrade.
Does peel and stick replace the need for synthetic felt? Not for the whole roof. Use peel and stick at code-required ice barrier zones, valleys, and penetrations. Use synthetic in the field. Full-coverage peel and stick is reserved for low-slope, high-wind, or compromised-ventilation situations.
What temperature is too cold to install peel and stick? Below 40 degrees F most adhesives will not flow. The product sticks initially but bond strength is low until temperatures rise. If you must install in cold weather, follow the manufacturer’s primer recommendation and check bond after the first warm day.
Bottom line
Peel and stick underlayment is not a premium upgrade you can negotiate away to save $800 on a reroof. In any climate with average January temp at or below 25 degrees F, it is code-required at the eaves. In every climate it is the only material that survives a backed-up valley or a leaking chimney flashing without leaking at every nail. Pick a 40-mil granular product from one of the four major brands, install it on a clean dry deck within the exposure window, roll every seam with a J-roller, and run a full-width strip in every valley before shingles. The membrane outlives the shingles by twenty years if installed correctly. If installed badly, it fails before the next snow.