This rain gutter install guide covers what actually goes wrong when homeowners (and undertrained crews) hang gutters: wrong size for the roof area, wrong pitch, hangers too far apart, downspouts undersized or too far apart, and termination dumping water against the foundation. Get those five right and an aluminum gutter system (see our complete rain gutter system design guide) runs 25 to 30 years without trouble. Get any of them wrong and you are repairing within 5 years.
The short version
- Pitch: 1/4 inch drop per 10 feet toward the downspout. Half that and water sits. Twice that and the front of the gutter dips out of plane visually.
- Hanger spacing: every 24 to 30 inches on aluminum. Tighten to 18 to 24 inches in snow regions and on 0.027 gauge.
- Hangers: Spectra E-Z Lock or Raytec hidden hangers for aluminum K-style. Bracket hangers for half-round. Stainless or aluminum fasteners only.
- Downspout placement: one every 35 to 40 feet of gutter run minimum. Closer in heavy-rain regions.
- Downspout size: 2×3 inch handles 600 sq ft of roof drainage. 3×4 inch handles 1,200 sq ft. Default to 3×4 on any roof over 1,000 sq ft.
- Termination: 2 to 4 feet from foundation minimum via splash block or extension. Buried tie-in to a drain line is the durable answer.
- Gutter size: 5-inch K-style handles up to 1,200 sq ft of roof. 6-inch handles 2,000 sq ft. Pick by roof area, not by what the shop is pushing.
Step one: size the gutter to the roof, not to the budget
The single most common gutter install mistake in 2026 is putting 5-inch K-style on a roof that needs 6-inch. Supply yards stock 5-inch by volume, gutter machines are set up for 5-inch by default, and contractors quote 5-inch because that is what most customers compare. On any roof drainage area over 1,200 square feet, 5-inch overflows in heavy rain. The water that should be running through the gutter spills over the front lip, soaks the fascia, hits the siding, splashes against the foundation, and creates the basement moisture problems the gutter was supposed to prevent.
The roof area to gutter size mapping (assumes 1 inch per hour rainfall, standard pitch, downspout sized to capacity):
| Roof drainage area per downspout | K-style size | Half-round size | Downspout size |
|---|---|---|---|
| Up to 600 sq ft | 5 inch | 5 inch | 2×3 inch |
| 600 to 1,200 sq ft | 5 inch | 6 inch | 2×3 or 3×4 inch |
| 1,200 to 2,000 sq ft | 6 inch | 6 or 7 inch | 3×4 inch |
| Over 2,000 sq ft | 6 or 7 inch | 7 inch | 3×4 inch, multiple |
The math is per-downspout drainage area, not total roof area. A 2,400 square foot roof with downspouts at three locations splits to 800 square feet each, and 5-inch K-style works if each downspout actually drains its assigned segment without water having to flow past another downspout. In high-rainfall regions (Pacific Northwest, Gulf Coast, Southeast), upgrade one size beyond the table.
For the full sizing methodology including rainfall intensity adjustments, see gutter sizes and capacity. For the profile decision between K-style and half-round, see k-style vs half-round gutters. For the cost implications of each size, see gutter cost per linear foot.
Step two: chalk the pitch line before anything goes up
Gutter pitch is 1/4 inch drop per 10 feet, sloped toward the downspout. On a 40-foot run with one downspout at the end, that is 1 inch of total drop from the high end to the downspout. On a 40-foot run with downspouts at both ends (water draining away from the center), the high point is at the middle and each half drops 1/2 inch over 20 feet.
The right way to set pitch: snap a chalk line along the fascia at the high end of the run, measure down by the required drop at the downspout end, snap a second chalk line, then snap the line between the two reference marks. The gutter back edge follows this chalked line. The pitch is built in from the start. Eyeballing pitch from a ladder produces inconsistent results that look fine until the first heavy rain reveals the puddle in the middle.
Less pitch than 1/4 inch per 10 feet means water sits in the gutter between rains. Standing water accelerates corrosion at any small coating defect, breeds mosquitoes in warm weather, and ices up in winter. More pitch than 1/2 inch per 10 feet creates a visible dip in the gutter line that homeowners notice from the curb and complain about.
Long runs over 40 feet split into two pitched sections that drain toward downspouts at each end. The high point in the middle is invisible from the ground if both halves are pitched symmetrically. This is how most professional residential gutter installs handle long fascia runs.
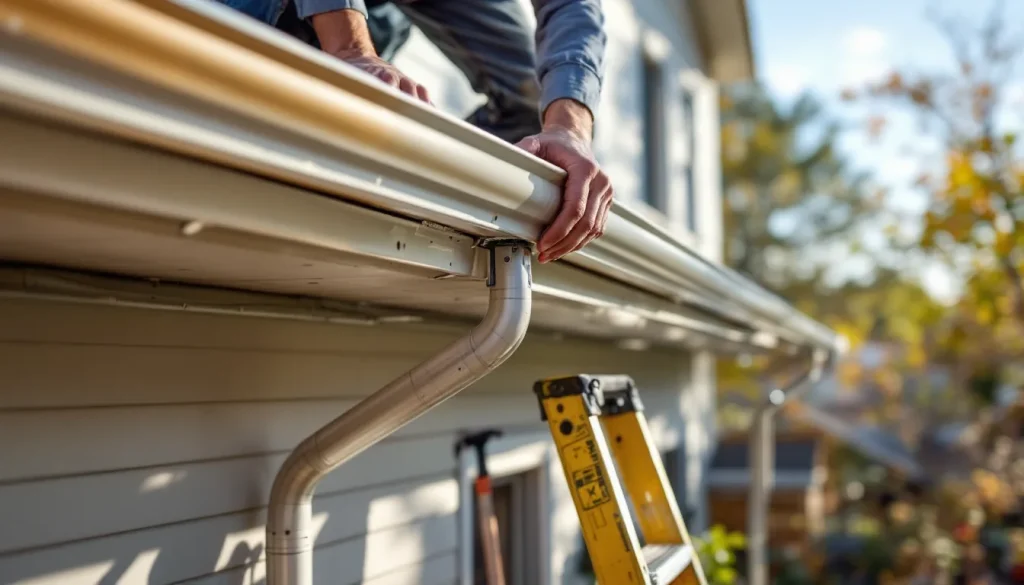
Step three: hanger spacing matters more than hanger brand
Hidden hangers are the standard for aluminum (see our gutter material choice) K-style. The two dominant brands in 2026 are Spectra E-Z Lock and Raytec. Both are aluminum brackets that snap into the front lip of the gutter and screw through the back into the fascia with a single screw. The screw should be stainless or aluminum to prevent galvanic corrosion with the aluminum gutter.
The hanger choice matters less than the spacing. Industry-standard spacing is 24 to 30 inches on center for residential aluminum K-style. Tighten to 18 to 24 inches in snow regions where ice load matters. Tighten to 18 inches for 0.027 gauge gutter in any region with serious winter. 0.032 gauge gutter holds shape better and can run at 24 inches even in snow regions.
The fastener has to hit something solid. The screw goes through the fascia and ideally into the rafter tail or the sub-fascia behind it. On houses where the fascia is decorative trim attached to a sub-fascia, the sub-fascia provides the anchor. On houses where the fascia is the only structural element, it has to be in good condition (no rot, no cracks, fully attached to the rafter tails). For the fascia condition issue, see fascia rot from gutters.
Half-round gutters use bracket-style hangers that cradle the gutter from underneath rather than snapping into the lip. Brackets typically space at 24 to 32 inches. Copper half-round uses copper or brass brackets to avoid galvanic issues. Aluminum half-round uses aluminum or coated steel brackets. Same spacing logic as K-style: tighter in snow regions, looser in mild climates.
Step four: downspout placement and sizing
Downspouts drive the entire system. A perfectly sized, pitched, hung gutter overflows if the downspouts cannot move water out as fast as the roof delivers it. The two variables: how often (spacing) and how big (size).
Spacing: one downspout per 35 to 40 feet of gutter run is the residential standard. Closer in heavy-rain regions (one per 30 feet in Pacific Northwest and Southeast). Closer also where roof valleys dump concentrated water into the gutter at a single point. Roof valleys deliver 3 to 5 times the average drainage rate for the area they cover, and the downspout has to be positioned within 3 to 5 feet of the valley discharge or the gutter overflows at the valley before the water reaches the downspout.
Sizing: 2×3 inch downspout (rectangular) handles roughly 600 square feet of roof drainage area at 1 inch per hour rainfall. 3×4 inch downspout handles roughly 1,200 square feet. Round downspouts have similar capacity to rectangular at equivalent cross-section. Copper round downspouts at 3-inch diameter approximate 2×3 rectangular capacity. 4-inch round approximates 3×4 rectangular.
On any new install with a roof area over 1,000 square feet, default to 3×4 inch downspout. The cost premium over 2×3 is small ($2 to $3 per linear foot) and the capacity headroom is real. Most gutter-overflow callbacks in 2026 trace to undersized 2×3 downspouts that the original contractor installed because that is what the supply house had in stock.
For the full downspout sizing and placement methodology, see downspout placement and sizing.
Step five: termination and where the water actually goes
The downspout has to deliver water away from the foundation. The two acceptable terminations are surface (splash block or extension) and buried (tie-in to a drain line or French drain).
Surface termination requires a splash block or flexible extension that throws water 2 to 4 feet minimum from the foundation. Splash blocks (precast concrete pads, $15 to $30) sit at the base of the downspout and the water sheets over them. Extensions (flexible plastic tubing, $20 to $40) carry water 4 to 10 feet away depending on length. For the choice between them, see splash blocks vs extensions.
Buried termination ties the downspout into a 4-inch perforated or solid PVC pipe that carries water either to daylight (downhill discharge to the yard surface) or to a French drain or dry well. This is the durable answer for any property where surface water management matters. The downspout connection uses a clean-out tee at grade so that clogs can be cleared without digging. For the French drain integration detail, see french drain gutter integration.
Termination is where homeowners and crews cut corners most often. The downspout that dumps water 6 inches from the foundation creates a basement moisture problem within 2 to 5 years. The cost difference between proper termination and the short-cut version is $50 to $200 per downspout. Not optional.
The sequence on install day
A two-person crew installing continuous aluminum K-style on a typical 200-foot residential job runs the sequence like this:
- Tear-off if applicable. Remove old gutters, brackets, and downspouts. Discard. Patch fastener holes in the fascia with caulk or filler.
- Fascia inspection. Walk every linear foot looking for rot, soft spots, missing nails, gaps. Note any sections that need carpentry repair before gutter goes up.
- Chalk lines. Mark the high point at each end of each run, snap pitch lines.
- Set up the gutter machine. Load the coil into the New Tech Machinery MACH II or Mark IV, dial the cut length, position the truck or trailer near the work.
- Run the first gutter section. Extrude the length needed for the longest fascia run.
- Hang first section. Position to chalk line, install hidden hangers every 24 to 30 inches, screw to fascia.
- Cut and install end caps. Crimp end caps to the gutter end, seal with butyl or sealant.
- Cut downspout outlets. Cut hole in gutter bottom at downspout location, install outlet flange, seal.
- Continue all gutter runs. Repeat for each side of the house.
- Install corner miters. Cut and assemble inside and outside corner miters at the intersections. Seal joints.
- Install downspouts. Cut downspout to length, attach elbows at top and bottom, strap to wall every 6 to 10 feet.
- Set splash blocks or extensions. Position at the base of each downspout.
- Water test. Run a hose into the highest point of each run, watch the water flow toward the downspouts. Check for puddles, leaks at corners and outlets, and overflow.
- Cleanup and haul-away. Remove debris and old material.
A 200-foot job runs 6 to 9 hours for a competent two-person crew on a single-story straight-fascia ranch. Add 30 to 50 percent for two-story work. Add 50 to 100 percent for complex geometry with bay windows, dormers, and multiple corner miters.
Where DIY goes wrong
Gutter installation is one of the more DIY-friendly roofing tasks because the materials are light, the work is at ladder height (not on the roof), and the consequences of a small mistake are leaks rather than structural failure. Plenty of homeowners hang their own sectional aluminum gutters successfully. The mistakes that show up in DIY installs:
- No pitch or wrong pitch. Without a chalked line, the gutter ends up either level or pitched wrong. Water sits or pools.
- Hangers too far apart. Hardware-store boxed kits sometimes include hangers spaced for 36-inch installation, which sags within a year under water weight.
- Wrong fasteners. Steel screws into aluminum gutter cause galvanic corrosion at every fastener point. Use aluminum or stainless.
- Sectional joints leaking. The slip-joint connectors that join 10-foot sectional gutter pieces need careful sealing with butyl tape, not a quick swipe of caulk. Most DIY leaks are at these joints.
- Downspout too far from valley. If a roof valley discharges 8 feet from the downspout, the gutter overflows at the valley in any meaningful rain.
- Termination at the foundation. The downspout dumping water 4 inches from the wall creates exactly the problem the gutter was installed to prevent.
The DIY install also misses the continuous advantage. Sectional gutter has joints every 10 feet that are leak points. Continuous gutter has joints only at corners and downspout outlets. The continuous advantage is real and accessible only through a professional install with a gutter machine.
The fascia interaction
Gutter installation interacts with fascia condition. The hidden hangers and bracket hangers screw into the fascia and the gutter’s load transfers there. If the fascia is rotted, soft, or marginal, the gutter pulls away from the house within 1 to 3 years even with proper hanger spacing.
The right sequence on any reroof or gutter replacement: inspect fascia, repair or replace any compromised section, then install new gutters. Doing it in the reverse order (gutter first, fascia repair when the gutter falls off) costs more in the long run because you pay for two gutter installs.
For the fascia condition diagnosis and repair guide, see fascia board and fascia rot from gutters. The drip edge that delivers water from the roof into the gutter is also part of this assembly: see drip edge and drip edge installation detail.
Gutter guards: install or skip?
Gutter guards reduce cleaning frequency and prevent some of the debris-related failures that drive homeowners crazy. They add $6 to $20 per linear foot to the install cost depending on the product, which can effectively double the gutter cost for the higher-end micromesh systems. The decision is a function of tree cover, willingness to climb a ladder, and how much you value your weekends.
On a property with heavy tree cover (deciduous trees within 30 feet of the roofline), gutter guards pay for themselves in 5 to 8 years of avoided cleaning cost and avoided fascia damage. On a treeless property, they are unnecessary and the money is better spent on a gauge upgrade or downspout upgrade.
For product comparison, see best gutter guards. For the DIY install path, see diy gutter guards.
Tools and materials list for DIY
For homeowners attempting sectional install:
- 10-foot aluminum gutter sections, K-style, 0.027 or 0.032 gauge
- Hidden hangers, one every 24 to 30 inches of run
- End caps (one per gutter run end)
- Downspout outlets (one per downspout)
- Slip joint connectors with gaskets (one per section joint)
- Inside and outside corner miters (one per corner)
- Downspout: 2×3 or 3×4 inch aluminum, with A and B elbows at top and bottom
- Downspout straps (one every 6 to 10 feet of downspout)
- Splash blocks or flexible extensions
- Gutter sealant (Geocel or similar butyl-based sealant rated for gutter use)
- Stainless steel or aluminum screws, 1.5 inch length
- Chalk line, level, measuring tape, drill, tin snips, rivet gun, ladder rated for the work
The shopping list runs $250 to $500 for a 200-foot job in materials. Labor at $90 to $130 per hour per crew member for a two-person crew over 8 hours is $1,400 to $2,100. The DIY savings are real if you have the time and the comfort working on ladders. The DIY risk is leak repair within 3 to 5 years if the joints are not sealed correctly.
What to verify after install
Before paying the contractor or moving on from a DIY job:
- Run a hose at the high end of each gutter run. Water should flow continuously toward the downspout without puddling anywhere.
- Check every corner miter for leaks during the water test.
- Check every downspout outlet for leaks.
- Verify downspouts discharge 2 to 4 feet from the foundation minimum.
- Verify the gutter front lip is level looking down the run from the ground. Hanger spacing issues show up as dips.
- Verify hidden hangers are spaced 24 to 30 inches (or whatever your region requires).
- Verify the gutter is correctly pitched by looking at where water sits during the test.
A proper install passes all of these checks on the first try. Any failure means the contractor goes back up the ladder before you pay.
The system context
Gutters work as part of a roof edge water-management system. The shingle delivers water to the drip edge. The drip edge delivers water into the gutter. The gutter carries water to the downspout. The downspout delivers water to termination. Each piece has to work for the whole system to work.
For the broader system, see gutter installation, gutter installation cost, continuous vs sectional gutters, heated gutter cable for snow-belt installations, and scuppers vs gutters flat roof for flat-roof drainage alternatives. For the broader roof pricing picture, see roofing cost per square and how much does a new roof cost. For deeper coverage on related topics, browse the learn library.
Install once, install right, and the gutter system runs 25 to 30 years on aluminum or 50-plus on copper. Install fast and cheap, and you are repairing inside the warranty period.