A roof cricket is a small framed peak built on the uphill side of any roof obstruction (chimneys, dormer walls, parapet returns, wide vent stacks) to divert water and debris around the obstruction rather than letting it dam against the upslope face. The International Residential Code (IRC R1003.20) mandates a cricket on every chimney wider than 30 inches measured perpendicular to the slope, but the same design logic applies to any obstacle on the roof that interrupts water flow. A correctly designed cricket has at minimum a 1:2 pitch on its own ridge surfaces, is framed before the roof underlayment goes down, gets covered with self-adhered ice and water shield over the entire footprint, and is metal-flashed with a minimum 6-inch overlap at the cricket ridge that is either soldered (copper) or hand-folded and sealed (galvanized). Done right, it eliminates the single most common chimney failure mode (upslope debris damming and the resulting deck rot) for the life of the roof.
The short version
- A roof cricket is a small framed peak on the uphill side of any roof obstruction that diverts water around it.
- Required by IRC R1003.20 on every chimney wider than 30 inches measured perpendicular to the slope.
- Minimum cricket slope: 1:2 (one unit rise per two units run) on the cricket’s own ridge faces.
- Build sequence: frame, sheath in 1/2 inch ply or OSB, ice and water shield over everything, metal flash with 6-inch ridge overlap.
- Metal: 24-gauge galvanized minimum, 16-oz copper for premium, soldered at the ridge on copper.
- Cricket flashing weaves into the regular shingle courses on each side and runs up the chimney face under counter flashing.
- Install cost on a typical 30-by-36-inch chimney cricket: $400 to $1,200 as add-on to a re-roof, $800 to $2,200 standalone.
What a cricket does and why every wide chimney needs one
Water running down a roof slope picks up speed and volume the further it travels. When that water hits a chimney, dormer, parapet, or any vertical obstacle dead in its path, the obstacle dams the flow. On a narrow obstacle (under about 30 inches across) the water just splits and runs around the sides without much problem. On a wider obstacle, the upslope face becomes a holding pen: water pools against the masonry or siding, leaves and pine needles collect in the pool, ice forms in the winter, and the combination of constant moisture and freeze-thaw cycling rots the deck behind the obstacle within five to ten years.
A cricket eliminates the dam. By framing a small peak on the uphill side with its ridge running away from the obstacle and back into the main roof slope, you turn the upslope face from a wall that water hits head-on into a V-shape that water flows around. Debris that used to collect now slides off to either side. Ice that used to form a thick sheet against the masonry now drains as it melts. The deck stays dry, the flashing stays free of standing water, and the obstacle becomes a normal roof penetration instead of a known failure point. Crickets on chimneys are the most common application (and the only one explicitly mandated by IRC R1003.20), but the same construction shows up under different names on other obstacles. A “saddle” on the uphill side of a dormer wall is functionally a cricket. A “diverter” on the uphill side of a parapet return is a cricket. For the chimney-specific install detail see our chimney cricket install piece; this guide covers the design principles that apply to any obstacle. For the dormer and other saddle applications see roof saddle installation.
When code requires a cricket
The triggering condition under IRC R1003.20 is straightforward: any chimney wider than 30 inches measured perpendicular to the roof slope direction must have a cricket on the uphill side. “Perpendicular to the slope” means the dimension facing up the slope, not the chimney’s longest dimension. A chimney that is 24 inches wide in the slope direction but 48 inches long parallel to the slope does not trigger the requirement because the upslope face is only 24 inches wide. A chimney that is 36 inches wide in the slope direction triggers the requirement regardless of its other dimension.
The IRC has carried this requirement essentially unchanged since the 2000 edition. Most state and local codes adopt the IRC verbatim, so the 30-inch trigger is effectively national. The few jurisdictions that have stricter local amendments (some coastal counties, some heavy-snow markets) typically lower the trigger to 24 inches or require a cricket on all chimneys regardless of width. Always check the local amendment before assuming the IRC default applies, especially in retrofit work where the original install may have predated the requirement and the homeowner is bringing the roof up to current code as part of a re-roof.
Even where code does not require a cricket (chimney exactly 30 inches or narrower, dormer wall under similar dimensions, parapet returns), most experienced roofers install one anyway on anything wider than about 24 inches. The cost of a cricket on a re-roof job is modest ($400 to $1,200), and the long-term cost of skipping one and watching the deck rot behind the obstacle is multiples of that. Many shingle manufacturer warranties (notably GAF’s Golden Pledge and Owens Corning’s Platinum) implicitly require crickets on wide chimneys as part of the qualifying install spec.
Design: how to size and pitch a cricket
Two dimensions drive a cricket’s design: the height of the cricket ridge above the deck, and the length of the cricket as it runs away from the obstacle. The standard rule of thumb is that the cricket should extend at least half the width of the obstacle up the slope. A 36-inch-wide chimney gets a cricket that runs at least 18 inches up the slope from the back of the chimney to the cricket ridge. A 48-inch-wide chimney gets a 24-inch cricket. Wider crickets shed faster and dam less debris; the minimum dimensions above are functional but not generous.
The cricket’s own ridge surfaces have to have a minimum slope of 1:2 (one unit rise per two units run) to ensure water sheds rather than pools. On a low-slope main roof (4:12 or shallower) this often means the cricket ridge ends up rising several inches above the surrounding deck, which is correct and necessary. On a steeper main roof (8:12 or steeper) the cricket can be lower-profile because the main slope contributes to the runoff angle. The cricket ridge should always run perpendicular to the obstacle and parallel to the main roof slope direction, with the two cricket faces meeting at the ridge and tapering down to the deck on each side.
Framing: the actual carpentry
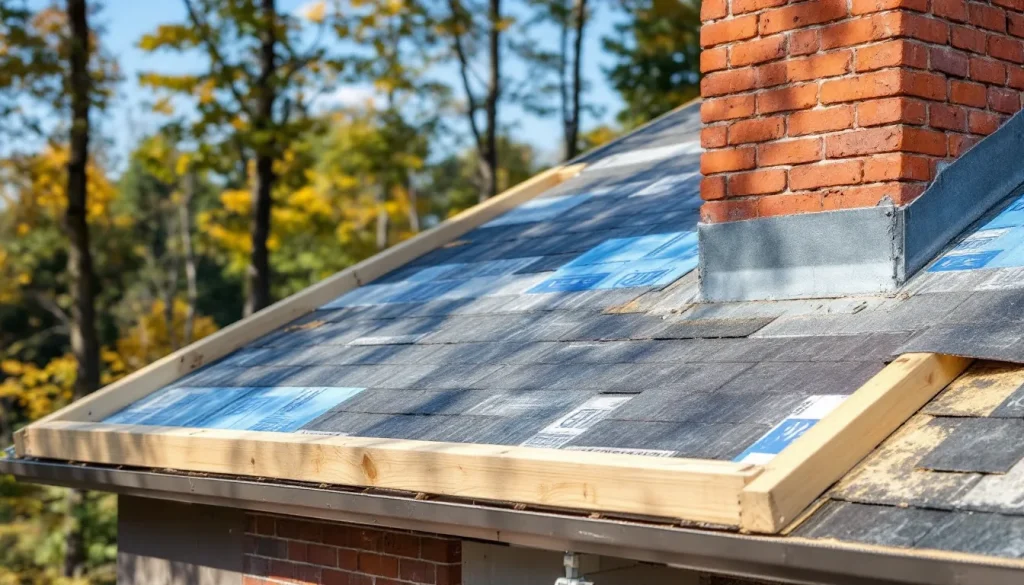
A cricket is framed with a 2×4 or 2×6 ridge board running from the upslope face of the obstacle straight back up the main roof slope to the cricket’s high point, plus 1×4 or 2×4 rafters running from the ridge down to the main roof deck on each side. The rafters get cut to bear against the main deck on the bottom edge and against the ridge board on the top edge. For a typical 30-by-36-inch chimney cricket, the ridge board is about 18 inches long, the rafters are 18 to 24 inches long with a compound cut to match both the main slope and the cricket slope, and the whole framing structure rises maybe 4 to 6 inches above the deck at its highest point.
Sheathing goes over the framing in two triangular panels of 1/2-inch plywood or OSB, one panel per cricket face, cut to fit the ridge-to-deck geometry on each side. The sheathing edges that meet the main deck get a bead of construction adhesive plus ring-shank nails into the deck. The edges that meet the ridge get nailed off to the ridge board. The two panels meeting at the cricket ridge get fastened together with a continuous nail line. Once the sheathing is fastened, the cricket framing reads as a continuous small gable peak rising out of the main roof slope.
Underlayment: ice and water shield first, always
Before any metal flashing touches the cricket, the entire cricket gets covered in self-adhered ice and water shield, lapped 6 inches up the obstacle face (chimney brick, dormer wall, parapet) and extended at least 6 inches past the cricket footprint onto the surrounding deck on all sides. This membrane is the second line of defense behind the metal flashing. If water ever gets past a seam in the metal (which on a 25-plus year roof is when, not if), the membrane catches it and routes it back out onto the shingle course below the cricket instead of letting it through the deck.
The ice and water shield used on a cricket should be the high-temperature variety (rated to 240F+) because the metal flashing above can hit 180F on a black-shingle south-facing roof in summer and the membrane needs to stay stable underneath. Standard ice and water shield (rated to 220F) works in most northern climates but is borderline on hot southern installs. Brand choice: Grace Ice and Water Shield HT, Henry Blueskin RF200, and Owens Corning WeatherLock Mat are the most common high-temp options used by production roofers. For the membrane itself see our ice and water shield overview and peel and stick underlayment guide. For the code-required ice dam protection that often runs continuous past the cricket area, see our ice dam protection membrane code brief.
Metal flashing: gauge, overlap, and corners
Once the underlayment is down, the cricket gets metal flashed with two pre-bent sheet metal pieces, one per cricket face, joined at the ridge with a minimum 6-inch overlap. Material: 24-gauge galvanized steel minimum (26-gauge will work but bends and dents under foot traffic), 16-ounce copper for premium installs or where the existing roof is copper. Each cricket flashing piece is bent so the top edge runs up the obstacle face (under the counter flashing), the bottom edge laps over the regular roof underlayment, and the ridge edge laps onto the matching piece from the other side.
The ridge overlap on a copper cricket gets soldered solid for a fully watertight joint. On galvanized, the overlap gets hand-folded into a standing seam or a sealed lap with polyurethane sealant (Geocel 2300 or NPC Solar Seal 900) in the bond line, plus an underlying piece of self-adhered membrane to back it up. Caulk-only is not acceptable on the ridge overlap; it fails the first season of freeze-thaw cycling. The four corners where the cricket flashing meets the obstacle face and where it transitions to the side step flashing along the obstacle get hand-folded and sealed similar to a chimney apron corner.
Side edges of the cricket flashing weave into the regular shingle courses on each side of the obstacle, exactly like step flashing along a chimney side. Each cricket flashing piece sits under the next shingle course up and over the shingle course below. The top edge of the cricket flashing runs up the obstacle face by at least 6 inches and gets covered by counter flashing reglet-mounted into the masonry (on a chimney) or the wall sheathing under the housewrap and siding (on a dormer). For the counter flashing detail see our counter flashing guide, and for the chimney-specific four-part system that includes the cricket as the fourth part see chimney flashing installation detail.
Cost: what a cricket actually adds to the job
A new cricket installed as part of a re-roof on a 30-by-36-inch chimney runs $400 to $1,200 over the base shingle pricing in 2026. The low end assumes galvanized metal, sound existing deck around the chimney, and the cricket being framed while the shingle crew is already on the roof. The high end assumes copper, deck rot to be replaced under the cricket footprint, and a complex chimney geometry requiring custom flashing fabrication on-site. A cricket installed as a standalone retrofit (the roof is otherwise sound but the existing chimney has no cricket and is showing damming) runs $800 to $2,200 because of the additional mobilization, the need to lift and re-lay shingles around the cricket footprint, and the often-bundled scope of stripping back to the deck to check for existing damage.
Re-flashing an existing cricket whose metal has aged out runs $300 to $800, again depending on material and access. If the deck under the cricket has rotted (the most common scenario when a wide chimney has been running without a cricket for 15-plus years), add $400 to $1,500 in carpentry to cut out the rot, sister the framing, and patch the sheathing. The full breakdown of cricket and chimney scope line items is in our roof repair costs itemized reference.
Cricket failure modes (what goes wrong even on correctly framed installs)
Three things kill crickets even when the original framing was correct. First, the ridge overlap. On galvanized installs where the lap was caulked instead of folded and membrane-backed, the lap fails within a few freeze-thaw seasons and water gets in along the ridge line. Second, the corners. Where the cricket flashing meets the obstacle face, the hand-folded corner has to be either soldered (copper) or membrane-backed (galvanized); butted corners sealed only with caulk fail similar to the ridge lap.
Third, debris accumulation. Even a correctly built cricket will collect leaves and pine needles in the valleys formed where the cricket faces meet the main roof slope. If those valleys are not cleaned out at least annually, the debris dams up exactly the way the upslope face used to dam up before the cricket was installed, and the same rot pattern develops, just shifted to the cricket valleys instead of the obstacle face. This is the single most common reason a cricket fails on a roof under 20 years old. It is not a design failure; it is a maintenance failure. Annual roof and gutter cleaning needs to include the cricket valleys on every wide chimney.
If the cricket is failing and the chimney is leaking as a result, the diagnostic path is in our chimney flashing leak repair guide. For the broader diagnostic on tracing any flashing-driven leak see how to fix a roof leak and the roof flashing repair overview. Cricket work that gets bundled with other flashing scope on a re-roof tracks the pricing in our 2026 roofing cost report.
Bottom line
A roof cricket is mandatory on every chimney wider than 30 inches by IRC R1003.20 and is good practice on every other wide roof obstruction regardless of code. Build it with at least a 1:2 ridge slope, sheath it in 1/2-inch plywood, cover the entire footprint with high-temperature ice and water shield, and flash it with 24-gauge galvanized or 16-ounce copper sheet metal with a 6-inch overlap at the ridge (soldered on copper, folded and membrane-backed on galvanized). The install adds $400 to $1,200 as part of a re-roof and prevents the single most common chimney failure mode (upslope debris damming and the resulting deck rot) for the life of the roof. The most common failure mode on a correctly built cricket is not design; it is maintenance, specifically failure to clean debris out of the cricket valleys at least annually.