
By The Roofing Brief Team | Last reviewed: October 2026.
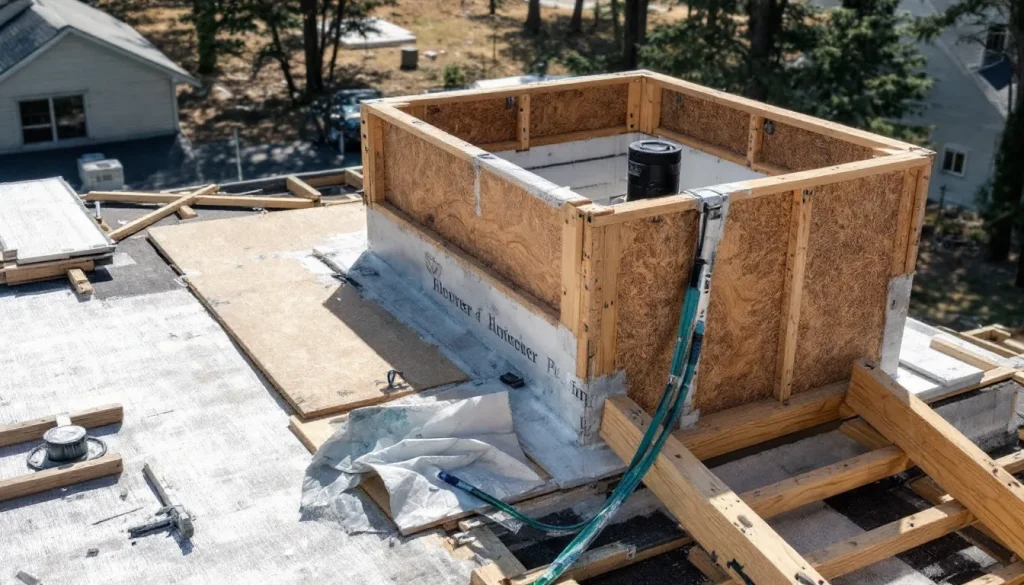
A roof saddle is a small framed ridge built on the uphill side of a chimney, dormer, or wall obstruction that diverts water around the obstruction instead of letting it pile against the wall and pond. Related: Roof cricket design. It is the same thing as a cricket, just two names for one detail. The 2018 IRC settles it: R903.2.2 is titled “Crickets and Saddles” and requires one on the ridge side of any chimney or penetration more than 30 inches wide, measured perpendicular to the slope, and R1003.20 requires a chimney cricket where the chimney dimension parallel to the ridgeline exceeds 30 inches and the chimney does not intersect the ridgeline. The detail involves three layers: a framed peak (ridge board and two rafters), a sheathing skin, and a sequence of ice and water shield, metal flashing, and counter-flashing into a reglet cut in the chimney face.
The short version
- Saddle and cricket are the same thing: a small framed peak built uphill of a chimney to divert water around it.
- 2018 IRC R903.2.2 requires one on the ridge side of any chimney or penetration wider than 30 in (measured perpendicular to the slope); R1003.20 adds the chimney case where the ridgeline dimension exceeds 30 in.
- Framing: ridge board centered on chimney width, height H set by IRC Table R1003.20 (H = 1/4 of the chimney width on a 6:12 roof), sheathing skin matching the deck.
- Waterproofing layer order: ice and water shield FIRST, then galvanized or copper sheet metal flashing, then counter-flashing reglet cut into the chimney.
- Flashing metal must be corrosion resistant and at least 0.019 in thick (No. 26 galvanized sheet) under R903.2.1; use copper or galvanized, because aluminum can corrode against masonry mortar.
- Cost: the line items below add up to $305 to $495 in materials; labor is a planning estimate, so get local quotes.
Saddle and cricket are the same thing
Open any roofing trade publication, ask three different contractors, and you will get three different answers about the saddle-vs-cricket distinction. The truth is they are the same detail with two interchangeable names. Some sources will claim a saddle is bigger or built on more than just chimneys (around dormers, walls, parapets) while a cricket is specifically a chimney detail. The IRC does not draw that line: R903.2.2 and its title use both terms for the same detail.
What matters is the function: a small framed ridge built on the uphill side of any obstruction that disrupts roof water flow, so meltwater and runoff shed around the obstruction instead of pooling against it. Without a saddle, water hitting the uphill face of a 36-inch chimney runs down both sides and concentrates at the back corners, where it freezes, finds the flashing seam, and leaks. With a saddle, the water hits the saddle ridge, splits cleanly to either side, and never touches the chimney face.
When code requires a saddle
Two 2018 IRC sections apply. R903.2.2: “A cricket or saddle shall be installed on the ridge side of any chimney or penetration more than 30 inches (762 mm) wide as measured perpendicular to the slope.” Coverings must be sheet metal or the same material as the roof covering, and unit skylights flashed to the maker’s instructions are exempt; the 2018 IBC repeats the rule at Section 1503.5. R1003.20 (Chimney Crickets): chimneys get a cricket where the dimension parallel to the ridgeline is greater than 30 inches and the chimney does not intersect the ridgeline, and the cricket-chimney intersection is flashed and counterflashed like the rest of the chimney.
| If the situation is | Then |
|---|---|
| Chimney wider than 30 in, measured parallel to the ridgeline, and not on the ridge | Cricket required (R1003.20), flashed and counterflashed |
| Any chimney or penetration over 30 in wide perpendicular to the slope | Cricket or saddle on the ridge side (R903.2.2), sheet metal or matching roof covering |
| Chimney 30 in or narrower | No cricket required by these sections; step flashing and an apron flashing carry the load |
| Unit skylight flashed to its maker’s instructions | Exempt from the cricket rule (R903.2.2 exception) |
| Your town adopted a different IRC edition or amendments | Ask the building department which edition and amendments apply before you frame |
Why 30 inches? Below that width, the water hitting the chimney face is small enough that step flashing and a properly installed apron flashing can shed it. Above it, the water concentrates at the back corners, where the flashing details are weakest. A saddle moves the water around the chimney entirely. Adopted editions and amendments differ by jurisdiction, so confirm with the building department; a saddle on a narrower chimney during a reroof is still a common precaution.
Saddle framing detail
The framed saddle is a tiny dual-pitch roof. Three components:
- Ridge board: 2×4 or 2×6 running perpendicular to the main roof ridge, centered on the chimney width. Length equals the chimney width plus 12 to 24 inches on each side for the rafter projection.
- Rafters: Rafters running from the saddle ridge down to the main roof deck, cut so the ridge height matches the IRC table below. The rafters are tied into the chimney face at the high end (using metal saddle hangers) or rest on the existing deck (using rafter ties). Spaced 16 to 24 inches on center for the typical residential saddle width.
- Sheathing: 1/2 inch CDX plywood or 7/16 inch OSB, matched to the existing roof deck thickness. Cut to fit the saddle triangles and nail to the rafters with 8d common nails at 6 inches on center at panel edges and 12 inches in the field.
Saddle height is set by IRC Table R1003.20: the cricket height H is a fraction of the chimney width W that depends on the main roof slope. For a 36-inch-wide chimney:
| If the main roof slope is | H as a share of W | Then H on a 36 in chimney is |
|---|---|---|
| 12:12 | 1/2 of W | 18 in |
| 8:12 | 1/3 of W | 12 in |
| 6:12 | 1/4 of W | 9 in |
| 4:12 | 1/6 of W | 6 in |
| 3:12 | 1/8 of W | 4.5 in |
Taller peaks divert more water but add visual bulk. Scale the table to your chimney: a 48 inch chimney on a 6:12 roof needs H = 12 in.
Materials and sizing
| Component | Material | Size | Notes |
|---|---|---|---|
| Ridge board | Pressure-treated 2×4 or 2×6 | Width = chimney width + 12 to 24 in | PT required for contact with masonry |
| Rafters | SPF 2×4 or 2×6 | Cut to the Table R1003.20 height, 16 to 24 in OC | Tie to chimney with saddle hangers OR rest on existing deck |
| Sheathing | 1/2 in CDX plywood or 7/16 in OSB | Cut to fit saddle triangles | Match existing deck thickness |
| Ice and water shield | 40-mil or 60-mil self-adhered | Full coverage of saddle + 12 in onto chimney + 18 in onto roof field | Grace, GAF StormGuard, CertainTeed WinterGuard |
| Sheet metal flashing | 26-gauge galvanized (0.019 in minimum, R903.2.1) or 16-oz copper | Custom-bent to saddle profile | 6 in onto roof, 6 in up chimney face |
| Counter-flashing | Same metal as base flashing | Reglet cut 1.5 in deep into mortar joint | Bent down 4 in to overlap base flashing |
Install sequence (8 steps)
- Strip the area. Tear off shingles, underlayment, and existing flashing in a working zone extending 24 inches around the chimney on all sides. Expose the deck and any rafters under the saddle area. Verify deck is sound and replace any rotten sheathing.
- Frame the saddle. Measure chimney width parallel to ridge. Cut the ridge board to chimney width plus desired rafter projection on each side. Position the ridge board centered on the chimney width, touching the uphill face of the chimney, perpendicular to the main roof ridge. Install metal saddle hangers (Simpson H1 or similar) on the chimney face to support the high end of the ridge board, or use a ledger bolted to the chimney with masonry anchors. Cut and install two rafters per side, sloping from the ridge board down to the main roof deck. Nail with 16d common nails or use Simpson rafter ties.
- Sheath the saddle. Cut sheathing to fit each saddle triangle. Nail to the rafters with 8d common nails at 6 inches on center at panel edges. The sheathing surface should be flush with the existing roof deck where they meet so shingles lay flat across the transition.
- Ice and water shield over the entire saddle. Self-adhered membrane covers 100 percent of the saddle sheathing, extends 12 inches up the chimney face (bonded to the masonry), and extends 18 inches onto the surrounding roof field on all sides. This is the primary waterproofing layer. See the peel and stick underlayment guide for application detail on masonry.
- Form the base flashing. Cut 26-gauge galvanized or 16-oz copper sheet metal to a saddle pattern: a roughly diamond-shaped piece that has a 6-inch turn-up against the chimney face, a 6-inch lap onto the roof field on each side of the saddle, and seams along the saddle ridge bent to match the saddle slope. The metal piece is one continuous custom-bent pattern, NOT pieced together at seams. Order it from a sheet metal shop with the chimney dimensions and saddle slope; expect $80 to $200 in custom metal work.
- Install the base flashing. Set the base flashing over the ice and water shield. The bottom lap onto the roof field sits OVER the underlayment of the surrounding roof field. Use metal at least 0.019 inch thick (R903.2.1). The chimney upturn is held against the chimney face with masonry anchors or polyurethane sealant. The saddle ridge seam folds over the saddle peak.
- Cut the reglet and install counter-flashing. A reglet is a horizontal groove cut into the mortar joint of the chimney, 1.5 inches deep, at a height that lets the counter-flashing drop down 4 inches to overlap the base flashing turn-up. Use a masonry saw or grinder. Cut the counter-flashing from the same metal as the base flashing, with a 1.5-inch lip that tucks into the reglet. Insert the lip, fill the reglet with polyurethane sealant, fold the counter-flashing down over the base flashing turn-up. The two layers of flashing now overlap by 2 inches.
- Shingle over the base flashing. Run new shingle courses across the saddle, nailed with at least four fasteners per strip shingle (IRC R905.2.6), with each course lapping the base flashing by the standard shingle exposure. Use step flashing in the corners where the saddle slope meets the main roof slope. The shingle courses cover the roof-field portion of the base flashing; only the chimney upturn and the counter-flashing remain visible.
Common mistakes
The chimney saddle is one of the highest-leak-risk details on any residential roof. The errors are mostly about layer order and material choice.
- No saddle on a 36-inch chimney. Skipping the saddle on a code-triggered chimney is the single most common mistake. The contractor saves an hour, the homeowner gets a leak in year 3.
- Aluminum flashing against masonry. Alkaline mortar can etch bare aluminum and leave chalky white corrosion on the flashing. Use copper or galvanized steel (at least 0.019 in thick, R903.2.1) for any chimney flashing.
- Sealant instead of a reglet cut. Counter-flashing held to the chimney face with polyurethane sealant fails the first time the sealant cracks (3 to 7 years). The reglet cut mechanically locks the counter-flashing in place and the sealant only weatherproofs the joint. Cut the reglet.
- Pieced-together base flashing. Trying to piece the saddle base flashing from rectangular shingle flashing pieces leaves seams along the saddle ridge, exactly where water concentrates. Use a single custom-bent piece of metal at least 0.019 inch thick.
- Ice and water shield short of the chimney. The membrane needs to extend 12 inches UP the chimney face, bonded to the masonry. Stopping at the chimney base leaves the most vulnerable joint unprotected by the primary waterproofing layer.
- No saddle hangers at the ridge board. Each rafter also needs at least 1 1/2 inches of bearing on wood (IRC R802.6). Toe-nailing the ridge board to the chimney face without metal hangers means the saddle is supported only by friction and a couple of nails. Snow load on the saddle pulls the connection apart over time.
- Step flashing tucked under the base flashing at the corners. Step flashing against a sidewall must be at least 4 inches high and 4 inches wide (IRC R905.2.8.3). The sequence should be: step flashing OVER base flashing on the chimney sides, so water from the saddle drains onto the step flashing, not behind it. Reverse the lap and the corners leak first.
- Cricket too shallow. A saddle built below the Table R1003.20 height (for example 6 in on a 36 in chimney at 6:12, where the table gives 9 in) diverts water poorly, and snow piles on it and can form an ice dam.
- Pressure-treated lumber not used at the masonry contact. Standard SPF 2×4 against masonry wicks moisture and rots within 5 to 10 years. The ridge board and any rafter end touching masonry must be pressure-treated or copper-isolated.
- Failure to flash the counter-flashing termination. Where the counter-flashing meets the front and back of the chimney, the joint needs to be sealed and stepped. Open ends let wind-driven rain enter the reglet, and the counter-flashing metal should be at least 0.019 inch thick like the base (R905.2.8.1).
Cost
These are estimate line items for a 36-inch chimney, not a surveyed price; confirm with local supplier quotes.
- Framing lumber (PT 2×6 ridge, SPF 2×4 rafters): $40 to $80
- Sheathing (one sheet 7/16 OSB cut to size): $35
- Ice and water shield (one roll partial use): $40
- Custom-bent galvanized base flashing: $80 to $150
- Counter-flashing material: $40 to $80
- Polyurethane sealant, masonry anchors, fasteners: $30
- Replacement shingles (1 to 2 bundles): $40 to $80
Material total: $305 to $495.
Labor is the variable. During a reroof the chimney is already exposed and the saddle is an add-on; on a retrofit the surrounding shingle work is extra, so expect the retrofit to cost noticeably more than the $305 to $495 materials total plus the same crew time. Ask for the saddle as a separate line on the quote.
Saddle around other obstructions
The saddle/cricket detail is most associated with chimneys but applies to other roof obstructions too:
- Dormers wider than 30 in: The same detail applies on the uphill side of any dormer with a vertical face wider than 30 inches. Same framing, same flashing sequence.
- Skylights wider than 30 in: R903.2.2 exempts unit skylights installed per R308.6 and flashed to the maker’s instructions from the cricket rule, but a cricket above a skylight wider than 36 inches is a common precaution. See skylight leak repair for the related detail.
- Parapet walls or roof-to-wall transitions: Where a roof slope dies into a vertical wall and the wall is more than 30 inches wide, a saddle on the high side handles the water that would otherwise pond against the wall.
The same framing, sheathing and flashing layer order applies to a dormer, skylight or wall, with the 30 inch trigger measured on the face that meets the water. For the chimney-specific version, see chimney cricket install.
FAQ
Is a saddle the same as a cricket? Yes. The 2018 IRC titles R903.2.2 Crickets and Saddles and treats them as one detail. Some sources try to distinguish them by size or location but there is no consistent industry definition.
When is a saddle required by code? Under the 2018 IRC, a chimney or penetration more than 30 inches wide measured perpendicular to the slope needs a saddle or cricket on its ridge side (R903.2.2), and a chimney over 30 inches parallel to the ridgeline that does not intersect it needs one under R1003.20. Local amendments can differ, so ask your building department.
Can I install a saddle on an existing roof without tearing off shingles? Partially. You can frame and sheath the saddle, but the underlayment, base flashing, counter-flashing, and shingle replacement requires removing existing shingles in a working zone of 24 inches around the chimney. Plan it into a reroof or budget 6 to 12 hours of shingle work.
What slope should the saddle be? Set the peak height from IRC Table R1003.20: 1/4 of the chimney width on a 6:12 roof (9 in on a 36 in chimney), 1/3 on an 8:12 roof, and 1/2 on a 12:12 roof.
Why does my chimney leak even though it has a cricket? Usually because the cricket was framed correctly but the flashing detail was botched: aluminum against masonry, sealant instead of a 1.5 inch reglet, pieced flashing at the saddle ridge, or step flashing under base flashing in the corners. See the chimney flashing leak repair guide for the diagnostic checklist.
Bottom line
A roof saddle and a roof cricket are the same thing: a framed peak on the uphill side of a chimney or other obstruction that diverts water around it. The 2018 IRC requires one on chimneys and penetrations wider than 30 inches, and local amendments can differ. The detail is framing plus sheathing plus three layers of waterproofing (ice and water shield, base flashing, counter-flashing into a reglet), built with copper or galvanized steel and pressure-treated lumber where it touches masonry. Done right, the saddle is invisible from the ground and bulletproof for the life of the roof. Skipped or botched, the chimney leaks in year 3 and the homeowner pays five times the cost to chase the leak instead of doing it right the first time.