
By The Roofing Brief Team. Last reviewed: October 2026.
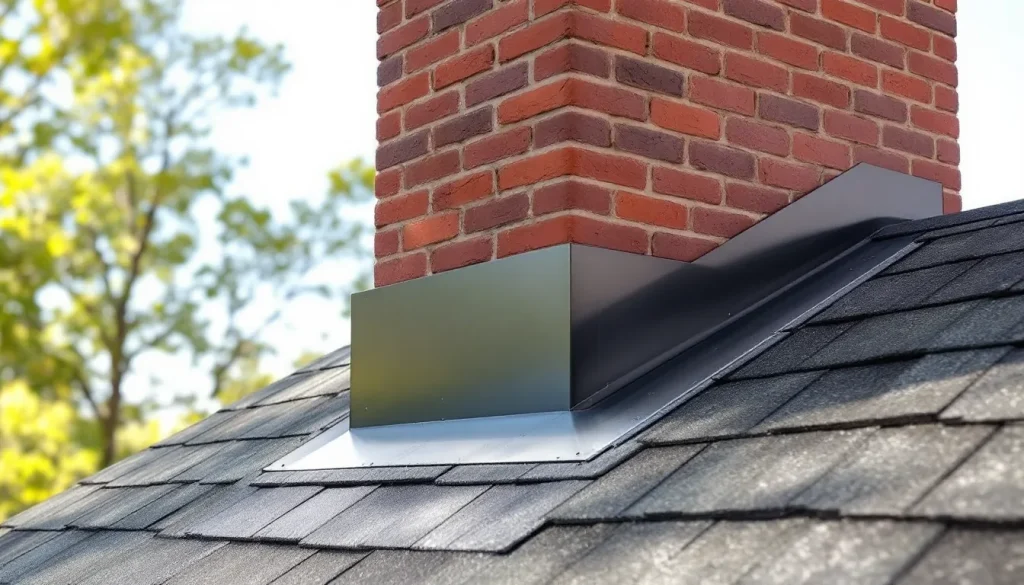
Apron flashing on a roof is the continuous L-shaped piece of sheet metal installed across the downhill (front) face of a chimney, dormer, or skylight, where the roof slope runs up and ends against a vertical surface. Unlike step flashing (one piece per shingle course along the sloped sides), apron flashing is a single piece that runs the full width of the downhill face and laps over the top shingle course below it. The published front-wall detail in the ARMA Residential Asphalt Roofing Manual and the Owens Corning Roofer’s Guide runs the metal at least 5 inches up the wall and at least 4 inches onto the last shingle course; at a chimney front, Owens Corning runs 26 gauge apron metal at least 12 inches up the face. IRC R903.2.1 requires flashing at every wall and roof intersection in metal at least 0.019 inch thick, and R905.2.8.4 sends front-wall and chimney flashing to the shingle maker’s printed instructions. Skip the apron, install it short, or rely on caulk to seal the wall leg, and you get the classic “chimney front leak” that shows up as a ceiling stain directly below the downhill face of the chimney.
The short version
- Apron flashing covers the downhill face of chimneys, dormers, and skylights, and laps over the shingles below it.
- Front wall (siding): at least 5 in up the wall, 4 in onto the last shingle course, which should be at least 8 in wide (ARMA; Owens Corning).
- Chimney front: at least 12 in up the face and 4 in over the shingles, 26 gauge corrosion-resistant metal (Owens Corning).
- One continuous piece, not stepped. Step flashing handles the sides; apron flashing handles the front.
- Counter flashing covers the wall leg on masonry; on siding walls, the siding comes down at least 2 in over it (ARMA).
- Code minimum metal: 0.019 in, which is No. 26 galvanized sheet (IRC R903.2.1).
- Where a front wall meets a sidewall, run the apron at least 7 in around the corner before the step flashing starts (ARMA; Owens Corning).
What apron flashing is and where it goes
Apron flashing solves the downhill side of any roof obstruction. Water running down the roof above hits the back (uphill) side of the obstruction, gets diverted around the sides by step flashing or a cricket (required on chimneys more than 30 inches wide under IRC R1003.20), and rejoins on the downhill side. At the downhill face, water sheets off the obstruction and lands on the roof. Without apron flashing, that water runs into the unprotected wall-to-roof corner and goes under the top shingle course below the obstruction.
Apron flashing intercepts that water with a continuous metal piece. The wall leg goes up the downhill face of the obstruction, at least 5 inches on a siding wall per ARMA and Owens Corning. The roof leg sits over the top course of shingles below, at least 4 inches onto it, set in asphalt roof cement and nailed to the roof. Water hits the wall leg, sheds onto the roof leg, and runs off onto the shingles below just like the rest of the roof. ARMA and Owens Corning call this detail “flashing against vertical front walls”; it is also called front-wall, headwall or front flashing.
Apron flashing is one of three obstruction-related flashings: apron on the downhill side, step flashing on the sides (at least 4 by 4 inches under IRC R905.2.8.3), and a chimney cricket or back flashing on the uphill side. For the full picture, see what is flashing on a roof and what is flashing on a house.
Roof apron flashing decision table
| If the downhill face is | Use | Rule or source |
|---|---|---|
| A sided wall (dormer front, second-story wall above a lower roof) | Continuous metal strip at least 5 in up the wall and 4 in onto the last course; cover strip of shingles set in cement over it; siding lapped at least 2 in over the vertical leg | ARMA Residential Asphalt Roofing Manual; Owens Corning Roofer’s Guide |
| A brick or stone chimney front | 26 gauge apron at least 12 in up the face and 4 in over the shingles, primed brick, counter flashing above | Owens Corning Roofer’s Guide |
| The last shingle course would be under 8 in wide | Adjust exposure on the previous 2 courses so the last course is at least 8 in | ARMA; Owens Corning |
| A front wall that meets a sidewall at a corner | Run the apron at least 7 in around the corner, then step flash up the sidewall | ARMA; Owens Corning |
| A skylight | The skylight maker’s flashing kit, including its downhill piece | VELUX ties its 10-year installation warranty to correct skylight and appropriate flashing installation |
| A chimney wider than 30 in parallel to the ridge | Apron in front plus a cricket behind | IRC R1003.20; ARMA recommends a cricket at 24 in or wider |
| Existing apron being reused on a re-roof | Only if like-new and of code gauge; never if buckled, rusted, bent, cracked or broken | Owens Corning technical bulletin on sidewall and front wall flashing |
| Retail stock under 0.019 in thick | Do not use as apron flashing | IRC R903.2.1 minimum (No. 26 galvanized sheet) |
Apron flashing detail: sizing chart
The two shingle-industry documents agree on the front-wall numbers, and Owens Corning adds a taller leg at chimneys. Dimensions not set by a published source are marked as such.
| Application | Wall leg (up) | Roof leg (onto shingles) | Corner or side extension | Metal | Source |
|---|---|---|---|---|---|
| Front wall with siding (dormer face, wall above a lower roof) | At least 5 in | At least 4 in onto a last course at least 8 in wide | At least 7 in around a sidewall corner | Corrosion-resistant metal, 0.019 in minimum | ARMA; Owens Corning; IRC R903.2.1 |
| Chimney front (masonry) | At least 12 in | At least 4 in | Wraps the corners under the first step flashing | 26 gauge corrosion-resistant metal | Owens Corning Roofer’s Guide |
| Chimney back (cricket flashing, for comparison) | At least 6 in up the brick | At least 6 in onto the roof | Laps the side step flashing | Corrosion-resistant metal | Owens Corning Roofer’s Guide |
| Sidewall step flashing (for comparison) | 5 in (code minimum 4 in) | 5 in (code minimum 4 in) | Each piece 10 in long, 2 in wider than exposure | Corrosion-resistant metal | ARMA; IRC R905.2.8.3 |
| Skylight downhill piece | Per kit | Per kit | Per kit | Per kit | Skylight maker’s instructions |
| Off-the-shelf example | 4 in | 4 in, with a 1/2 in hem | Field cut | Prefinished metal | Ivey’s 4″x4″x1/2″ apron flashing, $14.66 each (Oct 2026) |
The roof leg is the critical dimension. Anything shorter than the 4 inch minimum in the ARMA and Owens Corning details leaves too little metal over the last course, and water tracking down the wall leg can get under it. Anything longer is extra metal but harmless as long as the cover shingles still hide it. The corner wrap lets the bottom step flashing piece on each side lap over the apron, sealing the corner where many “chimney front leak” failures happen; note that a stock 4 by 4 inch piece meets the 4 inch roof leg but not the 5 inch wall leg in the front-wall detail.
Material comparison
| Material | Spec | Source for the spec | Best for | Watch out for |
|---|---|---|---|---|
| Galvanized steel | 0.019 in (No. 26) minimum; 26 ga for chimney aprons | IRC R903.2.1; Owens Corning | Standard residential, inland, asphalt shingle | Do not mix with aluminum or copper at the corner laps |
| Aluminum | At least 0.019 in; 0.024 in is the IRC minimum for aluminum valley lining | IRC R903.2.1; Table R905.2.8.2 | Coastal, standard residential | Avoid direct contact with copper or pressure-treated wood |
| Painted aluminum (Kynar) | 0.032 in Kynar aluminum offered as an apron option | Grant Logan apron flashing | Visible installations, color matching to shingle | Field cuts expose unpainted edges |
| Copper | 16 oz cold-rolled (IRC valley minimum); 16 or 20 oz apron stock | Table R905.2.8.2; Grant Logan | Premium residential, slate, cedar shake, heritage | Will stain shingles and stucco below; never contact aluminum or steel |
| Lead-coated copper | ASTM B101, 16 oz per sq ft | Table R905.2.8.2 | Heritage, no-staining premium | Cost; weight |
| Stainless steel | 28 ga minimum in the IRC valley table | Table R905.2.8.2 | Coastal salt air, premium | Harder to bend in the field |
For standard residential work, 26 gauge galvanized (the Owens Corning chimney spec and the IRC R903.2.1 floor) or aluminum of at least 0.019 inch covers most aprons, and Grant Logan’s apron stock in 24 gauge galvanized or Galvalume is a heavier option. Copper makes sense on premium installs where the chimney crown and full chimney flashing system are getting copper anyway. Match the apron metal to the step flashing metal to avoid galvanic corrosion at the side overlaps.
Install sequence (6 steps)
- Step 1: Prep the chimney and deck. Build the cricket first on any chimney more than 30 inches wide (IRC R1003.20). Carry the underlayment 3 to 4 inches up the wall or chimney face, the figure ARMA shows at sidewalls, and add ice and water shield around the chimney base as a second line of defense. On masonry, Owens Corning applies asphaltic masonry primer (ASTM D41) wherever roof cement will touch the brick.
- Step 2: Shingle up to the downhill face. Run the shingle courses up to the front of the chimney or wall before any flashing goes on. Adjust exposure slightly on the previous 2 courses so the last course is at least 8 inches wide (ARMA; Owens Corning).
- Step 3: Cut and bend the apron. Cut the metal to the face width plus enough at each end to wrap the corners; ARMA runs a front-wall strip at least 7 inches around a sidewall corner. Bend the L so the roof leg extends at least 4 inches onto the last course and the wall leg runs at least 5 inches up a sided wall or at least 12 inches up a chimney face (Owens Corning). Match the bend to the roof pitch: 90 degrees plus the pitch angle, so about 117 degrees on a 6/12 roof (whose slope is about 26.6 degrees). A 1/2 inch hem on the roof leg edge, as on Ivey’s stock apron, stiffens the edge.
- Step 4: Set it in cement and nail the roof leg. Embed the apron over the last course in asphalt roof cement (ASTM D4586) and nail it to the roof. Do not nail the strip to a sided wall (ARMA). At a chimney, Owens Corning allows one or two nails into mortar joints only to hold the metal until the cement sets; never nail through the brick face.
- Step 5: Step flash up the sides, lapping over the apron’s corner wraps. The first step flashing piece on each side sits over the apron’s wrapped end. Each step piece is 10 inches long and 2 inches wider than the shingle exposure (10 by 7 inches at a 5 inch exposure), nailed with 2 nails within 1 inch of its upper edge, per ARMA. Continue up each side one piece per course, as in our step flashing installation guide.
- Step 6: Cover and counter flash. On a front wall, apply an additional row of shingles in asphalt roof cement over the apron’s roof leg, trimmed to the width of the strip (ARMA; Owens Corning), and bring the siding down at least 2 inches over the wall leg without nailing into the flashing. On a chimney, install counter flashing in a reglet cut into a mortar joint so it laps down over the apron’s wall leg; it slides over the apron if the chimney and roof move differently, which is why ARMA secures aprons to the deck and counter flashing to the masonry.
Common failure modes
- Roof leg under the 4 inch minimum. A short roof leg cannot cover enough of the last course, and water tracking down the wall leg gets under it. ARMA and Owens Corning both set 4 inches as the floor.
- Apron tucked under the last course instead of over it. In the ARMA front-wall detail the strip goes over the last course and at least 4 inches onto it. Tucked under that course, it sends water onto the underlayment instead of onto the shingle surface.
- Corner wraps too short or missing. An apron that ends flush with the chimney corners leaves the most leak-prone corner unsealed, and the step flashing has nothing to lap onto; ARMA wraps a front-wall strip at least 7 inches around a sidewall corner. Caulk in that gap is a temporary fix.
- Apron nailed through the wall leg. ARMA says not to nail the strip to the wall; differential movement between wall and roof breaks the seal at every nail head.
- No counter flashing over the apron wall leg. An exposed wall leg on masonry lets water run down the brick and behind the metal. Counter flashing let into a mortar joint covers it; on siding walls, the siding laps at least 2 inches over it (ARMA).
- Apron wall leg sealed to the chimney with caulk only. Sealant on its own has no lap to fall back on when it ages, and IRC R905.2.8.1 calls for cap flashing of 0.019 inch metal, not a bead of caulk. Counter flashing with sealant in a reglet is the durable detail.
- Retail flashing below code thickness. IRC R903.2.1 sets a 0.019 inch minimum (No. 26 galvanized). Check the gauge on the label before buying roof-to-wall stock.
- Apron material aluminum, step flashing galvanized (mixed metals). The lap at the chimney corner puts aluminum against galvanized steel in a wet environment, and galvanic corrosion attacks both. Match metals, as Grant Logan’s single-metal apron options (copper, galvanized, Galvalume, Kynar aluminum) allow.
- Ice barrier assumed at the chimney. IRC R905.1.2 requires an ice barrier from the eave edge to at least 24 inches inside the exterior wall in areas with a history of ice forming at the eaves; it does not cover a mid-roof chimney, so add membrane there by choice.
- No cricket on the uphill side of wide chimneys. Apron flashing on the downhill side is half the chimney detail. Chimneys more than 30 inches wide also need a cricket on the uphill side under IRC R1003.20; without it, water dams behind the chimney.
Cost
Apron flashing material is cheap; the cost driver is labor and access to the chimney. Ivey’s lists a 4″x4″x1/2″ apron piece at $14.66, and the published repair ranges below are for flashing jobs that include the apron.
| Job (2026) | Typical cost | Source |
|---|---|---|
| Chimney flashing repair (chimney component) | $200 to $300 | This Old House chimney repair cost guide |
| Flashing repair around chimneys, skylights, vents and wall transitions | $300 to $800 | SquareDash, Apr 2026 |
| Chimney flashing repair or replacement | $400 to $1,600 | Angi chimney flashing cost guide, 2026 |
| Roof flashing repair, national average range | $569 to $2,536 | Thumbtack, updated Jul 2026 |
| New chimney cricket (uphill side) | $700 to $1,300 | This Old House chimney repair cost guide |
| New apron during a full re-roof | Usually inside the per-square shingle price | Ask for it as a line item |
Chimney leak diagnosis: chimney flashing leak repair. Skylight flashing: skylight leak repair.
Dormer front faces: our roof flashing guide and how to roof a dormer, which walks through the full shingle order.
How apron differs from headwall flashing
Apron flashing and headwall flashing describe the same geometry: a roof slope that runs up and ends against a vertical surface, with water running off the wall and down the roof. “Apron” is the usual name at a chimney, dormer front or skylight; “headwall” is the usual name where a lower roof dies into a taller wall; ARMA and Owens Corning call both “flashing against vertical front walls” and use the same 5 inch up, 4 inch over, 8 inch last-course detail. Retail listings add a third meaning: Amerimax’s 2.47 inch “roof apron” sold at big-box stores is an eave edge flashing for the fascia, not a front-wall flashing.
The integration is the same on both: the roof leg goes over the last shingle course, a cover row of shingles is set in cement over it, and the wall covering or counter flashing laps down over the wall leg by at least 2 inches. Most apron-flashing failures (short roof leg, missing corner wraps, no counter flashing) repeat exactly on headwall installations.
Code references
IRC R903.2.1 requires flashing at wall and roof intersections, at changes in slope or direction and around roof openings, in corrosion-resistant metal at least 0.019 inch thick (No. 26 galvanized sheet). IRC R905.2.8.4 says flashing against a vertical front wall, and chimney flashing, shall be applied per the asphalt shingle manufacturer’s printed instructions, which is where the Owens Corning and ARMA dimensions come in. IRC R905.2.8.3 covers sidewall base flashing (continuous or step, at least 4 by 4 inches), and R905.2.8.1 sets base and cap flashing at 0.019 inch metal. Owens Corning’s technical bulletin states that sidewall and front wall flashing is required by building code and that new flashing is required for its Platinum warranty.
Frequently asked questions
What is apron flashing on a roof?
Apron flashing is a continuous L-shaped piece of sheet metal installed on the downhill face of a chimney, dormer, or skylight where the roof slope ends against a vertical surface. It laps over the top shingle course below; ARMA and Owens Corning run it at least 5 inches up a sided wall and 4 inches onto the shingles, and Owens Corning runs chimney aprons at least 12 inches up the face.
What size apron flashing should I use?
Front wall with siding: at least 5 inches up the wall and 4 inches onto a last shingle course at least 8 inches wide, wrapping at least 7 inches around a sidewall corner (ARMA; Owens Corning). Chimney front: at least 12 inches up the face and 4 inches over the shingles in 26 gauge metal (Owens Corning). Skylights use the maker’s flashing kit dimensions.
What is the difference between apron flashing and step flashing?
Apron flashing is one continuous piece installed on the downhill (front) side of an obstruction. Step flashing is one piece per shingle course on the sloped sides, each 10 inches long and 2 inches wider than the shingle exposure per ARMA. The first step piece on each side laps over the apron’s corner wrap; one alone is not enough.
Do I need apron flashing on a skylight?
Yes, but use the skylight maker’s flashing kit rather than generic apron stock; the kit includes the downhill piece. VELUX ties its 10-year installation warranty to correct skylight and appropriate flashing installation, against leaks, no matter who installs it.
What material should apron flashing be?
Corrosion-resistant metal at least 0.019 inch thick under IRC R903.2.1, which is No. 26 galvanized sheet; Owens Corning specifies 26 gauge at chimneys. Aluminum, 24 gauge galvanized or Galvalume, 16 or 20 oz copper and 0.032 inch Kynar aluminum are all sold as apron stock. Match the step flashing metal at the corners to avoid galvanic corrosion.
How long does apron flashing last?
No code or shingle maker publishes a service life for apron flashing. Durability tracks the metal (copper and stainless outlast 26 gauge galvanized), the counter flashing over the wall leg, and whether the corners were lapped rather than caulked. Owens Corning lets roofers reuse existing flashing only if it is like-new, of code gauge and not rusted, bent or cracked.
Bottom line
Apron flashing is the downhill-face piece of the chimney, dormer, and skylight flashing system. Shingle up to the face with a last course at least 8 inches wide, set a continuous apron over it in roof cement with at least 4 inches on the shingles and 5 inches up a sided wall (12 inches up a chimney, per Owens Corning), nail the roof leg only, lap the step flashing over the corner wraps, cover the roof leg with a trimmed shingle row, and lap counter flashing or siding at least 2 inches over the wall leg. Use metal at least 0.019 inch thick. Do all of that and the “chimney front leak” that plagues aging roofs has no easy path in.