Ice (see our ice dam protection membrane code) dam prevention in 2026 requires fixing the root cause, which is warm attic air escaping through the roof deck and melting the snow above, rather than treating the symptom, which is the ice ridge that forms along the cold eave. The permanent solutions cost $1,500 to $8,000 for attic insulation upgrades plus ridge and soffit ventilation balancing, while the temporary fixes such as heat cables and calcium chloride socks buy you one season of relief at $200 to $800. Here is what each approach actually does, when it works, and what it costs in 2026 dollars across the snow belt from Minnesota to Maine.
The short version
- The real fix is air sealing and insulating the attic floor to R-49 or R-60, then balancing intake (soffit) and exhaust (ridge) ventilation at a 1:1 ratio per the 2021 IRC R806.
- Permanent prevention runs $1,500 to $8,000 depending on attic size, existing insulation, and access. Most northern homes pay back the cost in 5 to 9 winters through lower heating bills.
- Heat cables ($200 to $800 installed) work as a one-season patch but use 60 to 200 watts per linear foot when on. They do not stop dams, they melt channels through them.
- Calcium chloride socks (not rock salt) cost under $40 and melt safe drainage channels without staining shingles or corroding gutters and flashing.
- During a reroof, upgrade the eave ice and water shield to 6 feet up the slope from the wall line (IRC R905.1.2). This is the single most cost-effective construction step.
- Standard homeowner policies cover interior damage from ice dam leaks but exclude the dam-removal cost itself. File quickly to preserve coverage.
Short answer: permanent fix vs temporary patch
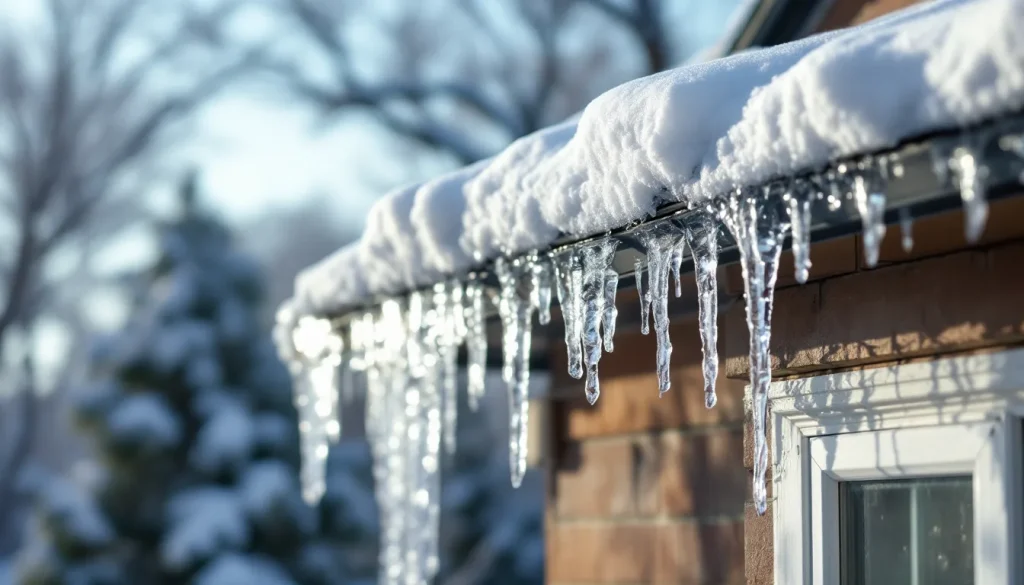
Ice dams form when heat escapes from the living space into the attic, the attic warms the underside of the roof deck, snow on the upper roof melts, and that meltwater runs down to the cold eave (which sits below freezing because it overhangs the wall instead of the heated attic) where it refreezes into a ridge. That ridge then traps subsequent meltwater behind it, which backs up under the shingles and leaks into the ceiling below.
The permanent prevention path stops the warm air from reaching the deck in the first place. That means air sealing penetrations (recessed lights, plumbing stacks, top plates, attic hatch) and adding insulation to R-49 or R-60 on the attic floor, then making sure soffit intake vents and ridge exhaust vents are unblocked and balanced so the underside of the deck stays cold. Total cost typically runs $1,500 to $8,000 depending on attic size, current condition, and whether the contractor needs to install soffit baffles to keep insulation out of the intake path.
The temporary patch path accepts that the attic is leaky and the deck is warm, then manages the symptom every winter. Self-regulating heat cables along the eave and in the gutters cost $200 to $800 installed and use real electricity all winter. Calcium chloride socks laid across the dam cost $20 to $40 a season and melt a drainage channel through the ice. A roof rake clears the upper roof so there is no snow to melt in the first place, but it requires a homeowner willing to do the work after every storm.
What actually causes ice dams
The National Roofing Contractors Association (NRCA) and University of Minnesota Extension both teach the same three-ingredient model: snow on the roof, an outside air temperature below freezing, and a roof deck surface temperature that is above 32 degrees on the heated portion but below 32 degrees at the eave overhang. Remove any one ingredient and the dam cannot form.
You cannot control the snow or the outside temperature. You can control the deck temperature. The deck warms up because heat from the living space rises into the attic by three mechanisms, ranked roughly in order of how much heat each carries on a typical northern home:
- Air leakage (conduction by air): warm, moist indoor air slips through gaps around recessed light cans, ceiling fan boxes, plumbing stack penetrations, the attic hatch, top plate gaps where interior walls meet the ceiling, and chimney chases. This is usually 40 to 60 percent of the heat reaching the deck.
- Conduction through insulation: heat conducts through the insulation itself. If you have R-19 fiberglass batts (about 6 inches) you are losing roughly 2 to 3 times the heat you would lose at R-49.
- Radiant heat from ductwork: uninsulated HVAC ducts and dryer vents in the attic radiate heat directly to the deck.
Air sealing addresses the biggest source first. Insulating before sealing is a common mistake because the insulation just filters the warm air on its way up, which deposits the moisture as frost on the underside of the deck. Seal first, then insulate.
Attic insulation upgrade (the real fix)
The 2021 International Energy Conservation Code (IECC) sets attic insulation minimums by climate zone. Climate Zones 5 through 8 (most of the snow belt) require R-49 minimum for new construction. The DOE recommends R-60 for retrofits in Zones 6 through 8 because the marginal payback on the extra inches is fast in cold climates.
A standard cellulose blow-in retrofit on a 1,500 to 2,000 square foot attic runs $1,800 to $3,800 in 2026. Fiberglass blow-in runs $1,500 to $3,200. Closed cell spray foam (used when there is no ventilation pathway, for example a cathedral ceiling or a knee wall) runs $3 to $7 per board foot, which on a 2,000 square foot attic at 6 inches deep works out to $7,000 to $14,000.
Before adding insulation, the contractor should do four things in sequence:
- Air seal the penetrations with two-part spray foam (cans for small gaps, gun foam for bigger), fire-rated caulk around chimney chases, and rigid foam covers with sealed seams over recessed lights that are not IC-rated.
- Weatherstrip the attic hatch and add an insulated cover that latches.
- Install soffit baffles (cardboard or foam channels stapled to the rafters at the eave) so the new insulation does not block the soffit intake vents.
- Verify duct insulation is intact, ideally R-8 wrapped, with all seams mastic-sealed.
Ridge and soffit ventilation balancing
The IRC R806 requires net free ventilation area of 1 square foot per 150 square feet of attic floor, or 1 per 300 if you split the venting 50/50 between intake (low, at the soffits) and exhaust (high, at the ridge or upper gable). The 50/50 split is the better target because it drives a continuous convective flow that keeps the entire underside of the deck close to outside air temperature.
Common ventilation failures that contribute to ice dams:
- Blocked soffit vents: the most common single problem. Old fiberglass batts compress into the eave bays and choke off the intake. Soffit baffles fix this.
- Ridge vent over a non-continuous slot: the cap looks right from the ground but the underlying sheathing was never properly cut back to the manufacturer-specified 1 to 2 inches per side.
- Mixed exhaust types on one attic: a ridge vent plus a powered attic fan plus gable vents on the same attic short-circuits the convective loop. Pick one exhaust strategy.
- Cathedral ceilings with no ventilation gap: these require a different strategy entirely, either a vented insulation channel with at least 1 inch of free air space above the insulation, or an unvented assembly with closed cell foam against the deck.
Adding a continuous ridge vent during a reroof runs $400 to $900 in materials and 2 to 4 hours of labor. Adding soffit vents on a home that lacks them can run $600 to $2,000 depending on whether the soffits are wood, aluminum, or vinyl. See our deeper write-ups on attic ventilation and soffit vents for the specifics.
Ice and water shield upgrade during reroof
The IRC R905.1.2 (Ice Barriers section) requires self-adhering polymer-modified bitumen membrane (commonly called ice and water shield) from the eave edge to a point at least 24 inches inside the exterior wall line in any region where the average January temperature is 25 degrees F or colder. NRCA’s 2023 best practice guidance recommends going further: a full 6 feet up the slope from the wall line, plus all valleys, plus all penetrations.
The cost delta during a reroof is small: ice and water shield runs $80 to $120 per roll (200 square feet), versus standard synthetic underlayment at $30 to $60 per roll. On a typical 25-square (2,500 square foot) roof, the upgrade adds $300 to $700 to the total job. If you live anywhere ice dams are a recurring possibility and your roofer is not already quoting 6 feet up from the eave plus all valleys, push back. See felt vs synthetic underlayment for how the membranes compare on the rest of the roof.
Temporary fix comparison
The three temporary approaches at a glance, for a typical 2-story home with 80 linear feet of ice-prone eave:
| Method | Year 1 cost | Annual cost after | Effort | Effective at | Notes |
|---|---|---|---|---|---|
| Roof rake | $60 to $250 (rake) | $0 | 30 to 60 min after each storm | Prevention only | Best low-cost daily strategy |
| Calcium chloride socks | $30 to $60 | $30 to $60 | 15 min per dam, ladder work | Existing dams | Safe, slow, very cheap |
| Self-regulating heat cable (DIY) | $350 to $900 | $130 to $250 power | 2 to 6 hr install | Drainage channels | Tape lasts 5 to 10 yr |
| Self-regulating heat cable (pro) | $1,000 to $2,200 | $130 to $250 power | 1 day install | Drainage channels | Includes GFCI circuit |
| Constant-wattage heat cable on snow controller | $2,000 to $4,500 | $60 to $180 power | 1 day install | Drainage channels | Snow sensor cuts power use |
Heat cables: the temporary band-aid
Heat cables (also called heat tape, deicing cable, or roof heating cable) are self-regulating electric resistance wires that you snake along the eave in a zig-zag pattern and continue through the gutters and downspouts. They do not prevent ice dams. They melt drainage channels through whatever ice forms, so meltwater has somewhere to go.
Costs in 2026:
- DIY self-regulating cable: $4 to $8 per linear foot for the cable, $50 to $150 for the controller, plus a dedicated GFCI circuit if you do not already have outdoor outlets at the eave.
- Professional install of self-regulating cable: $12 to $25 per linear foot all-in.
- Premium constant-wattage cable on a snow sensor controller: $25 to $45 per linear foot installed.
Operating cost: a self-regulating cable draws 5 to 8 watts per foot at 32 degrees F and 8 to 12 watts per foot at minus 10. A 100-foot run on for 1,000 hours over a winter at $0.16 per kWh costs roughly $130 to $200 in electricity.
The honest tradeoff: heat cables are the right call for a homeowner who cannot afford the permanent fix this year and just needs to get through one or two winters without ceiling damage. They are the wrong call as a long-term strategy because the underlying air leak and insulation deficit gets worse every year (insulation settles, air seals dry and crack) and the cables themselves typically last only 5 to 10 winters.
Calcium chloride socks
The calcium chloride sock is the only safe DIY treatment that does not damage the roof. The technique is straightforward: fill a cotton tube sock or nylon stocking with calcium chloride pellets (not rock salt, not sodium chloride, and not magnesium chloride if you can avoid it), tie it off, and lay it perpendicular across the ice dam so that one end hangs over the eave. The calcium chloride dissolves slowly into the surrounding snow and ice, melting a vertical drainage channel through the dam over 12 to 48 hours.
Why calcium chloride specifically:
- It melts at temperatures down to minus 25 F. Rock salt stops working around 15 F.
- It does not corrode aluminum gutters, copper flashing, or galvanized fasteners the way rock salt does.
- It does not strip the granules off asphalt shingles or stain them the way some magnesium chloride blends do.
Source: a 50 lb bag costs $25 to $40 at hardware stores. One sock per 4 to 6 feet of dam, placed perpendicular so meltwater drains down the slope rather than along it.
Roof rake snow removal
A roof rake is a long aluminum or plastic handle with a flat blade on the end designed to pull snow down off the lower 3 to 6 feet of the roof from the ground. Clearing this band removes the fuel for the dam: if there is no snow at the eave, there is nothing to melt into a ridge.
Costs and considerations:
- Basic 16 to 24 foot aluminum rake: $40 to $120.
- Wheeled “snow slide” style (rolls down the roof on a tarp): $80 to $200, easier on shingles.
- Telescoping rake to 30 feet for 2-story homes: $120 to $300.
Rake after every snowfall of 6 inches or more. Pull straight down, never side to side, and never try to scrape the roof clean to the shingle. Leave the last inch of snow as a buffer. NRCA cautions against raking from on top of the roof or from a ladder leaned against gutters loaded with snow and ice.
Code minimum vs best practice insulation
| Climate Zone | IECC 2021 attic minimum | DOE retrofit recommendation | NRCA / Building Science best practice |
|---|---|---|---|
| Zone 3 (mild) | R-38 | R-38 to R-49 | R-49 |
| Zone 4 (moderate) | R-49 | R-49 | R-49 to R-60 |
| Zone 5 (cool) | R-49 | R-49 to R-60 | R-60 |
| Zone 6 (cold) | R-49 | R-60 | R-60 |
| Zone 7 (very cold) | R-49 | R-60 | R-60 to R-75 |
| Zone 8 (subarctic) | R-49 | R-60 to R-75 | R-75 or higher |
Most ice dam regions are Zone 5 through 7. The IECC minimum (R-49) is enough to meet code, but the difference between R-49 and R-60 is roughly $400 to $800 of additional insulation labor on a typical attic and gives noticeably better deck-temperature control on the coldest weeks. For a homeowner doing the work once for a 20-year ownership horizon, R-60 is the right pick.
Insurance coverage for ice dam damage
Standard HO-3 homeowner policies generally cover sudden and accidental interior water damage from ice dams: the ruined drywall, the soaked insulation, the buckled hardwood floor below the leak. They generally do not cover the cost to remove the dam itself, nor do they cover damage attributable to long-term seepage or “neglected maintenance.”
Practical claims tips:
- Document the leak with photos and video the day you discover it. Note the date and outside temperature.
- Get the dam steam-removed by a licensed roofer (see ice dam removal) before more water gets behind the shingles.
- Save receipts for emergency mitigation: pro removal, towels, fans, dehumidifiers. Most policies reimburse these as “reasonable emergency expenses.”
- Ask the adjuster in writing whether your policy has a separate deductible or sublimit for water damage. Some policies in MA, MN, and NY do.
If the leak damaged the roof deck or shingles themselves, you may have a roof replacement claim. See how to choose a roofing contractor before signing with anyone who shows up uninvited after a storm.
Permanent fix cost breakdown
Costs below assume a 1,500 to 2,000 square foot attic on a 1.5 to 2 story home in a Climate Zone 6 market (Minneapolis, Boston, Burlington VT, Denver foothills).
| Work item | Materials | Labor | Total | Notes |
|---|---|---|---|---|
| Air sealing attic penetrations | $150 to $400 | $400 to $900 | $550 to $1,300 | 4 to 8 hours of labor; canned foam, fire caulk, rigid foam covers |
| Cellulose blow-in to R-60 | $700 to $1,500 | $1,100 to $2,300 | $1,800 to $3,800 | 16 to 18 inches over existing |
| Fiberglass blow-in to R-49 | $600 to $1,300 | $900 to $1,900 | $1,500 to $3,200 | Lighter, less settling than cellulose |
| Soffit baffle install | $80 to $200 | $300 to $700 | $380 to $900 | Per pair of rafters; needed in older homes |
| Continuous ridge vent retrofit | $200 to $450 | $400 to $900 | $600 to $1,350 | Best done during a reroof |
| Add soffit vents (no existing) | $150 to $500 | $450 to $1,500 | $600 to $2,000 | Wood soffits cost more than vinyl |
| Insulated attic hatch cover | $60 to $150 | $100 to $250 | $160 to $400 | Weatherstripping plus rigid foam box |
| Reroof with 6 ft eave ice and water shield upgrade | $300 to $700 above base | included in reroof | $300 to $700 incremental | Use during scheduled reroof |
| Typical permanent prevention bundle | $2,500 to $6,500 | Air seal + R-60 + soffit baffles + ridge vent |
Regional considerations
The dam itself forms by the same physics anywhere it gets cold enough. The economics and the right strategy mix shift by region.
| Region | Climate Zone | Average Jan F | Typical dam frequency | Recommended approach |
|---|---|---|---|---|
| Minneapolis / St Paul MN | 6A | 15 F | 2 to 5 per winter | Full permanent fix; R-60; 6 ft ice and water shield; heat cables on shaded north-facing eaves only |
| Boston / metro MA | 5A | 30 F | 1 to 3 per winter, often after one big storm | Permanent fix; R-49; roof rake after major storms |
| Buffalo / Rochester NY | 5A/6A | 26 F | 3 to 6 per winter (lake effect) | Permanent fix essential; R-60; rake; calcium chloride socks on standby |
| Denver foothills CO | 5B/6B | 30 F | 1 to 3 per winter (freeze/thaw cycles) | R-49; balanced vent; heat cables on north-facing low slopes |
| Portland ME / Burlington VT | 6A | 20 F | 2 to 5 per winter | Permanent fix; R-60; metal panels at eaves if reroofing |
| Chicago IL / Milwaukee WI | 5A | 22 F | 1 to 3 per winter | R-49 minimum; soffit baffles; ridge vent |
| Pittsburgh PA / Cleveland OH | 5A | 28 F | 1 to 2 per winter | Air sealing + R-49; rake low slopes |
Code requirements
If you are reroofing or doing a major attic project in a cold climate, four code sections drive the work:
- IRC R905.1.2 (Ice Barriers): ice barrier underlayment from eave to 24 inches inside the wall line in regions with January average temperature of 25 F or colder. NRCA recommends going to 6 feet inside the wall line.
- IRC R806 (Roof Ventilation): 1:150 minimum NFA, or 1:300 with balanced soffit and ridge venting.
- IECC R402.1.2 (Insulation Minimums): R-49 attic floor in Zones 4 through 8; R-60 recommended for retrofits.
- ASHRAE 90.2: air leakage targets for residential. The relevant duct sealing and envelope tightness targets reduce heat loss into the attic.
Local amendments matter. Massachusetts, Minnesota, and New York all have state energy codes that meet or exceed the 2021 IECC, and some municipalities require third-party blower door tests on retrofits over a certain scope. Check with your AHJ (Authority Having Jurisdiction) before pulling permits.
Putting it together: a 2026 prevention plan
For most homes in Climate Zones 5 through 7, the right sequence is:
- This winter: roof rake the lower 4 feet after every storm of 6 inches or more, and stage calcium chloride socks for active dams. Budget $50 to $200.
- Spring: get a contractor to do an air sealing and insulation upgrade to R-49 or R-60 with soffit baffles. Budget $2,500 to $5,000.
- When you reroof (typically every 20 to 30 years for asphalt, see asphalt shingle roof lifespan): pay the small premium to extend ice and water shield to 6 feet from the wall line, install a properly-cut continuous ridge vent, and consider metal panels at the lower eave courses for the most ice-prone slopes. Incremental cost $400 to $1,500 on top of a typical reroof. See how much does a new roof cost for the full reroof picture.
- Skip heat cables unless you have a specific architectural problem (a long cold valley over an unheated garage, a north-facing dormer with no attic access) that air sealing cannot reach.
FAQs
Do I really need to fix the attic if I just install heat cables?
You can run on heat cables alone, but the underlying heat loss continues and your heating bill keeps paying for the deck-warming that causes the dam. The DOE estimates that air sealing plus R-49 to R-60 attic insulation saves 10 to 25 percent on heating costs in northern climates, so the permanent fix often pays back in 5 to 9 winters even before you count the ice dam prevention.
Will adding a powered attic fan stop ice dams?
Usually no, and often it makes things worse. A powered attic fan can pull conditioned air up through ceiling penetrations into the attic, increasing the heat load on the deck. NRCA and the Building Science Corporation both recommend passive ridge plus soffit ventilation over powered fans for ice dam regions.
How much snow on the roof is too much?
Structurally, most homes built to modern codes can carry 30 to 40 lbs per square foot of snow load (regional variation by IRC R301.2). Ice dam risk does not require deep snow, only 3 to 6 inches across a warm deck. Rake the lower 3 to 6 feet whenever you get a storm of 6 inches or more.
Does a metal roof prevent ice dams?
A standing seam metal roof significantly reduces ice dam risk for two reasons: the smooth panel sheds snow faster (less time for the snow-melt-refreeze cycle to run) and metal panels are far less prone to leaking even when dams do form. They do not eliminate the physics, though. You still need the attic right. See metal vs asphalt shingle roof and standing seam metal roof cost.
Can I just use rock salt instead of calcium chloride?
No. Rock salt (sodium chloride) corrodes aluminum gutters, copper flashing, and galvanized fasteners, and it stops melting around 15 F, exactly when you most need it. It also stains asphalt shingles. Calcium chloride pellets cost about the same per bag and work down to minus 25 F without the corrosion.
How do I know if my soffit vents are blocked?
From inside the attic on a sunny day with the attic light off, you should be able to see daylight at every soffit bay. If most or all of them are dark, your intake is blocked by insulation, paint, or debris. Soffit baffles installed from inside the attic restore the airflow path without tearing out the soffit panels.
Do gutters cause ice dams?
No. Gutters do not cause ice dams, although a clogged gutter that ices up first does give the dam a head start. Removing gutters does not prevent dams. The ice forms on the roof surface at the eave whether the gutter is there or not.
Is closed cell spray foam the best attic insulation for ice dam prevention?
It is the best choice for cathedral ceilings, knee walls, and any unvented assembly because it both insulates and air-seals in one step. For a standard vented attic with floor access, blown cellulose or fiberglass to R-49 or R-60 plus separate air sealing is more cost-effective. Closed cell foam runs $3 to $7 per board foot vs $1.50 to $2.50 per square foot for blown cellulose at the same R-value.