Roof flashing (see our what is flashing on a house) is the sheet metal pieces installed at every roof penetration, valley, and intersection (chimneys, vent pipes, skylights, valleys, walls, and dormers) to direct water away from these weakness points on a roof and back onto the shingles. Flashing failure causes an estimated 40 to 50 percent of all residential roof leaks per NRCA field reports, which is why flashing installation quality matters more than the shingle brand on the roof. In 2026, IRC R903.2 mandates corrosion-resistant flashing at every wall, valley, and penetration, and the cost to add proper flashing during a reroof runs $500 to $2,500 depending on the number of penetrations. Skipping or shortcutting flashing is the single most common preventable cause of premature roof failure, and a roof with weak flashing will leak no matter how good the shingles above it are.
The short version
- Flashing failure causes 40 to 50 percent of residential roof leaks. The shingle field rarely fails first; the flashings around chimneys, valleys, and walls do.
- IRC R903.2 requires corrosion-resistant flashing at every wall intersection, valley, and roof penetration on residential roofs.
- Step flashing is the most important type. It is the L-shaped pieces woven into each shingle course where a wall or dormer meets the roof.
- Chimney flashing is a 4-piece system: step flashing, counter flashing, apron at the front, and a cricket or saddle at the back of wide chimneys.
- Material choice runs aluminum (most homes), galvanized steel (cold climates), copper (architectural), and lead (chimneys and historic).
- The right sequence (underlayment first, step flashing woven with shingles, counter flashing on top) prevents 90 percent of flashing leaks. Caulk-only flashing is a 5 year fix.
The Short Answer: Why Flashing Matters Most
A modern asphalt shingle roof on a simple gable home has roughly 95 percent of its surface area covered by the shingle field. The shingle field rarely leaks before the shingles are at end of life: the asphalt and granules form a redundant water-shedding surface that handles all but the most extreme conditions. The remaining 5 percent of the roof area is around the chimneys, walls, valleys, vent pipes, and skylights, and this 5 percent generates almost half of all leak callbacks.
The reason is geometric. At every penetration and intersection, water that has been running smoothly across the shingles encounters a vertical surface or a directional change. Without flashing, water finds its way into the joint. With flashing, the metal redirects the water back onto the shingles to continue its trip down to the gutter. The flashing detail is what makes the joint waterproof, and the quality of the flashing work determines the leak rate of the entire roof. Curb-mounted units follow the same rule, as our evaporative cooler roof jack install guide shows.
NRCA installation manuals dedicate more page count to flashing details than to any other roof component. GAF, Owens Corning, and CertainTeed warranty exclusions consistently cite “improper flashing” as the leading cause of denied claims. The installer skill that separates a 30 year roof from a 12 year roof is almost always the flashing technique. For the broader water-tracking diagnostic framework when leaks do happen, see roof leak repair.
Step Flashing (the Most Important Type for Walls/Dormers)
Step flashing is the L-shaped metal piece (typically 5×7 inches or 4×10 inches per piece) woven into each shingle course where a roof plane meets a vertical wall or dormer. Each piece extends about 4 inches up the wall and 4 inches across the roof, and each piece overlaps the piece below by 2 inches. The result is a continuous, shingle-by-shingle layering of metal and shingle that prevents water from ever reaching the wall-to-roof joint directly.
Step flashing is the single most important flashing type because walls and dormers represent the longest concentrated runs of vertical-to-horizontal transition on a typical roof. A 12-foot wall meeting a roof has 30 or more step flashing pieces, each one critical to the watertight seal.
The right step flashing install sequence:
- Install ice-and-water shield or underlayment up the wall by at least 6 inches before any flashing.
- Install the first shingle course at the base of the wall.
- Place the first step flashing piece on top of the first shingle, bent 90 degrees so half is on the shingle and half is up the wall.
- Install the next shingle course over the top half of the step flashing piece, with the flashing piece sticking out 2 inches above the shingle.
- Place the next step flashing piece on top of the new shingle course, overlapping the first piece by 2 inches.
- Continue weaving step flashing and shingles up the entire wall length.
- Install counter flashing (separately covered below) over the top edge of the step flashing to seal the upper edge into the wall.
The most common error is installing all the step flashing first as one long piece (called “continuous flashing”), then shingling over the top. This fails because water that lands on the continuous metal at any point has a clear path down the metal to the bottom of the wall, where it pools at the eave. Real step flashing forces water to step off each piece onto the shingle below, which is the entire point.
Counter Flashing (Over Step Flashing)
Counter flashing is the second layer of flashing that covers the top edge of step flashing where it meets the wall. The counter flashing extends down over the top inch or two of the step flashing and either embeds into a reglet (a saw-cut slot) in masonry walls, or tucks behind the siding on stud-wall construction.
The reason for counter flashing is the joint between the top of the step flashing and the wall. Without counter flashing, that joint is exposed and water can enter at the top of each step flashing piece. The counter flashing creates a second barrier and gives a clean, code-compliant finish.
On masonry walls (brick chimneys, stone walls, parapet walls on flat-roof tie-ins), counter flashing embeds into a reglet cut into the mortar joint about 4 inches above the roof line. The reglet is filled with polyurethane sealant or lead wool to lock the counter flashing in place. On stud walls (wood-framed dormers, vertical siding intersections), counter flashing tucks behind the siding (which is reinstalled over the top of the counter flashing).
The right counter flashing is independent from the step flashing. A common shortcut is to bend the top edge of the step flashing up against the wall and seal it with caulk. This shortcut survives the inspection but fails within 5 to 8 years as the caulk degrades and the joint opens. Independent counter flashing is the durable answer.
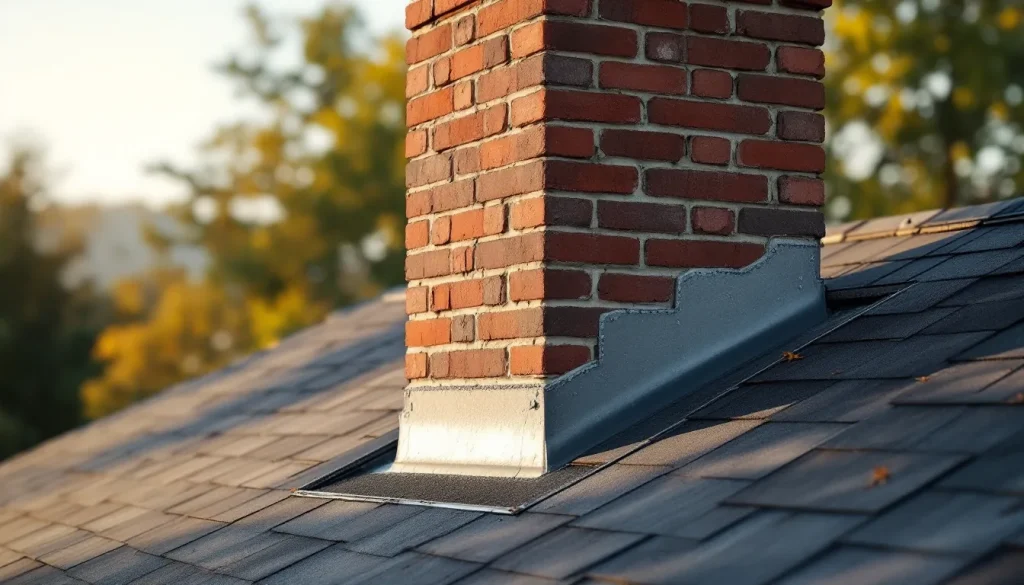
Chimney Flashing: The 4-Piece System
| Component | Location | Purpose |
|---|---|---|
| Apron flashing (front base) | Front (downslope) face of chimney | Sheds water around the front of the chimney onto the shingles below |
| Step flashing (sides) | Both side faces of chimney | Weaves into each shingle course to shed water down the sides |
| Saddle / cricket flashing (back) | Back (upslope) face of chimney | Diverts water around the chimney rather than letting it pile against the back |
| Counter flashing | Embedded into chimney masonry above all other flashing | Seals the top edge of every other flashing piece against the chimney face |
Chimneys are the most leak-prone feature on any residential roof because they combine all four directions of water management: front, two sides, back, and top. The 4-piece system addresses each direction with a dedicated flashing component, and the counter flashing seals every joint.
The leak history of chimneys is documented in NRCA field surveys and in insurance claim data. Roofs with proper 4-piece chimney flashing leak at the chimney at roughly 8 percent of the rate of roofs with single-piece pan flashing or caulk-and-pray detailing. The cost difference at install time is $200 to $500. The lifetime savings on leak repair, drywall replacement, and chimney rebuild is often in the thousands.
Apron Flashing (Front of Chimney)
The apron flashing is a single bent piece of metal at the front (downslope) face of the chimney, extending about 4 inches up the chimney face and 6 to 10 inches out onto the roof below. The apron sits over the top of the shingles below and is covered by the counter flashing above.
The apron’s job is to shed water that has run down the front face of the chimney onto the shingles, where it can continue down the roof to the gutter. Without the apron, water running down the chimney face enters the joint between the chimney and the roof at the front, creating one of the most common chimney leak paths.
The apron should be wide enough that the side step flashing on the next course overlaps it by 2 inches at each side. The bottom edge of the apron should be cut to follow the shingle exposure pattern so the appearance is clean from the ground.
Cricket / Saddle Flashing (Back of Wide Chimneys)
A cricket (also called a saddle) is a small ridged structure built on the upslope side of a chimney to divert water around it rather than letting water pile up against the back face. The IRC R1003.20 code requires a cricket on any chimney wider than 30 inches measured perpendicular to the slope.
Without a cricket, water running down the roof piles against the back face of the chimney every time it rains. The piled water finds its way into the joint within a few years, even with perfect flashing. With a cricket, the water is divided at the peak of the cricket and runs around each side of the chimney, where the step flashing handles the side runs.
Crickets are built with 2×4 framing covered with sheathing and underlayment, then flashed with either step flashing pieces or a single piece of pan flashing. For wider chimneys (greater than 48 inches), the cricket is large enough to be its own roof structure and is typically shingled to match the main roof. For narrower chimneys (30 to 48 inches), a smaller cricket built only of flashing metal is acceptable.
The most common chimney leak in older homes traces back to a missing cricket on a wide chimney. The fix is to build the cricket and re-flash the back of the chimney, which costs $400 to $1,200 as a standalone project and far less when bundled with a reroof. See roof flashing repair for the broader repair framework.
Valley Flashing: Open vs Closed Valleys
Valleys are the V-shaped channels where two roof planes meet at an inside corner. The amount of water concentrated in a valley is significant: a 1,000 square foot roof draining into a single valley can deliver 600 gallons of water during a heavy storm directly down the valley line. Without proper valley flashing, this concentrated flow finds the smallest weakness and turns it into a major leak.
| Valley type | Description | Best for |
|---|---|---|
| Open valley | Metal valley flashing exposed; shingles cut back on both sides leaving a 4 to 6 inch metal channel | High-water-volume valleys; long valley runs; areas with heavy debris |
| Closed-cut valley | One roof plane’s shingles run through the valley; the other plane’s shingles are cut at the centerline | Standard residential; lowest material cost |
| Woven valley | Shingles from both planes weave through the valley alternately | Traditional 3-tab shingles; declining in modern use |
| California (long) valley | Variant of closed-cut with a starter row run up the valley to add water resistance | Moderate-water valleys, regional preference in west |
Open valleys are the most durable choice for high-water valleys and are required by some shingle manufacturers in regions with heavy snow or extreme rainfall. The metal valley flashing (typically aluminum or galvanized steel, 24 inches wide minimum, 16 to 24 gauge) is laid under the shingles on both planes, with the shingles cut back 3 to 4 inches on each side of the valley centerline. The exposed metal channel sheds water directly.
Closed-cut valleys are the dominant residential standard because they are 30 to 50 percent cheaper than open valleys at install and look cleaner from the ground. They perform well for typical residential water volumes when the underlayment in the valley is doubled up (typically a layer of ice-and-water shield centered in the valley) and the cut line is sealed.
Vent Pipe Boot Flashing
Vent pipes (plumbing stacks, furnace vents, kitchen exhausts) protrude through the roof and must be flashed with a vent boot. The boot is a flat metal base with an integrated rubber or neoprene collar that fits tight around the pipe. A dryer vent through the roof uses its own dedicated cap and boot rather than a standard plumbing collar.
The base of the boot is installed under the upslope shingles and over the downslope shingles, just like step flashing. The pipe diameter and the boot collar must match: standard sizes are 1.5″, 2″, 3″, and 4″ inside diameter. The collar squeezes around the pipe to create the seal.
Vent boots are the second-most-common flashing failure point on residential roofs after chimneys. The rubber collar typically UV-degrades within 10 to 15 years, cracks at the pipe, and starts leaking. The fix is a new boot, which costs $150 to $400 installed. Modern boots use lead or aluminum collars (more expensive but longer-lasting) instead of rubber, and these can match the 25 to 30 year shingle life.
The right vent boot for a long-life install is a lead-collar boot or an aluminum-collar boot with a no-caulk design. The boots typically run $30 to $80 each in materials versus $5 to $15 for the standard rubber-collar boots, but the install labor is the same and the longer life pays back many times over.
Drip Edge as Flashing
Drip edge functions as flashing at the eaves and rakes, even though it is typically discussed as its own roof component. Like all flashing, drip edge directs water away from a vulnerable joint (the fascia top edge) and back onto a water-shedding surface (the shingles or the gutter).
The 2018 IRC R905.2.8.5 code that mandates drip edge installation is part of the broader code that also mandates wall flashing (R903.2), valley flashing (R903.2.1), and chimney flashing (R903.2.2). All are corrosion-resistant metal flashings serving the same fundamental purpose at different roof locations. See drip edge for the full eave and rake detail.
Skylight Flashing
Skylights require their own dedicated flashing system, typically supplied by the skylight manufacturer (Velux, Fakro, Sun-Tek). The system includes a head flashing at the top, step flashing at the sides, and an apron flashing at the bottom, similar to chimney flashing but sized for the skylight.
The right approach is to use the manufacturer’s flashing kit. Generic flashing made on-site rarely matches the skylight curb profile and frequently leaks within a few years. Manufacturer kits cost $150 to $400 per skylight and are specifically engineered for the skylight model.
Skylight flashing is also the only flashing type where the warranty is typically tied to using the manufacturer-supplied components. Skylights flashed with shop-made or aftermarket flashing usually void the leak warranty. See skylight installation cost for the full skylight pricing and installation framework.
Material Options: Aluminum, Galvanized Steel, Copper, Lead
| Material | Cost/piece (step flashing 5×7) | Lifespan | Best for |
|---|---|---|---|
| Aluminum (.024-.032″) | $0.50-$1.20 | 30-50 years | Most residential; standard choice |
| Galvanized steel (26 ga) | $0.40-$1.00 | 20-30 years | Cold inland climates |
| Stainless steel (304 or 316) | $2.50-$5.00 | 50-100 years | Coastal salt air, copper roofs |
| Copper (16 oz) | $3.50-$8.00 | 50-100 years | Architectural; matches copper gutters |
| Lead (3 lb/sq ft) | $5.00-$10.00 | 75-150 years | Chimneys; historic; slate roofs |
Aluminum is the default for asphalt shingle roofs. Copper is the default for slate, cedar shake, and copper standing-seam roofs. Lead is the historic choice for chimney aprons and counter flashing because of its formability around irregular masonry shapes, though it has been displaced by copper and lead-coated copper in many modern installs due to environmental concerns about lead.
Galvanic corrosion is the trap to avoid. Never mix metals at a flashing connection: aluminum flashing must use aluminum nails, copper flashing must use copper nails, and copper should never contact aluminum or galvanized steel (the galvanic reaction destroys the aluminum within a few years). For mixed-metal situations (a copper chimney cap above aluminum flashing, for example), use stainless steel as an isolating intermediate.
Installation Sequence (the Order That Prevents Leaks)
The flashing install sequence on a typical reroof:
- Underlayment laid over sheathing, including ice-and-water shield in cold-climate eave and valley locations.
- Drip edge installed at eaves under the underlayment (eave drip edge actually goes on first, before the underlayment, then underlayment laps over it).
- Valley flashing installed over underlayment in valleys.
- Apron flashing installed at the front (downslope) face of chimneys, over the underlayment.
- Starter course of shingles laid.
- First course of shingles laid over starter.
- Step flashing woven into shingle courses at every wall, dormer, and chimney side as shingles are laid up the roof.
- Drip edge installed at rake edges over the underlayment.
- Vent pipe boots installed as the shingle courses approach each pipe.
- Cricket (if required by chimney width) constructed and flashed before shingles pass the chimney.
- Counter flashing installed over all step flashing, apron flashing, and cricket flashing, embedded into reglets in masonry or tucked behind siding on stud walls.
- Ridge cap installed over the ridge vent at the very top of the roof.
The sequence matters because each flashing piece relies on being layered correctly with the piece below it (water flows downhill). Installers who shortcut the sequence (installing all flashing at the end and trying to slip it under existing shingles) almost always create water entry points that take years to manifest as visible leaks. See parts of a roof for the full anatomy reference.
The Caulk Question (When to Use, When to Avoid)
Caulk has a role in flashing work, but it is a secondary role. Polyurethane sealant or butyl sealant is appropriate at three places: filling the reglet that holds counter flashing in masonry walls, sealing penetrations through the metal flashing (such as fastener heads), and dressing the visible flashing edges for a clean finish.
Caulk is the wrong answer at three places: as the primary water seal in any flashing joint, as a substitute for proper layering of step flashing, and at any place where the joint will see thermal movement of more than 1/8 inch. Caulk has a 5 to 10 year lifespan in roof exposure; it dries, cracks, and pulls away. Any flashing detail that relies on caulk as the primary seal is a 5 to 10 year fix at most.
The phrase that captures the right approach: caulk is the bandage, not the surgery. Real flashing details work mechanically without any caulk at all; the caulk is just for finish and to add a redundant seal at specific small openings.
IRC R903.2 Code Requirements
IRC R903.2 reads: “Flashing shall be installed in such a manner so as to prevent moisture from entering the wall and roof through joints in copings, through moisture-permeable materials and at intersections with parapet walls and other penetrations through the roof plane.”
R903.2.1 specifically requires that flashing be installed at wall and roof intersections, at any change of roof slope or direction, and around all penetrations. R903.2.2 specifies chimney flashing. R903.2.3 specifies kickout flashing where roofs terminate at vertical walls (a particularly common leak point on dormers and bay windows).
| Code section | Coverage |
|---|---|
| R903.2 | General flashing requirements; corrosion-resistant metal at all joints and penetrations |
| R903.2.1 | Wall and roof intersections; slope changes |
| R903.2.2 | Chimney flashing; 4-piece system or equivalent |
| R903.2.3 | Kickout flashing at vertical wall terminations |
| R905.2.8 | Asphalt shingle valley flashing |
| R905.2.8.5 | Drip edge at eaves and rakes |
| R1003.20 | Cricket required on chimneys wider than 30 inches across the slope |
Inspectors check these requirements during reroof inspections, and roofs without compliant flashing fail inspection. The retrofit cost to fix flashing after a failed inspection is several times the cost to do it right during the original reroof.
Common Flashing Failures
| Failure | Symptom | Lifespan if installed wrong |
|---|---|---|
| Continuous flashing instead of step flashing | Wall stain inside; leak at bottom of wall after heavy rain | 5-10 years |
| Caulk-only chimney flashing | Chimney leak appears in heaviest rains; stain on attic side of chimney | 3-7 years |
| Missing cricket on wide chimney | Water pools at back of chimney; leak appears at back face | 5-10 years |
| UV-cracked vent pipe boot | Ring-shaped stain around pipe on ceiling below | 10-15 years (then needs replacement) |
| Missing kickout flashing at wall termination | Saturated wall area at the wall-roof termination; siding rot | 3-8 years |
| Counter flashing nailed to face of brick | Loose counter flashing pulls free; reglet preferred | 5-12 years |
| Improper valley flashing (no centerline ice and water) | Valley leak in heavy rain; granule loss in valley | 10-15 years |
Most flashing failures are not visible from the ground. The diagnostic is interior: water stains on the ceiling or wall directly below the flashing point, attic moisture staining around the penetration on the sheathing underside, or active drip during heavy rain.
The repair scope depends on how far the leak has traveled. Catching a flashing failure within the first leak event usually means a $200 to $800 spot repair. Letting the leak continue for years can mean sheathing replacement, insulation removal, drywall replacement, and mold remediation, easily reaching $3,000 to $15,000. See roof flashing repair for the detailed repair guide.
Manufacturer Warranty Position on Flashing
All major shingle manufacturers (GAF, Owens Corning, CertainTeed, Atlas) exclude flashing failures from their material warranties. The shingles themselves are warranted; the flashing is the installer’s responsibility. This is why the certified installer programs (GAF Master Elite, Owens Corning Platinum Preferred, CertainTeed SELECT ShingleMaster) check flashing detail during their certifications.
The enhanced warranties offered by these certified programs (the GAF Golden Pledge, the OC Platinum Protection) extend coverage to flashing for the warranty period, but only when the install was done by a certified contractor and the contractor’s workmanship is documented. For a homeowner, the path to actual flashing warranty coverage is: hire a certified contractor, register the warranty, and keep the documentation.
Standard reroofs (uncertified contractor, baseline manufacturer warranty) leave flashing failures to the homeowner. See how to choose a roofing contractor for the certification framework and signs you need a new roof for the timing of when flashing failures push a roof into reroof territory.
Cost to Add Flashing During Reroof
| Flashing component | Cost installed during reroof | Cost as standalone repair |
|---|---|---|
| Step flashing at one wall (10-15 LF) | $80-$200 | $300-$700 |
| Chimney flashing (4-piece system) | $300-$800 | $800-$2,000 |
| Cricket construction + flashing | $300-$900 | $700-$1,800 |
| Vent pipe boot (per penetration) | $30-$80 | $150-$400 |
| Open valley flashing (per valley) | $120-$350 | $400-$1,000 |
| Skylight flashing kit (per skylight) | $150-$400 | $500-$1,200 |
| Counter flashing into masonry reglet | $200-$500 | $500-$1,200 |
The standalone repair cost is roughly 2 to 4 times the install-during-reroof cost because the standalone work requires lifting and replacing shingles, masonry work on counter flashing, and dedicated mobilization. The strategy that pays best: do every flashing piece right during the reroof, even pieces that look like they have life left, because the cost premium during reroof is small and the cost of redoing them later is large.
For the full reroof cost framework that includes flashing as a line item, see how much does a new roof cost. For related water-management pieces, see gutter installation, fascia board, and roof sheathing. For the broader maintenance schedule that includes flashing inspection, see roof maintenance schedule.
Frequently asked questions
What is roof flashing?
Roof flashing is sheet metal pieces installed at every roof penetration, valley, and intersection (chimneys, vent pipes, skylights, valleys, walls, and dormers) to direct water away from these joints and back onto the shingle surface.
What causes most roof leaks?
Flashing failure causes 40 to 50 percent of all residential roof leaks per NRCA field data. The shingle field rarely fails first; the flashing around chimneys, valleys, walls, and vent pipes usually fails before the shingles do.
Is roof flashing required by code?
Yes. IRC R903.2 requires corrosion-resistant flashing at every wall intersection, every valley, every penetration, and around chimneys. Specific subsections address eaves, rakes, kickouts, and chimney crickets.
How long does roof flashing last?
Aluminum flashing lasts 30 to 50 years. Copper and stainless steel last 50 to 100 years. The rubber collars on vent pipe boots last 10 to 15 years and need replacement before the shingles do.
What is step flashing?
Step flashing is the L-shaped pieces of metal (typically 5×7 inches each) woven into each shingle course where a roof plane meets a vertical wall or dormer. Each piece overlaps the piece below by 2 inches.
Can I install flashing myself?
Vent pipe boot replacement is realistic DIY. Step flashing and chimney flashing on a reroof are pro jobs because they require correctly woven layering with the shingle courses. Most flashing failures trace back to amateur or shortcut installs.
What is a chimney cricket?
A cricket (also called a saddle) is a small ridged structure built on the upslope side of a chimney to divert water around it rather than letting water pile against the back face. IRC R1003.20 requires a cricket on any chimney wider than 30 inches across the slope.
What happens when flashing fails?
Leaks appear as water stains on the ceiling or wall below the flashing point. Caught early, the repair is $200 to $800. Allowed to continue for years, the damage spreads to sheathing, insulation, drywall, and framing, with repair costs reaching $3,000 to $15,000.